A home for a cat with your own hands is much more profitable in terms of financial costs, takes into account the individual characteristics of the animal, and is selected to match the interior of the apartment.
There are several options for homemade houses - temporary, permanent. The first ones are built at the dacha, where they take the cat with them, and place them in the car when moving. The second ones are in the apartment
Some cat owners are perplexed why build a special house if the animals already live in it. However, if you observe the behavior of your pet, you may notice some strangeness. The cat chooses a place to sleep - curls up on an armchair, climbs into suitcases, niches for shoes, lockers for clothes. Or he constantly climbs onto the bedside table or window sill, causing inconvenience to the owners. And all this is connected with her instincts.
A cat is a predatory animal. Her constant presence in a person’s house makes her not such an aggressive hunter, but wild instincts continue to be present in her. In nature, a cat always has a den, where she sleeps during the day and hides her kittens. And also a shelter from which the animal looks out for prey at night and hides from enemies. A caring, loving owner must take into account the needs of his pet and make his stay in the house as comfortable as possible.
Buy or make it yourself
Currently, in any pet store you can choose any kind of housing for a cat. The variety of shapes and designs is impressive. Stylish, beautiful, and quite expensive. This is the main problem. In addition, it often happens that a pet refuses to live in the purchased house, ignores it in every possible way, bypasses it, and looks askance with distrust.
This behavior of the animal is explained by an overdeveloped sense of smell. The cat gets used to the smell of the house, feels calm in it, other people's aromas alarm it and scare it away. The glue with which the house was assembled, or the material itself, may smell. Another hindrance may be a discrepancy in size.
Of course, you can choose a house, taking into account the cat’s breed, morals, and behavioral characteristics. But, having brought it home, there is no need to rush to introduce it to the residents. Initially, it is worth making sure that it is saturated with the “native” smell. Place it on the balcony for a few days, then keep it unassembled in the apartment for a week. After that, try to introduce it to the cat.
A house made for a cat with your own hands will be more familiar to it, since the smell of its beloved owner will remain in it. The cat will definitely want to stay in it and will purr loudly as a sign of gratitude.
Features of a cat house
You should immediately pay attention to the fact that the house of the cat and cat  differ from each other. The cat is less demanding. All he needs is one manhole, a roof with all-round visibility. In this position, the hunter looks down on everything that is happening, looks out for the victim, and feels safe.
The cat takes care not only of itself, but also of the kittens. Her idea of safe housing is somewhat different. Her home should have an entrance and an additional exit; the observation deck is not located on the roof at all, but a little to the side.
The cat climbs onto the observation deck, watches everything that happens, at the same time, reliably protects the entrance of her shelter with kittens. And if an enemy attacks her, she will be able to ward off the danger from the cubs. If the enemy manages to discover the entrance to the lair with kittens, they will be able to escape through the emergency exit.
A house made for a cat with your own hands must take into account all these features.
Types of homemade houses
All of them are divided into stationary and mobile. The first ones have a more complex design and are manufactured taking into account the fact that they will not be periodically disassembled or moved to another place. Mobile houses are simple, sometimes made quickly from available materials. Suitcases, baskets, old clothes, sheets, bags are used. Anything you can imagine. Such houses should be light and quick to assemble. Pets are placed in them when traveling by car, shopping, and street walks.
A house made for a cat with your own hands can be of different colors, since they do not distinguish colors well. Therefore, this nuance completely depends on the personal preferences of the owner. The animal makes claims about the material from which the house is made.
The following classification of types of housing for cats is based on the form:
- Hammocks are soft loungers that are attached in different ways to the legs of chairs and tables. A cozy cradle appears under the cover of a chair or table.
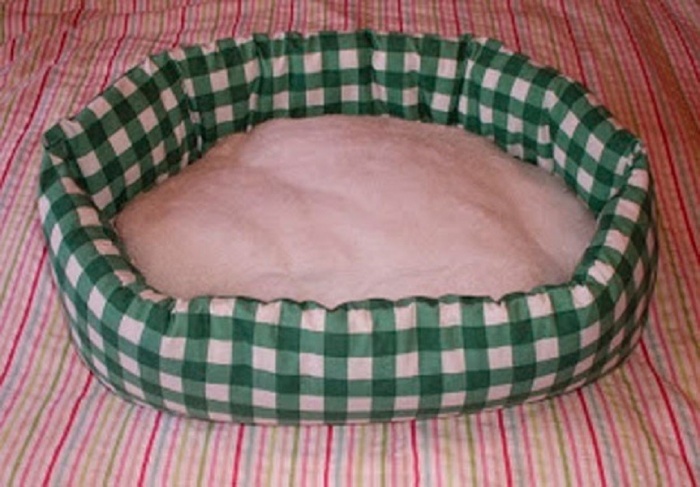
- Beds are a simple option that does not require much effort to make. Consists of a small elevation, a mattress. For example, you can put it on a basket. Place a wide drawer with faux fur and a mattress made of foam rubber.
- Booth - different materials are used, most often plywood, polystyrene foam. Covered with soft fabric, square or rectangular in shape, there should be a scratching post.
- Cardboard house - made very quickly, a cardboard box or separate sheets are used to create housing of any shape. Beautiful, fast, but short-lived.
- Wigwam - some breeds of cats in the wild live in the hollow hollows of old trees, constantly rising on their hind legs to look out from there. A wigwam is built using this principle.
- Houses with complex structures. They can be built-in or free-standing. They consist of several booths, observation platforms, sun loungers, and scratching posts.
The list goes on, since there are no limits to human imagination. A house made from an old T-shirt, basket, suitcase, burlap, thread, etc. The scheme of each of them is quite simple, the drawings do not take much time.
Do-it-yourself climbing frames for cats: photo


A house made for a cat with your own hands from a box

Surely in every home there is a box in which a cat can easily fit. It is quite suitable for creating a quick house. The simplest option is to place a pillow, mattress, or faux fur in a box. A home made for a cat with your own hands is ready. You can put such a house anywhere. Suitable as mobile housing.
The second option is to cut several holes in the box. One is for the entrance, about 25 cm in diameter. The rest are cut out in the form of windows. This device is made very quickly and does not require special skills. A large box can accommodate several individuals at once. The main disadvantage is its fragility. And the advantage is that you can quickly make a new one to replace it.
House instructions from a T-shirt
A house made for a cat from a T-shirt will surely appeal to your pet. With the condition that an old T-shirt will be used. The design resembles a tent. The material is the simplest, it is always available in the household, it is done in 5 minutes, the diagram is clear, the drawings are available.
Manufacturing instructions
Materials for production:
- T-shirt;
- Scotch;
- Pins;
- Wire;
- Sheet of cardboard – 40*40 cm;
- Wire hanger – 2 pcs.
Scheme and drawings of the labor process: 
- From the hanger - trempel, cut off the upper part - the hook. Bend the rest of the wire in the form of an arc, as for a tent.
- Cover the cardboard with tape. This way it will look a little better and become stronger.
- Fasten 2 wire arcs crosswise. They can stand calmly in this position.
- Adjust this semicircle to the size of the cardboard, pierce the ends in each corner. Wrap from the bottom of the cardboard and secure with tape.
- Place the structure and cover it with a T-shirt. The neck should be at the front of the tent - this is the entrance. At the back, secure the excess part of the T-shirt, sleeves, with pins, or sew by hand.
To prevent the house from leaning to the side, you need to securely fasten the wire at the base. For greater reliability and durability, instead of cardboard, use a sheet of plywood, foam plastic, or chipboard. The T-shirt can be easily removed, you can periodically replace it with another one, cats do not distinguish color and will not notice the substitution.
A do-it-yourself cat house made from a T-shirt can be used as a stationary or mobile one.
Cat house from an old monitor
A non-working TV will still come in handy around the house. It turns out to be a beautiful, durable, reliable house for a family of cats.
Material: 
- Water-based paint;
- Soft fabric for interior upholstery;
- Mattress fabric, foam rubber;
- Stickers;
- Glue gun.
Scheme and drawings:
- Remove the inside of the old monitor and remove the screen;
- Cut a round hole on the side that will serve as the entrance.
- Paint the monitor with paint of any color, but the main thing is that it is water-based.
- Sew upholstery for the inside of the house. The material should be used in such a way that it is not electrified, since constant friction of the wool can provoke a discharge. The upholstery is secured with glue.
- The mattress is sewn according to the size of the monitor.
- Various stickers are placed on the plastic screen so you can draw something. Kittens will look at them with interest, and for people it will look like a computer monitor, and the screensaver will be live kittens or a cat.
The house for the cat is ready with your own hands. However, this point should be taken into account. Plastic does not allow air to pass through and is a synthetic material. Staying in such a house is unsafe for health. That's why. Still, it’s better to refuse such a house.
Wigwam for cats
A home made for a cat with your own hands, in the form of a wigwam, is made like a home made from a T-shirt. Its height should be 60 cm. Cardboard, chipboard, foam plastic, and plywood are used as a solid base. The main task is to make a strong frame. Strong wire and wooden planks are suitable for these purposes. The outer fabric for covering the wigwam should be natural. They put it on top of the structure, the ends can be tied with ropes and ribbons. See instructions for making a T-shirt shelter.
DIY cat house from a suitcase
Nothing could be simpler. You will need an old suitcase. If the upholstery looks  not too good, you can put a self-sewn cover on top. The easiest option is to open the suitcase, put a pillow or mattress in it. The house for the cat is ready with your own hands.
To make all this look more interesting, proceed as follows. Prepare the legs. They can be carved from wood, if anyone knows how to do this, you can buy them ready-made at a furniture store, or use simple wooden planks. If there are several animals, you can make a two-story house out of one suitcase. Remove the suitcase lid. Attach the legs to the bottom of both parts. Place it like a bunk bed and secure it.
Instructions for a plywood house
A house made for a cat with your own hands from plywood is the most  practical, durable. Any complex design can be made. As a rule, it contains a booth, an observation deck, and a scratching post.
Material:
- It is better not to use plywood sheets up to 12 mm thick, chipboard, since the material contains foreign odors;
- Hemp rope, tourniquet for making a scratching post;
- PVA glue, after drying it leaves no odor;
- A dry stick with a diameter of at least 15 mm;
- Foam rubber;
- Quilted synthetic winterizer for making bedding;
- Upholstery furniture fabric from an old sofa, armchair.
Scheme and drawings:
- The interior of the space should be comfortable for lying. The average box dimensions are 40*60*40 cm. For large breeds, recalculation is made based on body size.
- The diameter of the hole at the top of the box should be such that the cat can easily pass through. Average diameter 20 cm.
- The observation deck is made at a height so that the cat can easily climb up, standing on its hind legs. The platform itself should be such that the pet can fit well on it.
- Lubricate the stick with PVA glue and wind the rope tightly without gaps. This will be a scratching post.
Plywood drawings can be very diverse. A typical house looks something like this:


Tools:
- Hacksaw or jigsaw;
- Screwdriver;
- Hammer;
- Scissors;
- Awl;
- Ruler;
- Glue brush;
- Pliers.
Cut: 
- All elements of the house and observation deck are drawn on plywood. Cut with a jigsaw. You will need 4 rectangles 40*60 cm for the side parts of the house, the base is 80*120 cm. The house will be attached to it. The roof is made either three-dimensional, then additional parts are cut out, or a rectangle - size 70*70 cm.
- A round hole for entry is cut out in one of the rectangles. And also on the plywood, which will serve as a roof, there is a hole for climbing to the observation deck.
- Prepare 2 sticks of equal size. One will be installed on the roof, the other on the plywood base.
- It would be better if the roof is removable. This will make it easier to clean the house.
- They cut out foam rubber for the upholstery of the inside of the house and the observation deck.
- Prepare the base for the mattress.
Drawings and sizes are individual.
Assembly instructions:
- The inside of the house should be soft. Foam rubber is glued onto the plywood, fabric on top, and upholstery material from an old sofa on the outside.
- Prepare the claw sharpener and install it on the base using glue.
- All parts of the house are glued together, installed on the base, and secured with glue.
- Lastly, the observation deck is installed.
A house made for a cat with your own hands will become a real decoration of the apartment. It must be installed where the cat likes to spend time. If she likes to climb onto the windowsill and watch what is happening outside, it is worth placing the house closer to the window. If the cat strives for warmth, closer to the radiator or in a sunny place.
A home for pets is not only comfortable furniture, but also an interior item for your apartment or house. That is why, when you undertake to make a house for a cat with your own hands, the main points that require compliance are the convenience and appearance of the future object. In this material we will present to your attention several instructions for making a wide variety of cat housing, and we will tell you how to make them yourself.
So, now that you know about the topic of the article, you can begin to consider in detail the instructions for creating comfortable houses for cats.
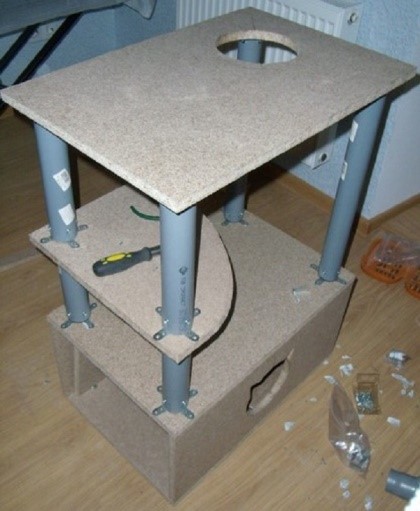
Instruction No. 1. Multifunctional cat house with scratching post
Step #1. Assembling the necessary materials
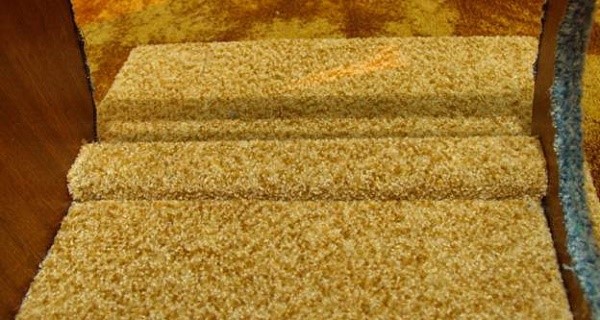
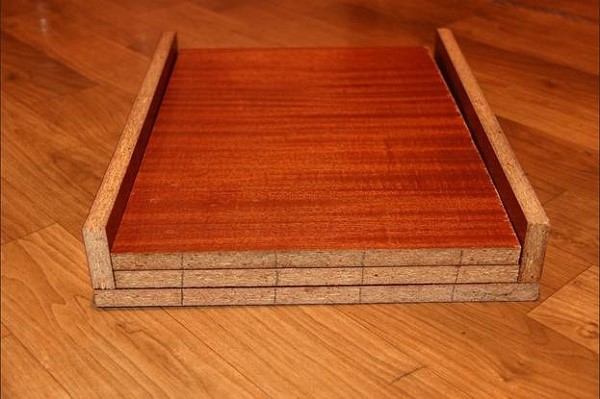
So, in order for your pet to become the happy owner of the same house as you can see in the picture above, you need a “hands-on” owner, several assistants if desired, as well as building materials.
So, first of all, we will need a fibreboard, which will play the role of a base for our future house, the size of which will be 40 by 122 centimeters. Next, for the roof of our cat’s home, we need to stock up on particle board, the size of which will be 44 by 61 centimeters.

For the walls of the house we will also need a particle board, the size of which will be 55 by 44 centimeters. To arrange spacers for the walls of the house, you also need to prepare 7 slats with the following parameters: 3 by 4 and 37 centimeters. Next, you need to find a plastic pipe with a diameter of 11 centimeters and a length of 60 centimeters. To give the house stability, you also need to prepare two medium-width beams. In addition, we will need to collect materials for a bed for the house, which will be presented:
- chipboard 44 by 40 centimeters;
- fiberboard 44 by 30 centimeters;
- foam cloth measuring 44 by 30 centimeters.

Now all that remains is to collect the materials to make the scratching posts:
- thin rope or rope twisted from cotton fabric, 110 millimeters thick and 15 meters long for the full height of the vertical scratching post;
- in addition, you need to prepare a rope for the scratching post, which is located in an inclined position relative to the house;
- you also need a board measuring 18 by 41 centimeters.
From additional materials for finishing, as well as construction tools, you will need to get:
- faux fur, carpet, leatherette or other fabric for finishing the house;
- saw and jigsaw;
- sandpaper for grouting;
- scissors;
- drill;
- construction stapler;
- screwdriver;
- glue gun or glue and a separate thin brush;
- measuring tape;

Step #2. We cut out the elements of the future cat's home
So, first of all, you need to cut out rectangular parts from the wood boards you have using tools, which will then become:
- the base of the house;
- bed;
- walls, etc.
The size of these parts is indicated in the first step, in which we collected the necessary materials, however, provided that you are not making exactly the same house, but a similar one, and bought slabs of a much larger or smaller size, you can change its parameters, paying attention only to maintain proportions.
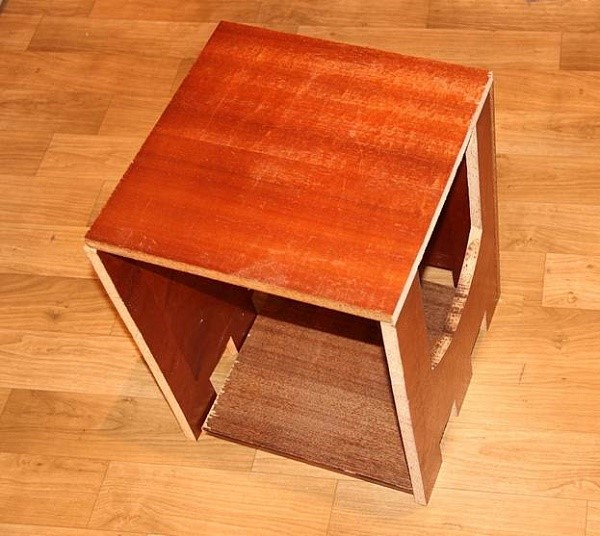
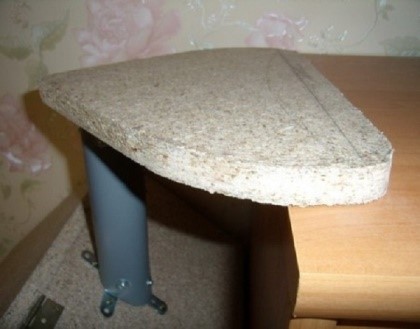
Provided that the dimensions are preserved in their original form, you will need to do the following: take the rectangular parts prepared for creating the walls and draw partially truncated circles on them, the radius of each of which will be 27 centimeters, exactly as shown in the picture .

At the same time, one of the walls of our house will remain untouched, while the second should be:
- decorated with windows;
- equipped with an entrance to the cat's room.
If you want to emphasize that a pet will live in the “box” you are making, the windows and entrance can be positioned according to the shape of the animal’s paw, however, if you have your own idea, implement it. So, many owners cut out windows and entrances in the form of:
- outline of a cat's head;
- butterflies;
- squares;
- triangles, etc.
Before cutting out parts, mark them on the panel to be processed using chalk, a marker or other writing utensil.

Provided that you decide to make a cat's paw, the parameters of the circles will be as follows:
- the entrance will have a diameter of 22 centimeters;
- The diameter of the windows will be 5.5 centimeters.
The windows should be positioned symmetrically, at a short distance from the future entrance.

Now let's start cutting out the parts. For this procedure, a jigsaw, drill and other tools are used that we mentioned in the first step, which involves collecting the necessary materials. It is better to start sawing with small circles, and complete the process by sawing through the entrance.

Step #3. We prepare the elements of our house for connection
Now we need to take both blanks, which we cut from the prepared and lined panels, and mark on them the points at which they will be fastened with slats. In total, as you remember, we have assembled 7 pieces of slats (you can see the full list of materials and tools in step No. 1 of this instruction).
At the previously marked points it is necessary to make holes with a drill, so that both parts of the house are drilled. Then, these holes must be deepened so that the self-tapping screws on which the slats will be placed fit into them.

Now you need to start preparing for the installation of the slats. To do this, the mentioned details are necessary:
- grind evenly;
- polish.
You can select the thickness of the slats yourself. So, those of them that are intended for installation on the lower level of the house can be made thicker.

- wooden slats;
- self-tapping screws
We make the fastening at those points where previously the recesses were drilled specifically for this purpose.

Step #4. Making upholstery for a cat's home
So that you can not only play inside and outside the house that we realize through our efforts, but also feel comfortable, it is necessary to upholster the house with fabric that we previously purchased specifically for this matter. In this case, the material requirements will be as follows:
- its cuts should be slightly larger than the walls of the dwelling;
- It is advisable to choose cut fabric pile to protect your pet from constantly leaving snags with its claws.
Faux fur is perfect for realizing our idea. Any cat will like to bask on this. However, you can also upholster the walls of the house with soft carpet, which wears out for a very long time and is suitable for claw points.
The fabric blank is cut exactly according to the shape of the “back” and “front” sides of the frame that we have. In the one that will serve as finishing for the entrance part of the house, by analogy with cutting out the parts of their wood board, it is also necessary to cut holes of the appropriate size.

This is how to correctly cut a piece of fabric to decorate a house
Then you need to attach the fabric to the wood part of the house using:
- glue gun;
- glue and brush;
- other devices you have.

When purchasing glue, you need to choose the least smelling composition, since cats do not like strong smells, plus, this substance probably releases various toxic compounds.
Important nuance: After gluing the fabric, it is best to place the house on a balcony or loggia, just so that all the toxic fumes disappear and cannot harm you, your children or animals.
After attaching the fabric, it is necessary to separately secure the places where the following are located:
- windows;
- entrance to the house.
Step #5. Making a bed
Now let's turn our attention to the panel, which will be the foundation of our future cat house. We take it and carefully glue the foam rubber to the place where the frame of the building will be installed. The size of the piece of foam rubber should be equal on all sides to the distance that remains between the wooden slats located on the side of the house.
The presented piece of foam rubber will be the first bed. Next to it there will be a pipe - a leg, which will then turn into a scratching post.

After you have drawn a place for the pipe and placed the foam rubber, you need to secure the fabric that you have chosen ahead of time to decorate the house on the entire surface of the platform. It should be strengthened especially carefully, simultaneously using:
- glue;
- construction stapler.
Provided that the material you choose may crumble, it is best to secure it also at the edges, gluing it on all sides.
Step #6. Preparing the roof of the house
Now, by analogy with the floor panel, you need to cover the roof with fabric. To do this, you also need to mark the allowances on the fabric with chalk for fastening to the panel cuts, and begin gluing, also using:
- glue gun;
- construction stapler.

Step #7. Completing the house and foundation
Now you need to take narrow strips of fabric glued to the platform that became the base for the house, and fit them from the inside of the frame, on the part where the lower slats are located.

Now we need to attach the house directly to the base of our structure. We will do this using self-tapping screws, which are screwed in in such a way that:
- the house was tightly held;
- the parts did not protrude beyond the floor panel.

Then we add a more civilized appearance to our structure by wrapping the slats inside strips of fabric that we had previously carefully attached to the frame.
A pre-prepared rectangle made from a wood-fiber panel must be placed on the roof of our building and secured with construction staples, which will then be hidden in fleecy fabric using ordinary scissors.

Now our task is to improve the interior decoration of our beloved cat’s house. To do this, with the same fabric that we chose for the base, it is necessary to trim the “skeleton” of the building from the inside.
Step #8. Final production of scratching post and bed
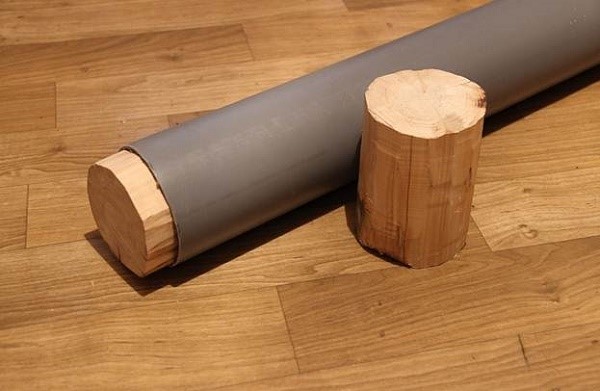
Now we need to use the plastic pipe we previously prepared, as well as blocks of wood to recreate the scratching post. We will proceed as follows:
- we insert the beam inside the pipe and immediately fasten the parts using the same screws or glue;
- We will make future parts for the sun lounger from the wood fiber and particle boards that we have left.

One of the previously cut pieces must be cut through in order to thread it directly onto the pipe.

Now you need to use a second part to cover the pipe protruding from the lower half.
The pipe is secured to the base using self-tapping screws, since this is the only way to strengthen our scratching post enough to prevent the cat from knocking it over. It is best to make three or four connection points, as shown in the picture below.

It is best to cover the base of our future scratching post with the same fabric as the floor panel, since cats will not touch this part of the house in any case, because when sharpening their claws they stretch their paws up.
Foam rubber must be glued to the top bed. To do this, cut out a soft part of the required size and fit it in place.

On top of the foam rubber, it is necessary to cover the lounger with a fabric that matches the color of the other textile cuts with which we have already decorated our structure. After the surface of the bed has been tightened, you will also need to glue the fabric on the bottom side of this level so that its edges do not stick out in different directions, thereby:
- shortening the service life of the surface;
- disrupting the harmonious appearance of the structure.
Now it’s time to wrap the pipe we prepared with the rope, inside of which the timber is placed, since it was intended not only as a support for the second tier of the house, but also as a scratching post. The wrapping should be done quite tightly, while the ends should be carefully secured with glue.

If desired, you can also attach a rope to the underside of the upper tier, at the end of which it would be appropriate to attach a toy so that the cat chases it and thereby keeps itself occupied.
Now we need to make a scratching post from a board, which will be located at an angle relative to our house. The underside of the scratching post should be in contact with the base of the house.

Both ends of this part must be covered with the same fabric that you used earlier. Then the middle of the desired board must also be wrapped with rope or twine so that the cat can sharpen its claws on it. We install the desired board to the house tangentially, and fasten it with self-tapping screws from the bottom.
Hurray, our DIY cat house is completely ready! Now you can not only make it yourself, but also improve it by adding several new tiers or rooms, provided that you have several animals.
Instruction No. 2. Castle house for the king of beasts
If your cat is not a simple representative of the feline family, but a blue-blooded muzzle, we advise you not to waste time on trifles, and immediately take care of creating a spacious castle for him. This option is good not only for its regal appearance, but also:
- the ability to hang the structure on the wall;
- the fact that with the right skill you can make a house project for a cat much more interesting and functional;
- the fact that as a result, your cat will receive a real refuge on a hill, where he can take a well-deserved break from annoying small children, dogs, and other animals.
If a regular house for cats would eat up a significant amount of space in the apartment, a wall lock for a cat will leave both you and your pet satisfied.
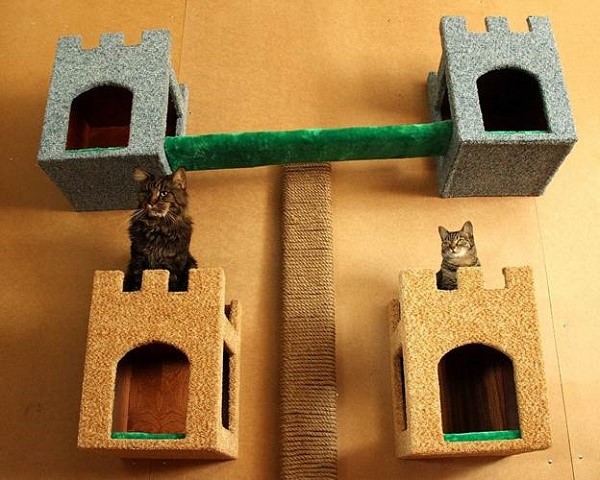
This is what the finished structure will look like
Step #1. Collecting the necessary materials
First of all, it is necessary to collect building materials, which will later be embodied in the turrets of a real cat’s castle.
So, you need to collect:
- particle boards;
- slats 4 pieces (2 x 5.5 x 44 centimeters and 2 x 5.5 x 23 centimeters);
- thick cotton rope, for example, made of jute;
- self-tapping screws, with the help of which we will further fasten the elements of the house;
- foam rubber for creating soft rest areas;
- fabric that is not easy to tear with claws;
- superglue with a brush or a refilled glue gun.

Once the necessary materials have been selected, start collecting the necessary tools, such as:
- construction stapler;
- scissors;
- jigsaw;
- saw;
- screwdriver;
- drill;
- marker;
- centimeter tape measure.
Now that we have collected everything we need, we move on to the next step.
Step #3. Preparatory work
The lock shown in the figure has the following parameters:
- the floor panels for the turrets are 34 by 34 centimeters;
- the height of the walls of each tower is 45.5 centimeters;
- the point at which the second floor begins is located at a height of 30 centimeters from the bottom of the wall.
In other words, in order for you and me to build our planned turrets, we need to cut out:
- grounds;
- walls of the specified size;
- the side walls are small, approximately 30.5 by 44 centimeters;
- shelf, the size of which will be 30.5 by 30.5 centimeters.
You should also remember that you must have prepared 4 slats of the sizes we indicated above.
The wall thickness will be approximately one and a half centimeters, as this is the standard parameter for a regular particle board.

Why do you need to determine the size of the turrets in advance? Everything is very simple: the house in which your mustachioed pets will be located, or rather its individual segments, should provide cats with the opportunity to:
- comfortable to stretch;
- stand up to your full height;
- move and stretch.
Provided that you still decide to make a second floor, it is best to make houses with sides, this way you will protect your beloved animals from falling on the floor while sleeping. Despite many theories about cats falling to the floor with all four paws, you can be sure that a sleeping pet will fall just as unsightly, painfully and dangerously as representatives of other species.
Step #3. Let's start cutting out the parts
So, we take the prepared particle boards and start cutting out 9 blanks (if you don’t have ready-made slats) of the sizes we indicated earlier. The shape of the blanks, as we remember, is rectangular.

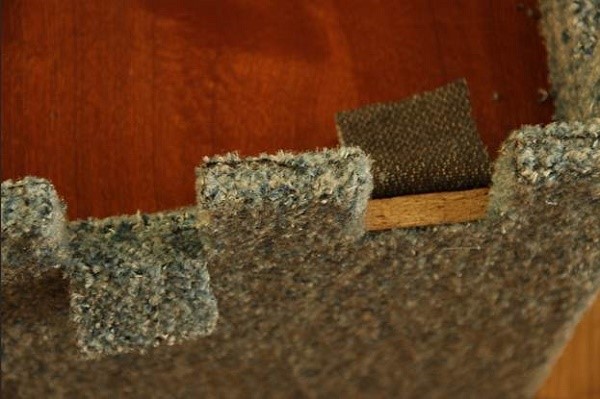
Now that everything is ready, let's begin the creative part of the work. We need to draw the teeth that will represent the walls of the towers. The height of each clove will be 6.5 centimeters.
Next, you need to take a large-sized wall, which will be placed on the side, and divide one of its sides into 5 identical sections, placing the appropriate markings. As we remember, our side is 34 centimeters, so when dividing we get:
- 5 segments;
- each of which will be equal to 6.8 centimeters.
Then you need to take other side walls, the size of which will be smaller, and attach them to the marked side of the future house, installing prepared slats at the edge. Then from the bottom we copy the markings onto smaller parts. This is necessary so that the walls of the houses, which will make the turrets resemble a real castle, be decorated with teeth of the same size.
After the ends are marked, it is necessary to transfer the markings to the plane of the board, and then draw a line, the length of which will be equal to the height of the teeth - 6.5 centimeters. After we connect the resulting dots, we get a finished drawing.

This is what the finished drawing will look like
Be sure to mark with crosses those parts of the part that you are going to cut out, so as not to inadvertently make a mistake. As you can understand, there will be fewer of them relative to those teeth that remain. Now we need to cut out the teeth according to the drawing that we previously completed.

The tower parameters will be as follows:
- width is 20 centimeters;
- height is 25 centimeters.
Now pay attention to the drawing shown in the picture below and use it to cut out the entrance using a jigsaw, manual or electric, depending on which one you have prepared.

Step #4. A castle is being built for our pets
Now you need to take that wall, the width of which is 34 centimeters, and use a drill to make recesses for self-tapping screws in it.

Now, using fasteners, you need to connect the side wall together with the one in which we made the move. We attach the second side panel in the same way, laying a shelf between them, if there is such a need.

After all the sides are adjusted, you need to install the turret on the teeth, and attach the floor panel of our structure to it with the base. It should also be attached with self-tapping screws.
Now measure approximately 30 centimeters from the beginning of the house, and make recesses to secure the shelves with self-tapping screws.

The shelf is attached as follows. This is the second tier of the house, on which the cat can also rest
To cover the sections that remain after cutting the parts, you need to attach slats of the appropriate size.
Now we need to cut the fabric we prepared in advance so that the cut in height and width is slightly larger than the parts of the tower. Then try on and adjust the size of the piece of fabric according to the dimensions of the part. If you are making a house according to our example, but do not follow the parameters, you will also have to measure the size of the piece of fabric yourself.
We stretch the fabric over the houses and fasten:
- using glue;
- or using a furniture stapler.
Remember that it is very important to fold the edges in parallel in order to maintain the harmonious appearance and neatness of the house. In the places where the teeth are located, it is necessary to leave an allowance of one and a half centimeters of fabric in order to bend the edges and close our part completely. It is very important that the glue you use to secure the ends does not have a strong odor, since cats react extremely negatively to this.

For the cloves, you need to prepare several long pieces of fabric, the height of which will be 6.5 centimeters each, and use them to trim the cloves of the tower directly from the inside of the building, from the floor of the second tier.
In order for the side entrances to also be trimmed with textiles, you need to attach the woven material directly to the house, measure the required size and cut it. Secure the edges with glue or a construction stapler.
In the same way, it is necessary to finish all the “bare” parts of our house. Measure the pieces of fabric that require fastening, mount them and fasten them.
Then we will need to make soft beds for our beloved pets so that they can rest comfortably on them. You need to measure each piece in the same way as you measured pieces of fabric. Only this time, before attaching them to the houses, you will need to wrap each piece of foam rubber with fabric, securing it in ways already known to us.
Now you need to put fasteners on the finished tower and hang it on the wall. To do this, you first need to drive in the dowels.
If desired, these houses can be equipped with a scratching post, similar to how we did it in the first instructions:
- find a board or plastic pipe;
- wrap the device with twine or rope.

Step #5. We make bridges between the towers
So that your pet can comfortably move around his walled possessions, and not jump there, as in an extreme park, it is best to attach bridges to the towers.
The role of these crossings between sections can be played by:
- a piece of wooden board;
- plywood;
- other dense material.
It should also be covered with fabric, the same one that was chosen for the body, or some other one. So you:
- make your pet’s stay in the complex as pleasant as possible;
- protect his paws from splinters and surface roughness that can harm the cat.
We would like to draw your attention to that in order for the animal to use each of the structural elements, they must be at some distance from the wall of the room to which they will be attached.

What you should get at the end of the work
As you can see, if you have the desire and free time, making an extraordinary house for your own pet is not so difficult. You can not only change the colors of the upholstery, but also vary:
- the size of the house premises;
- change the height of the parts;
- place such living corners around the entire perimeter of the house, turning your apartment into a “cat Rublevka”.
Provided that you will be making many rooms, it is better to make entrances to each on each side in order to create a kind of tunnel out of them.
Instruction No. 3. Play two-story cat bed
As you can already understand from the instructions for making a cat house presented above, the tasks of such structures are different:
- become a convenient resting place for the animal;
- introduce an entertaining moment.
Thus, the cat should have the opportunity not only to sleep inside a manufactured house or bed, but also to spend time in it with interest, for example, sharpening its claws. In this material we will look at how to make a three-story cat bed that will add an entertaining element to your pet’s life.

This is what our future house will look like
Step #1. We collect the necessary materials and tools for the manufacture of the planned complex
So, when you gather your strength, only a small matter remains: you will also need to collect tools and materials:
- two coffee or coffee tables, bought on the cheap or old ones that have lost their value;
- rope or twine;
- faux fur;
- construction stapler;
- glue gun;
- screws and screw;
- light or dark paint, preferably washable.

Step #2. Preparing the tables
Now that you and I have collected everything you need, let’s start preparing the details. First of all, we will process the tables. Start disassembling them, since each individual part of these items must be prepared for work by:
- decorations;
- improvements.
So, we need to separate from the whole object:
- legs;
- shelves (if available);
- table top.
It is best to choose a table with a shelf, since it is this that will subsequently play the role of a sun lounger, protected from prying observers, etc.

Step #3. We trim the shelves with fur
Now that we have separated all the parts, we will stretch the faux fur cover over:
- a shelf for a larger table;
- the cover of a small table, which will become the third tier of our structure.
It is important to remember that the fur must be carefully fixed, carefully bending its edges under the shelf and tabletop, which in turn must be secured with glue or a construction stapler.

Careful fastening is the key to long service life of the sun lounger
Step #4. We make devices for sharpening claws
The legs of the table, as you might understand, will play the role of scratching posts, provided that you wrap them in advance:
- rope;
- twine.
So, you can wrap both the supporting elements of both tables and:
- only small;
- or just big;
- or two legs here or there.
During fastening, the rope must also be fixed using construction staples or glue.

We recommend painting the remaining elements of our tables in a color that will suit the interior of your apartment and generally be pleasing to the eye. At the same time, it is important to choose a paint that is safe for animals and will not cause any damage if the legs are chewed and enter the gastrointestinal tract.

After the paint has completely hardened, you can begin to put the parts back together.
Step #5. Assembling the structure
Even though we are essentially putting the parts back in place, our design will be slightly improved by:
- installing a small table on a large one;
- fastening them through the legs using self-tapping screws.
You need to place a small table so that it occupies no more than 2/3 of a large one, since its legs will be scratching posts, which means that the cat must sit comfortably in order to sharpen its claws on them.
The final touch is to add entertaining elements, for example:
- toys hanging on a rope from the second tier to the floor;
- fluffy upholstery and other accessories that can distract the pet’s attention.
Here no one limits your imagination; you only need to proceed from the configuration of the house and your desire or unwillingness to continue working on the entertainment component of the platform.

Instruction No. 4. House for a cat on several floors
We have already told you how to make a real castle for a pet, however, if you are the owner of a true city cat, then his choice will most likely fall on a cat’s “new building” - a multi-tiered house that can accommodate one or several pets at once.
We would like to warn you: To build such a residential cat complex with your own hands, you need to work hard and spend a considerable amount of effort and patience. However, the result that you ultimately get will pay off not only the physical, but also the mental resources spent on making the house.
In this structure, your pet will have the opportunity to:
- get a good night's sleep;
- play;
- sharpen claws, etc.
So, let's start looking at the instructions.

This is what our house should look like
Step #1. Procurement of building materials and tools
So, as in all previous instructions, the first step in making a multi-story house for a cat will be to prepare the necessary materials, for example:
- particle boards;
- upholstery fabrics, preferably soft, with cut pile;
- rope or twine for scratching posts;
- plastic pipes;
- glue;
- self-tapping screws;
- hinges on which doors are hung;
- screws;
- metal corners;
- scissors;
- jigsaw, electronic or regular;
- centimeter tape measure;
- pencil.

When we have collected all the necessary materials, we can begin making our house, which will have as many as 6 floors!
Step #2. We are preparing the foundation for our multi-story building
So, first of all, we will begin to create a foundation that will support all the other floors of our complex. The same base will contain:
- entrance;
- windows (optional).
The entrance, like the windows, can be of completely different shapes, whatever you want.

The most popular options are:
- cuts in the shape of a cat's head;
- entrance in the form of an animal's paw;
- triangular entrance, etc.
Before cutting it out on one of the walls, you need to manually draw a template on paper. The template must be drawn in such a way that in the future the animal can freely enter the house through the prepared entrance, even if it:
- will get fat;
- will run into it at an angle, etc.
Once the shape is determined, create a template, lay it on the particleboard, trace it with a marker or pencil, and then cut it out with a jigsaw.
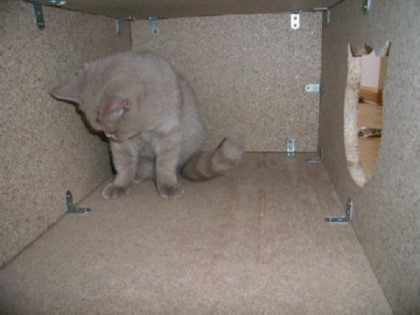
This is what the bottom tier should look like from the inside
Now you need to assemble the bases into a box of absolutely arbitrary size. So, for example, in the photo you can see a house with the following parameters:
- length - 80 centimeters;
- width - 55 centimeters;
- height - 30 centimeters.
You can choose completely different parameters for your product, however, follow only one condition: your cat should be comfortable.
The walls, one by one, need to be fastened from the inside with corners and screwed in with screws. The open part of the box must be equipped with door hinges so that it can be opened when necessary. This must be done exactly as shown in the picture, placing loops on the previously unattached wall as well.

This is how to properly secure door hinges

This is how the fastener will look when finished
Step #3. Making scratching posts
As you can understand, the pipes will serve not only as interfloor supports, but also as scratching posts. Metal corners must be attached to the base of each pipe. This way we can easily attach them to the base. If you want to make the house especially stable. You can insert a round hewn beam inside each pipe, however, it is worth remembering that in this case the total weight of the structure will increase, and it would be better to fasten them not with the help of corners, but with mortars, and not to a particle board, but to plywood, for example .
Please note: Using various pipes and panels you can make as many floors as you want. At the same time, you are not limited especially in the form of the future structure; let your imagination determine what the cat’s shelter will look like in the future.
Each pipe can be wrapped:
- twine;
- rope.
This way you will get a large number of scratching posts, and your upholstered furniture will be protected from the claws of your pets.
Step #4. We mount the stairs
It is very important that the cat can safely climb all floors of his house. To do this, we need to equip our high-rise building with a staircase that will stand slightly at an angle relative to the house.
You can build the intended building element from ordinary wooden boards, sawn into several parts. The stability of such a ladder is the most important nuance, since if it falls, it can crush your pet, which will have an extremely negative impact on its health.
This element can also be attached to the building using furniture corners. The angle of inclination relative to the cat's high-rise building will be approximately 45 degrees.
Step #5. Making a house on the upper tier
A cat house that will not only begin with a living “box”, but also end with it, will look very impressive. It is also advisable to attach a roof with two slopes to the top floor, like on a real house. The base of this last floor must be installed and attached to several pipes, preferably located symmetrically relative to its edges.

Assembling the house on the last tier is one of the last elements of our work
From the chipboards we have, we cut out parts of any size, such as you like best, and from them we form a structure similar to the house on the lower tier, also securing the walls using corners with screws.
Remember: Such a cat’s home, whether you like it or not, will have to be cleaned periodically in any case, since the cat will:
- I go to carry it;
- tear up toys there;
- shed inside, etc.
That is why one of the sides of our roof or house, as it is convenient for you, needs to be mounted on door hinges. This way, you will make it easier for yourself, and you can add an entertaining element to the cat.

In the version presented in the picture you can see the most ergonomic solution - a house with an entrance located on the side, equipped with an opening roof.
Interesting fact: The top floor of our house, which we just made, can be used as a platform for jumping onto the cabinet. No matter how high a cat sits, its nature requires it to climb even higher. Place her house next to the closet and give her this opportunity. To do this, it is best to take another plastic pipe and a small particle board.
Step #6. We carry out the finishing of our building
So, we finished our multi-story house, brought it to the closet, however, it has not yet acquired the appearance that we would like. If you do not decorate our work, it will not lose its properties, however, it will never be able to become a stylish item that complements the interior. By the way, this property is important for a cat’s house, because you will see it every day of your life, so let’s take care of the finishing.
So, all plastic pipes must be trimmed with rope or twine so that they not only acquire a stylish appearance, but also turn into scratching posts. We secure the top and base of the rope snakes with glue or a construction stapler.
Then, you need to take a carpet, or fabric with cut pile, and paste it over:
- all the internal parts of the house (it is best to do this during the process, but if you are doing this after, it is enough to glue the fabric only on the floors inside the houses and the platform, but you don’t have to touch the walls);
- the outside of cat houses;
- surfaces of platforms, etc.

Carpet is a soft material that will create comfort for cats, and at the same time allow them to sharpen their claws directly on it without losing their appearance. To glue the carpet evenly, you need:
- measure each part to be finished;
- If necessary, according to the template and drawings on the outside, cut holes with scissors with allowance for bends.
The folds and edges of the fabric are also fixed using glue or a construction stapler. If you want to create a monochrome structure, it is better to use the same fabric. If you like brightness, then take several different shades.

Don’t be lazy and cover all the existing parts of the structure with fabric.
The following can also be finished with soft material:
- roofs;
- ends;
- corners, etc.
As you can see, making a cozy multi-storey home for a pet is not so difficult; it is only important to follow the sequence of actions and devote some time to the process.
Instruction No. 5. Comfortable bed
Cats are creatures that love to hide. However, when choosing between a confined space and a comfortable lounger, they will always choose the second. That is why we should also tell you about how to make a comfortable sleeping place for your pet. Please note: if you have absolutely no skills in working with building materials and do not know which side to approach the jigsaw from, making such a bed is the best option for you.

This is what the finished bed will look like
Step #1. We collect the materials necessary for production
As usual, we start by collecting the materials necessary to make our lounger. So, we will need:
- wood fiber panels, the size of which will be 36 by 48 centimeters;
- foam rubber cut with parameters 35 by 46 centimeters;
- soft fabric or carpet, leatherette, faux fur;
- scissors;
- measuring tape;
- sewing supplies.

Step No. 2. Choose the place where our bed will be located
Why is it so important to first determine the place where your cat will sleep? Everything is very simple: the similar parameters of the sunbed will depend on its size and shape. In other words, you may want to place your cat pillow on:
- window sill;
- table;
- window;
- floor, etc.

All these parts of the interior space of the apartment will differ in:
- length;
- width, etc.
Provided that you do not know where you will put the lounger, make a sleeping place with the following parameters:
- 50 centimeters;
- by 30 centimeters.
Once you have chosen the place where the cat will rest, we will begin drawing the template.
Step #3. Preparing the details
We draw an oval shape on the prepared fiberboard with the parameters that interest us. If immediately drawing an oval is an impossible task for you, draw a rectangle, and there will already be an oval in it.

We cut out the resulting oval from our wood fiber panel, and we need to perform this action exactly twice. Now you need to measure and prepare the sides of the future bed. To do this you need to take a piece of foam rubber. The length of the sides should be 135 centimeters and the width 10 centimeters.

We fold the cut foam “scarf” in half and secure it in this position with glue. Then the resulting sausage needs to be covered with fabric, for example, faux suede or fur. When cutting the fabric, make an allowance so that you can easily attach this structure to the base of the couch from below.

Now we connect the side we made and the panel made of wood fiber material, leaving a free hanging edge of the fabric on the outside.
We connect the sides together, securing the protruding edge of the fabric with glue at the base of the lounger.
Step #4. We create comfort
Now we need to make the inside of our lounger soft. To do this, we clearly cut out a part from the foam rubber material according to its shape, a little smaller so that it can clearly fit inside the lounger.

Foam rubber is a soft material that follows the shape of the animal’s body
We wrap the finished part in fabric, which we sew on the bottom side using threads and needles prepared ahead of time. Lubricate the finished pad in the middle with glue and place it inside our lounger.
Hurray, our idea has been fully realized!
Pros and cons of making your own cat house
Now that you know how to make a cat house in several options, let's see what benefits you will get from this knowledge.
Table. Pros and cons of making a cat house with your own hands
As you can see, our idea has very few downsides. Moreover, if you have enough time, it is quite easy to bypass them, since the lack of skills is compensated by the thoroughness of the work being carried out, and each owner has a large amount of the required time on weekends.
If you also have a dog, he will tell you how to make a house for him yourself.

Let's sum it up
All you need to make your own cat house is enthusiasm, desire and simple building materials and tools. If all the mentioned elements are present, you can be sure that not only you, but also the one for whom it was all started will be satisfied with the result.

Video - How to make a house for a cat?
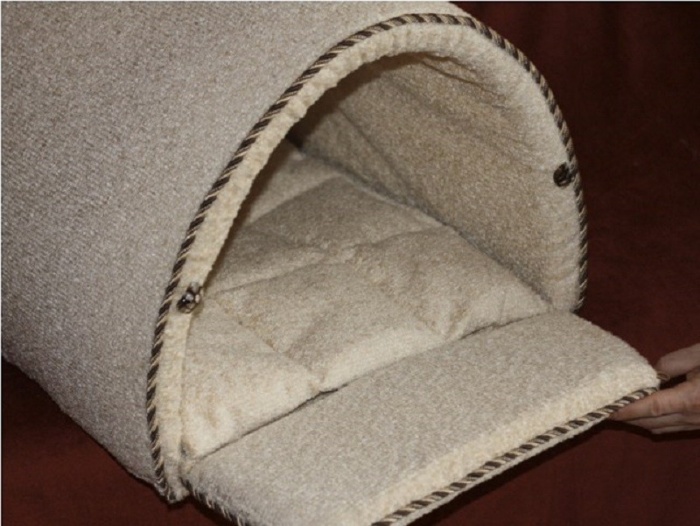
Caring for domestic cats gives many owners genuine pleasure. Therefore, when it comes to arranging a cozy corner for relaxation, the decision to sew an original house with your own hands naturally suggests itself. There are many simple and interesting ideas for decorating a cat house, some of which we will describe in detail.
Studying the assortment of specialized stores for animals sometimes causes delight and surprise, the models of houses are so different. However, spending money on purchasing an expensive product is not always wise. After reading the design recommendations, most will be able to sew an interesting design with their own hands. Before starting work, pay attention to the following nuances:
- It is extremely important to choose the right shape of the house, taking into account the character and habits of the cat. Some pets prefer to be visible. From this position, it is correct to choose an open bed for making. A cat whose priority is peace and privacy will appreciate a closed, kennel-type house.
- The next stage is sizing. The animal should fit freely in the house that you plan to sew with your own hands. And if you are the owner of an expectant mother, then you should also worry about the place for the upcoming offspring.
- Finishing material. Depending on the conditions in the apartment and the breed of cat (smooth-haired or fluffy), fabrics with or without a warming effect are used. Although most cats still prefer soft material.
Important ! The main condition is that the material is selected natural so as not to accumulate an electrostatic charge.
The second important factor when choosing is durability; the finish should not suffer after the cat’s first attempt to use the house as a scratching post.
A well-equipped house has the following characteristics:
- does not accumulate dust;
- easy to wash;
- meets safety requirements (does not contain sharp corners or material with a strong odor);
- The cat feels comfortable in it.
It is optimal to sew a house in accordance with the surrounding interior so that it fits harmoniously into the design of the room.
Master class on sewing a classic house
The desire to sew a resting place for a cat with your own hands allows you to fully unleash your own creative potential. An ordinary house can be played up in different ways: create a simple quadrangular structure or a model that imitates a cap, or maybe you want to sew a kind of tent. The choice is yours.
To sew a classic house model with your own hands, you do not need to have a high level of skill in using a sewing machine. Prepare for work:
- foam rubber, which will help keep the shape of the side walls, approximate thickness - 1.5 cm;
- It is better to lay foam rubber 2.5 cm thick on the bottom;
- dense material for decorative finishing; the interior and exterior of a cat house can be sewn from different fabrics.
The entire process of creating a masterpiece for a cat includes the following steps:
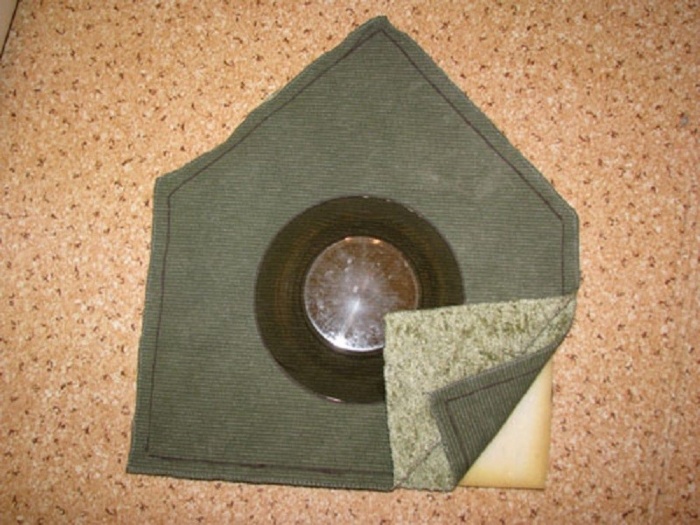
Pattern of details. Having prepared a template for one side from the newspaper, transfer it to the fabric and cut out 8 identical blanks. The base of the cat house is 40 cm, the height of the wall is per cm, and 25 cm is allocated for the roof. If different finishes are used, 4 pieces of each type of fabric will be required accordingly. For the bottom you need two blanks measuring 40x40 cm.
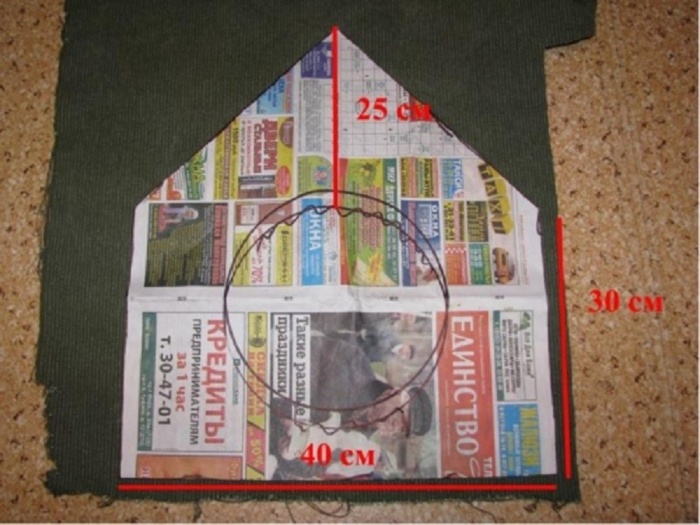
Note! The pattern elements are cut out with a margin of 2 cm for future seams. If you mark the four templates on the front side of the fabric, it will be easier to subsequently sew the parts of the house along the visible lines.
Similar actions are carried out with foam rubber: using material 15 mm thick, cut out 4 elements measuring 40x30x25 cm and 1 blank 40x40 cm with a thickness of 25 mm. No allowances are needed here. Before sewing fabric blanks for a cat's house, their edges should be finished with a zigzag stitch. Next, each wall of the cat's house is formed separately according to the sandwich principle: foam rubber is placed between two fabric parts, basted around the perimeter or fixed with safety pins, after which the blank can be sewn. Draw a circle on the fourth part of the wall of the cat house. Any plate of suitable size will help mark a neat entrance.
The entrance circumference, after pinning, is machine stitched. The edges of the cat house entrance need to be processed. It is enough to sew them on a machine using a zigzag stitch. Without touching the processed circle, the middle is cut out, the entire workpiece is turned outward. By analogy, you need to sew the bottom of the structure for the cat. To prevent the parts from delaminating, it is better to secure all the elements with your own hands with buttons.

All blanks are connected to each other from the inside out, starting from the entrance of the cat house, ending with the back wall.
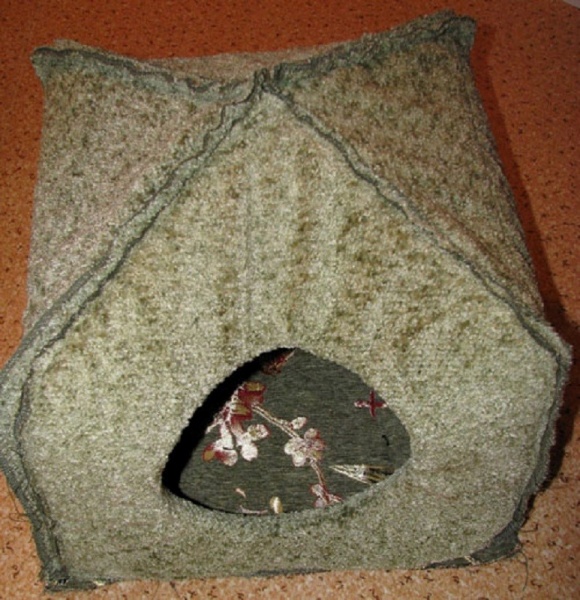
The final step is to sew the bottom and turn the cat house through the entrance. You can invite your pet to your housewarming party!

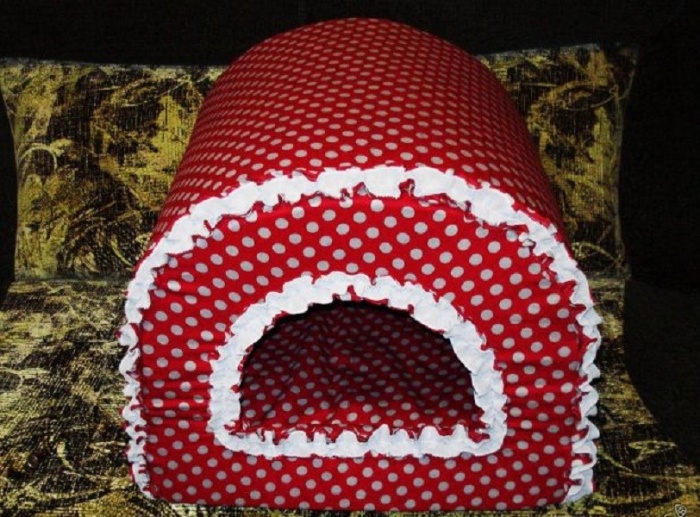
Look at the following photos to see what interesting models of houses you can sew with your own hands if you show a little imagination:


Interesting ideas for creating beds
Not all cats like to be in a closed house. Most people prefer to combine relaxation with observational activities, so a couch is the optimal solution for them. There are many interesting design ideas for such structures, which are not difficult to sew with your own hands.
Option 1
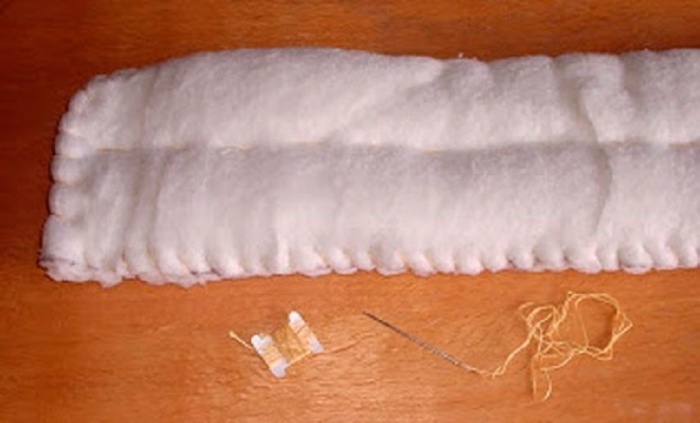
To sew a cat bed with sides you will need: a small flat pillow with synthetic filling and fabric for decoration. The creation procedure includes the following steps:
The pillow is cut into three pieces to create two long narrow pieces for the side and one rectangular piece with rounded edges for the bottom. Each of the blanks must be carefully sewn. On the sides it is better to place an additional seam in the middle.

The material for decoration is laid out out of the blue, the future sides of the cat bed are placed along the edges, after which they are covered with fabric.

A bed is formed from the resulting blank, the sides at the edges must be sewn, and there is room in the middle for a pillow. Inside the structure you can put a soft blanket for the cat or sew a pillow of the appropriate size, which is easy to get and wash if necessary.
Option 2
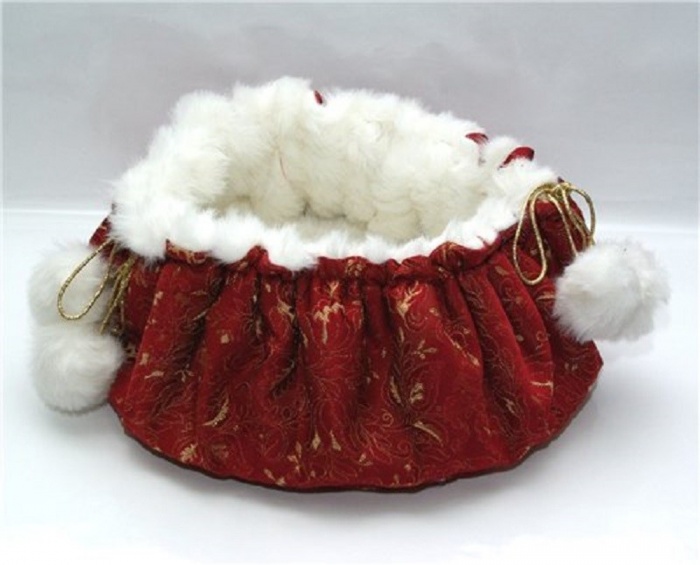
It’s very easy to sew a kind of nest-shaped house for your cat with your own hands. Prepare for work:
- fur fabric or thick fabric for decorative finishing;
- foam circle;
- strong rope to give the house the shape of a nest.

Using the proposed pattern, you need:
- Cut 2 circles with a diameter of 80 cm from the finishing material.
- Prepare a foam circle with a diameter of 40 cm.
- Sew two blanks of decorative material with your own hands from the wrong side.
- Turn the resulting cover right side out and insert the foam cushion.
- A seam is sewn at a distance of 1 cm from the edge of the circle. A rope is inserted into the resulting compartment and pulled to the required size.
Advice ! By decorating the cord with interesting pom-poms, you will create an additional object for your cat to play with.
Option 3
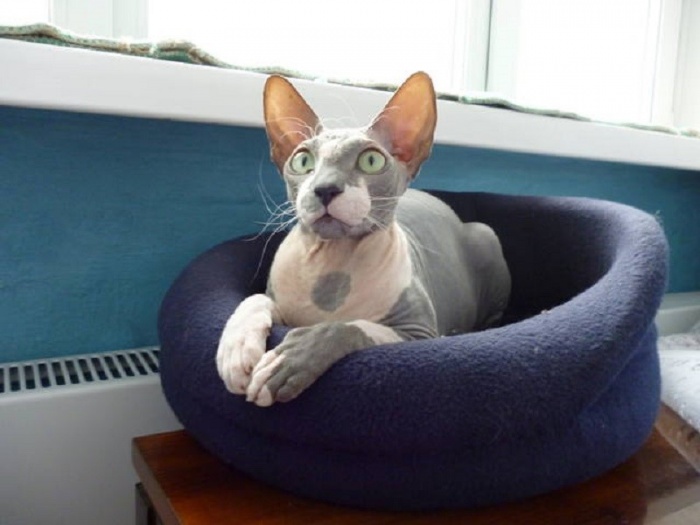
Another simple and quick option for a house in the form of a bed is sure to please your cat. Required material:
- Sew the cover preferably from fleece.
- Foam rubber will give the pillow softness; its thickness can vary from 1.5 to 2.5 cm. If there is thin material, the bottom is formed from two layers of foam rubber. If you use a product with a thickness of 2.5 cm, one circle will be enough.
Main stages:
- A circle or two is cut out of foam rubber (depending on thickness). The diameter corresponds to the planned size of the cat bed.
- Prepare two round blanks from the fabric to be decorated. The first is 0.5 cm larger than the diameter of the foam circle (seam allowance), the second with an allowance of 3.5 cm (taking into account the thickness of the foam cushion and seam).
- The foam cushion is placed between the finishing material and carefully sewn together.
Note! First, you can sew the cover, leaving a little space for inserting foam rubber, after which all that remains is to carefully decorate a small area of the bottom of the cat bed.
- A strip of foam rubber is prepared for the side, the length of which is equal to the circumference of the bottom.
- The part is lined with fleece, the edges are joined. Naturally, they also need to be sewn.
- The bottom of the cat bed is installed inside the hoop, the seam should be located at the bottom.
- Then you need to sew the two main elements together and turn the bed inside out.
- if the sides are slightly bent at the edges, you will get a model resembling an armchair.
Conclusion
As you can see, sewing an attractive house for a cat with your own hands is quite quick and easy. The main thing is to have a desire to please your pet and show a little imagination.
When they talk about interior design, they mean decorating a room for people. Pets are content with simple baskets and carriers. Their owners are forced to endure the pranks of animals in the form of torn curtains and scratched furniture.
However, cat owners can take care of their pet and prevent an unpleasant situation with property damage. To do this, you need to arrange for the cat his own habitat in the form of a cat house.
You can build a home for your cat yourself. The design of the product should be adjusted to the overall interior of the room.


Selection of materials
You need to select materials based on the following principles:
- Safety. The house should not have sharp protruding corners, small parts, or protruding threads. Nothing that a cat could swallow or injure its paw on.
- Quality. Housing for a cat should be made exclusively from natural materials. It is important to use non-toxic glue or paints.
- Hygiene. The cat's habitat should be easy to wash and disinfect.
Plywood house option
Required tools and materials:
- Sheets of plywood.
- Furniture corners.
- Carpet or other dense upholstery material.
- Foam rubber.
- Sandpaper.
- Liquid glue.
Manufacturing procedure:
- 6 identical squares are cut out of plywood.
- Holes are cut out in two squares so that the cat can enter through them.
- 5 identical squares are connected to each other, creating a house without a roof. All parts are fastened with furniture corners.
- Carry out the interior upholstery of the structure. To do this, use glue or a furniture stapler to lay a layer of foam rubber on the bottom. A carpet is placed on top of it. External walls are finished with the same material.
- The entrance holes are treated with sandpaper to avoid injury to the animal during entry and exit.
- They cover the top with a roof, fastening the structure with furniture corners.

The external design of the cat house is carried out in accordance with the overall interior of the room. You can trim the outside of the structure with carpet. Cover with self-adhesive wallpaper to match the color of other furniture. Or paint it to match the walls of the apartment.

A scratching post is installed next to the house, protecting furniture and curtains from damage.
Wood and plywood option
Required materials and tools:
- Plywood sheets, density 6 – 12 mm.
- Wooden boards, seasoned.
- Rope.
- Wooden post. Diameter 5 – 10 cm.
- Fabric for upholstery.
- Sintepon.
- PVA glue.
- Self-tapping screws, small nails.
- Electric jigsaw.
- Hacksaw for wood.
- Knife.
- Screwdriver.
- Brush.
- Pliers.
- Ruler.
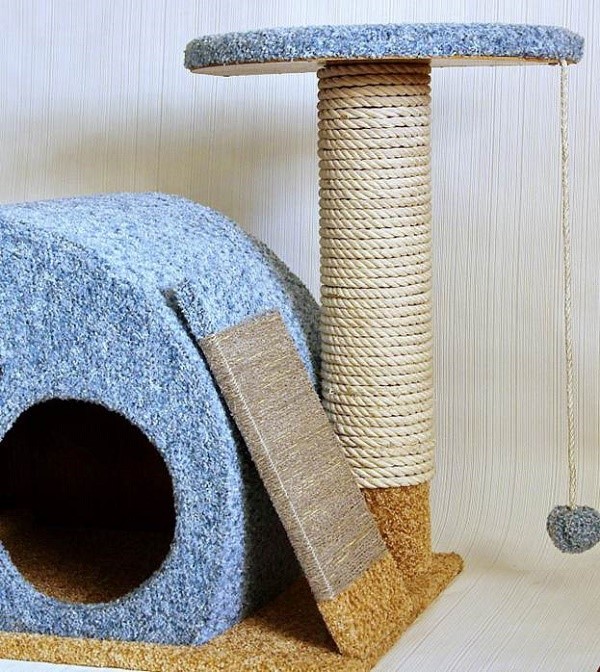
House with two entrances, observation deck and scratching post

Stage one. Uncover
- Draw drawings of a cat house. The drawing is transferred to prepared plywood sheets.
- An electric jigsaw and a hacksaw are used to cut out the base, parts and platforms from plywood.
- Wooden sticks are sawed off to the required height.
- Cut pieces of foam rubber, padding polyester, and carpet to finish all surfaces.
Stage two. Fastening and assembly
- The plywood and wood parts are glued together. The structure is secured with self-tapping screws and nails.
- Fabric and foam parts are securely glued using PVA glue. It is applied using movements from the center to the edges.

We assemble the parts of the structure. Subsequence:
- The foundation is being prepared. A column with a viewing platform is attached to it.
- They are assembling the house. The glued side is turned inward.
- The top surface and the sun lounger are covered with fabric.
- Place it on the base and secure the entire structure with glue.
The scratching post is made like this:
- The wooden column is securely coated with glue.
- Carefully wrap the rope, without making gaps or gaps.
- Leave the structure for two days to dry.
- A removable mat-bedding is laid in a dried and well-ventilated house.

Option with a high observation deck
- Determine the parameters of the future house. Based on the results obtained, six squares are cut out.
- Round holes are made in two planks. This will be the main door and the back door.
- The inner walls are upholstered with material, under which a foam layer is placed.
- Using furniture corners, the walls are connected like a cube.
- The pipe for the observation deck is well coated with PVA glue, and the rope is wound tightly.
- Cut out a square or rectangle from plywood. One side is covered with foam rubber. Then they decorate both sides with fabric.
- The viewing platform is attached to the pipe using furniture corners.
- The almost finished cat house is upholstered with furniture fabric. A pipe with an observation platform is attached to the structure.
- If desired, the owner can attach a hanging toy to the bottom of the observation deck.

The option of a cat's home with an observation platform installed at a height is possible only if the entire structure is securely fastened. An unstable house can tip over during use or play and injure the cat. When creating a home for a cat yourself, you should take care of the complete safety of your four-legged pet.
You can save money by using used upholstery material or using old foam rubber.
Important Notes
- Before starting work, be sure to draw a design diagram. This will allow you to cut the material as accurately as possible, avoiding damage and inaccuracies.
- New building material (boards, plywood) should not emit odor. It is necessary to let it sit so that all foreign odors disappear. Cats are very sensitive to foreign odors. A pet may refuse to live in a home that emits an unpleasant odor.
- Use only PVA glue. It weathers quickly, dries well, and does not release toxins into the surrounding air.
- For upholstery, natural or synthetic fabric is used. The main thing is that it does not become electrified. Silk and threads made from this material are not suitable for upholstery.
- Exposed metal parts are not allowed in the structure. The friction of a cat's fur produces a weak electrical discharge. Metal is a good conductor of current (albeit weak). This may harm the animal. In addition, pet hair can get caught on metal elements.

A pet must have its own resting place. There the cat will be able to retire and fully relax. Organizing such a corner is the responsibility of every cat owner.
Cats are one of the most beloved pets that can most often be found in an apartment. In order for the pet to feel comfortable and cozy, the owners try to create all suitable conditions for it: they provide it with a tasty and balanced diet, buy it beautiful collars or clothes, regularly comb its fur, and take it to appointments with the veterinarian. But besides all this, the cat also needs its own space - a house, and not every owner installs one in his own living space.
This design is an essential element of the animal’s normal life; it can be purchased in a store or made from scrap materials. The detailed instructions presented in this article will help you make a beautiful and cozy cat house with your own hands.
Depending on the design features of the product, cat houses are divided into:
- hammocks;
- beds;
- special booths;
- cardboard structures;
 To decide which house is right for your pet, observe its habits.
 - mini beds and sofas;
- built-in houses;
- complex complexes with game elements.
Hammocks– the simplest and most convenient designs for both pets and their owners. They are attached to the legs of furniture, do not interfere with movement around the room, and are almost invisible. You can make them yourself using simple items.
 A cat hammock can be hung in any room of the house.
 To work you will need:
- some durable fabric;
- threads;
- needles;
- fasteners that will fix the product in the selected location.
Important! Carabiners, Velcro and loops are the fastening elements of cat hammocks.
Cat beds- This is the simplest type of house. They are produced in the form of baskets or boxes with soft lining. This design is very simple to manufacture, so every homeowner can make it themselves from scrap materials.
 Original cat bed
 House-booth. The design of such a house resembles a doghouse; it has a roof and soft inner lining. A characteristic feature of the product is the presence of a special scratching post on which the pet sharpens its sharp claws. Such housing can be purchased at a pet store or made with your own hands.
 House-booth for a cat
 Cardboard structures. These are the most impractical products for pets. They quickly become unusable, lose their presentable appearance and tear. Constructed from boxes or cardboard sheets.
 Cardboard house
 Special mini-beds and sofas for cats. They are miniatures of pieces of home furniture. Such houses are very comfortable, fit harmoniously into the interior of the room, and do not clutter it up.
 Sofa for a cat
 Built-in houses. Built-in houses are universal structures. They are often located inside cabinets, bedside tables or ottomans. Such pieces of furniture perform two functions at once:
- house the pet;
- used by owners in everyday life (for storing things or other items).
 Built-in cat house
 Game complexes. These are quite complex and large products, consisting of a certain number of elements (ladders, scratching posts, beds, etc.). They are very convenient for cats, but not every homeowner can install such a house in their apartment, since they require a large area to accommodate them.
 Play complex for cats
 Materials for making the structure
The design of a cat house consists of several elements. These include:
- frame base;
- soft covering;
- special fillers and insulation materials;
- scratching posts;
- connecting elements of the structure;
- various fasteners.
To make the frame base, boards, wicker, plastic, plywood, chipboard or MDF are used. The main condition for choosing the right material is that it should not have an unpleasant odor, since the cat may not perceive such a “fragrant” home.
 Making the base of a plywood house
 The covering is made from any available soft fabric that is at hand. Plush, fur, carpet are the most popular materials for making upholstery for a cat house.
Important! Electrified materials must not be used during operation.
To ensure that the house is reliably protected and insulated, experts recommend using fillers such as synthetic winterizer, synthetic padding or foam rubber. They not only retain heat inside the structure, but also have soundproofing functions.
Scratching posts, unlike other elements, are made of more durable materials. Metal or plastic pipes are used to construct the frame, and strong jute rope is used to cover it.
 For upholstery, use soft polyester fabric
 Requirements for cat houses
Before you start making a house, you need to decide on the type of its design. Basic requirements for cat housing:
- The height of the house should be equal to the level where the pet spends the most time (height of the sofa, chair, table, bedside table, etc.).
- The housing must not have an unpleasant odor, as the animal simply will not perceive it.
- The dimensions must be appropriate for the cat so that it feels comfortable within its walls.
- Sustainability.
Dimensions
Before you start designing a house, you must make a drawing of it. Experts recommend:
- Height not lower than 40 cm.
- The perimeter of housing for a medium-sized cat is at least 40 x 40 cm.
- The diameter of the inlet hole is at least 15-20 cm.
Advice. When making a house yourself, you need to take into account the size of your pet!
To make a cat house with your own hands, the master does not need to have any special knowledge. To perform productive work, you will need to be patient and have all the necessary materials and tools.
Cardboard house
To work you will need:
- cardboard boxes (preferably large);
- pencil for marking;
- temp gun with glue sticks;
- ruler;
- knife or scissors.

Manufacturing technology of a two-tier house:
- Create a drawing of the house, apply it to cardboard boxes, cut out all the elements (floor, walls, roof).
- They draw windows and doors and cut them out.
- Assemble the first floor of the cat's housing, glue all the seams using a heat gun (it will reliably hold all the elements together).
- A connector is made in the roof of the first tier, which will serve as a hole for the cat to reach the second level.
- The elements of the second tier are glued to the finished structure.
- Decorate and paint the finished house.
A house made of wood (boards, fiberboard, etc.) in the form of a booth
For work you will need: A wooden booth
Manufacturing technology:
- Make a drawing of a cat house (each structural element).
- Apply markings, according to the finished drawing, to the material.
- All elements of the future structure are cut out (floor, walls, roof, entrance for the pet).
- Fasteners connect them together (except for the roof).
- Fix the padding polyester and carefully cover the house with soft fabric (both the inside and outside).
- The roof is sheathed separately and attached to the finished structure.
- Decorate the house.
Hanging pillows
Another option for a cat house is a hanging structure made from several soft pillows. It is attached to the ceiling or to the tabletop (from the bottom of the table).
To work you need:
- 2-3 pillows;
- thick decorative rope;
- anchor hook (if the structure will be attached to the ceiling);
- drill;
- threads and needles;
- decorative elements.
 Hanging bed made of pillows
 Manufacturing technology:
- A hole is made in the ceiling.
- Fix the anchor hook.
- The pillows are connected to each other using decorative ropes (at a certain distance from each other).
- 3-4 long ropes are sewn to the edges of the top pillow, connected to each other, and hung on a ceiling hook.
- Decorate the finished hanging house with affordable items.
The original cat house will become a favorite place for your pet. Make it yourself according to one of the suggested instructions, and your pet’s joy will know no bounds.
DIY cat house: video


