Technology for assembling a log frame for a house or bathhouse
Organization of a workplace for assembling walls
To ensure the work progresses, the beams are laid out in a stack at a distance of 5-6 meters from the building on one or, better yet, both sides. Each layer of beams in a stack is placed on spacers made of boards.
A workplace for marking and cutting beams will be equipped next to the stack. A variant of such a workplace is shown in the figure.
It is convenient to mark the timber using a template at a height of 0.9 - 1.1 meters in the marking area, node A in the figure. After marking, the timber is lowered onto low pads into the cutting area. In this position, it is convenient and safe to cut the timber with a chain saw.
The cut timber is lifted onto the wall. To facilitate the ascent, slopes are arranged - inclined beams, whose upper end rests on the upper crown of the log house. The timber is moved along the slopes using a rope.
Wedge-shaped stops are nailed to the slopes, which make lifting the beam safer. In addition to safety, the stops allow you to get by with little force. Even one person can, if necessary, lift the beam, fixing it with stops at intermediate points.
It is most convenient to carry out work on assembling a log frame from timber with a team of four people. You can work together, but the work will just go slower.
Scaffolding is constructed to install the upper rims of the log house and the roof.
 Three-tier scaffolding on the gable of the house. 1
— extreme racks; 2
— L-shaped scaffolding stand of the first tier on the side façade; 3
- flooring; 4
— central racks; 5
— cruciform braces (shown conditionally); 6
- bosses
Three-tier scaffolding on the gable of the house. 1
— extreme racks; 2
— L-shaped scaffolding stand of the first tier on the side façade; 3
- flooring; 4
— central racks; 5
— cruciform braces (shown conditionally); 6
- bosses The assembly of the upper crowns of the log house is carried out from the level of the first tier. The flooring of the first tier is laid on L-shaped racks, pos. 2 in the picture. The racks are installed around the walls of the house and attached to the walls using bosses, pos. 6.
At the stage of constructing the roof (attic), on the facades where the installation of gables is necessary, it is necessary to make scaffolding in three tiers. To construct scaffolding racks, boards 50 x 150 are used. mm. Flooring is made from the same boards.
Working from scaffolding is more convenient, faster and safer than from ladders - don’t forget about this.
Marking beams for wall assembly
Practical construction experience shows that it is not realistic to keep in mind the sequence of marking the elements of corner joints.
Before starting work, draw a diagram of the assembly of the walls of the house, which indicates: the serial number of the crown, the type of connecting element at the ends of the blanks, the position of the openings in the wall.
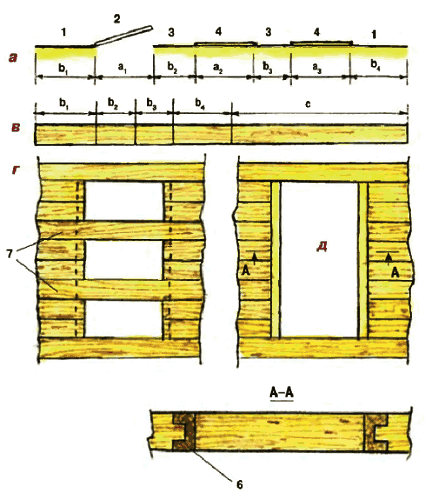
An example of a house wall assembly diagram is shown in the figure:
 Scheme for marking corner joints of timber and joints of parts of longitudinal walls, for a house with overall dimensions of 6x9 meters. A And WITH- longitudinal walls; D And B- transverse walls; E- internal wall made of timber - partition; 1
- joints of beams.
Scheme for marking corner joints of timber and joints of parts of longitudinal walls, for a house with overall dimensions of 6x9 meters. A And WITH- longitudinal walls; D And B- transverse walls; E- internal wall made of timber - partition; 1
- joints of beams. For the house shown in the diagram, each crown consists of 7 pieces of beams ranging in length from 3 to 6 m.
The crown of the longitudinal wall consists of two parts: the main beam of a standard length of 6 meters and an extension of 3 meters. On one crown, long beams are laid on the left, and extensions on the right. On the next crown, installation begins in a similar order, but on the right.
The parts of the crown of the transverse wall and the partition are made from one beam of a standard length of 6 meters.
To eliminate cold bridges in external walls, the joints of the beams of the longitudinal wall, item 1, are made by making vertical cuts “into the floor of the tree” with an overlap of 15 - 20 cm. The timber in the corners of the crowns is connected into a dressing with a root tenon (see below for more details).
How to correctly and quickly mark tenons, grooves and other profiles, ensure identical dimensions of lumber blanks?
The easiest way to do this is using templates. The template is placed on the beam and the contour of the template profiles is transferred to the surface of the beam with a marker.
It is more convenient, faster to mark and there will be fewer errors if the template completely follows the contour of the part and has the same length as the part being marked. I placed the template on the timber and immediately transferred all the dimensions and profiles to the workpiece.
For our example, we will need to make seven templates, corresponding to the number of parts in the crown. One template marks two mirrored wall parts.
If you think about it, the number of templates can be reduced. Let's look at how to make universal templates for marking parts of the longitudinal walls of a house (see above for the wall assembly diagram).
 Two templates (highlighted in bright yellow) for marking the beams of the longitudinal walls. 4
— groove for the main tenon; 5
- groove for the tenon of the internal wall; 6
- sample; 7
- finishing beam.
Two templates (highlighted in bright yellow) for marking the beams of the longitudinal walls. 4
— groove for the main tenon; 5
- groove for the tenon of the internal wall; 6
- sample; 7
- finishing beam. The picture above shows the template for marking the main beam in the crown, in which the extension is located on the right. On the wall marking diagram, these are crowns A1, A3, A5 and C1, C3, C5.
Bottom template serves for marking the main beam in the crowns with extension on the left - A2, A4, A6 and C2, C4, C6.
The templates are the same at first glance, but differ in that the grooves, item 5, for connecting to the partition, are located in different places of the templates.
The same templates are used to mark the parts of the extensions. To do this, on the templates at points b And With through holes are drilled, and at points A And d cuts are made.
To mark the extension, the template is placed on the beam and points are made on the surface of the workpiece through holes and cuts.
Remember this technique when making holes in the template. This will help you create universal templates in many other cases.
The templates are made from planed inch boards.
As a result, we manage to reduce the number of templates from seven to three (2 for longitudinal walls and 1 for transverse walls). Two longitudinal templates (right and left) provide the ability to obtain blanks for longitudinal walls, and one transverse template allows you to prepare parts for transverse walls and partitions.
Now let's look at how templates are used. To mark the first beam of the crown (for example, starting from the left), the left template is laid on the beam and the end of the template on the left is outlined with a marker, then two grooves and, finally, a recess for the connection “into the floor of the tree”. The marked timber is transferred to the cutting site, where unnecessary fragments (it is better to mark them out)
hatch) are cut with a chain saw.
How to mark parts with spikes? Obviously, the tenon and groove are elements of the same unit, which means they must match each other in size and location. In a part with a tenon, a tenon is marked in place of the groove.
If the groove dimensions are 5×5 cm, then the spike should have dimensions - 4.5 × 4.5 cm. The gap is filled with inter-crown insulation.
The template profile is transferred to the upper edge of the beam. The markings are transferred to the vertical edge of the beam using a square. Accurate cuts are made using these markings.
How to assemble smooth walls from timber of different widths
The technical conditions (TS) for the manufacture of timber allow deviations in the size of the timber in one direction or another from the standard value specified in the documents.
If the purchase documents indicate standard dimensions of timber, for example, section 150x150 mm. and length is 6 meters, then the actual dimensions will differ from the standard.
Each beam in a batch of timber brought to the construction site will differ from the dimensions indicated in the documents by several millimeters. The cross-sectional dimensions and length of the bars will be different.
The variation in sizes must be taken into account when developing templates, marking timber and assembling walls.
How to assemble smooth walls if the beams are different in width and length?
 b— minimum beam width; delta b- the difference between a narrow and wide beam.
 Obviously, using timber of different widths, you can make only one surface of the wall flat - either from the outside or from the inside of the building.
If they want to make the outside wall of the house smooth, then All beams in the wall are aligned along the outer edge. Then, inside the house, wide beams will protrude from the wall by the amount of “delta b"(the difference between narrow and wide bars). Alignment along the outer edge leads to an increase in gaps in the corner joint of the beams (see figure).
If the beams in the wall are aligned along the inner edge, then the “steps” from the protruding beams will already be on the outer surface of the wall. The outside of the wall is usually sheathed. And if you chamfer the outer edges of the timber, then the steps on the wall will be invisible even without cladding. The corner joints of the beams are more dense and “warm”.
How and with what to connect the crowns of a log house
Each crown of the log house is connected to the lower crown with metal or wooden dowels. The dowels are placed at a distance of approximately 250-300 mm from the end of the beam and then every 1-1.5 meters of the length of the beam.
Each detail of the crown is secured with at least two dowels. The length of the dowel must be at least 1.5 times greater than the height of the beam.
 cm., pos. 1.
 Round steel dowels with a diameter of 6-8 mm.- pins with a pointed end or nails (6x200-250 mm), simply hammer into the beams of the crowns, option a in the picture.
The upper ends of dowels made of any material must be buried into the timber by 2-4 cm. If this is not done, then when the timber dries and the log house shrinks, the dowels will be higher than the timber and will lift the upper crown. A large gap forms between the crowns.
For the same reason Driven pins cannot be made from reinforcing steel. The corrugated surface of such dowels will keep the crown beams from moving when the log house shrinks, even if the dowel is buried into the timber. The crowns will simply hang on such dowels.
Small-diameter steel hammer-in dowels cannot always provide the necessary wall rigidity, especially with long wall spans. Their use can be recommended for small buildings - for example, baths. To increase the rigidity of the walls of large buildings, it is necessary to install dowels of increased diameter.
Steel dowels with a diameter of 10 millimeters or more, as well as wooden dowels, are inserted into pre-drilled holes in the timber. The diameter of the holes is made slightly smaller than the diameter of the dowel.
When the dowel fits tightly into the hole, the rigidity of the wall increases, but the risk that the dowels will interfere with the shrinkage of the frame increases.
Wooden dowels with a diameter of 25-30 mm Convenient to cut from round cuttings for tools. Such cuttings are made from hardwood. It is recommended to chamfer the lower end of the dowel - it will be easier to drive the dowel into the hole.
You can cut 25x25 square dowels from a regular “inch” board mm. One end of the workpiece is chamfered. Such pins are driven into a hole made with a drill with a diameter of 24 mm.
The ribs of such a dowel, made of relatively “soft” coniferous wood, become crushed when hammered in, the wood becomes compacted, ensuring a fairly tight fit of the dowel in the hole.
How to properly drill holes in timber for dowels
The depth of the holes in the wall for installing dowels must exceed at least 4 cm. dowel length. Moreover, the hole must be free of chips.
To drill holes in timber that are deep enough and have a large diameter, a low-speed electric drill (drill) is usually used. The passport of a power tool usually indicates what diameter of drilling in a particular material the drill is designed for. Given the large drilling depth, it is better to choose a drill with a power reserve.
To drill holes in timber, it is convenient to equip the drill with a stop, as shown in the figure.
 The stop block is attached to the drill with steel clamps.
 The stop, in the form of a wooden block, is attached to the drill, for example, with clamps. The stop stops drilling at the required depth, but the rotation of the drill does not stop after that. Continuing to rotate in one place, the drill clears the hole from chips, grinds in and then easily comes out of the deep hole.
It is convenient to drill holes for connecting the crowns in a beam that is already installed on the wall in the design position on the inter-crown insulation. But here it's usual A problem arises - the crown gasket cannot be drilled. The fibers of the spacer material simply wrap around the drill bit and clamp it.
You have to install the beam on the wall in two steps. First, the timber is mounted without a gasket and temporarily secured from displacement, for example, with nails. Drill holes for dowels. Then the beam is moved from the wall and inter-crown insulation is laid.
At drilling sites cut the gasket with a sharp knife. Then, the removed beam is put back in place, this time on the gasket, and secured with dowels.
Drilling holes in timber laid on a wall should be done while standing on a solid foundation - scaffolding, scaffolding, flooring. Standing on a narrow wall and drilling is dangerous. The drill can “bite”, a powerful drill will turn around and easily throw the worker off the wall.
How to make a straight wall from crooked timber
Some of the timber delivered to the construction site may be bent. The beam can have a curvature in one plane, or it can be twisted with a screw and become diamond-shaped in cross-section.
If possible, it is better not to use curved beams for the walls of a house or bathhouse. It is recommended to cut beams with curvature into smaller pieces and use them in other, less critical places.
A small amount of timber that has curvature in one plane can be used to mount walls. You should not lay such a beam into a wall with its convexity up or down, in the hope that it will straighten under the weight of the house - the beam will not straighten, even if it is placed in the lower crowns.
The curved beam is laid in the wall, straightening it in a horizontal plane as shown in the figure.
 The crooked beam is straightened sequentially by fixing it with dowels
 The curved beam is drilled, aligning it with the straight beam at the drilling points. After laying the inter-crown insulation, the curved beam is fixed with dowels at one end and, when unbent, is sequentially fixed with dowels at other points.
Unbending the beam does not require much effort. A lever and bracket will help make work easier
Inter-crown gasket - insulation, sealant
For cold protection, a gasket is placed between the crowns. Previously, moss or flax tow were used for this. Currently, special cushioning materials based on flax wool or flax jute are available for sale. The material is sold in the form of a roll of tape with a width of 20 cm.
A strip of cushioning material is laid along the entire upper edge of the beam in two or three layers and secured with staples using a construction stapler.
If the wall is not sheathed, then the gasket should be 1-2 inches from the outer edge of the beam. cm., otherwise it will get wet.
Some craftsmen lay the cushioning material in one layer and suggest caulking the joints after the frame shrinks, adding additional material to the voids of the joints. In this option we have less consumption of cushioning material.
The work of caulking joints is quite labor-intensive and tedious. It is better to immediately lay a thicker sealant, in several layers (three layers), to eliminate the need to caulk horizontal joints.
How to control the correct assembly of a log house
During the construction of a house or bathhouse, it is necessary to regularly check the correct assembly of the log frame. To do this, it is enough to control the following five parameters:
- Verticality of corners.
- The height of corners and walls.
- Horizontality of the crowns and upper edges of the timber.
- Straightness of walls.
- The quality of installation of inter-crown insulation.
For control of vertical angles The following method is used.
 To control the verticality of the angle, a vertical line is applied on each side of the crown. 1
— lower trim; 2
- crowns; 3
— control lines; 4
- base.
To control the verticality of the angle, a vertical line is applied on each side of the crown. 1
— lower trim; 2
- crowns; 3
— control lines; 4
- base. On each side of the crown, a vertical line is drawn at the same distance from the corner edge.
When laying the crowns correctly, this line should be straight and coincide with the vertical. The verticality of the line is checked with a plumb line.
If deviations are found, the work is suspended and the cause is eliminated.
The height of corners and walls is measured roulette. The measurement is taken from the base horizontal line, which is applied to the strapping beam using a water level.
Horizontality of crowns and top faces timber is checked by level.
Straightness of walls determined visually by pulling a cord along the wall.
The verticality and height of the corners should be especially carefully and constantly checked. Deviations from verticality are eliminated, up to the replacement of the timber in the crown. The height of the corners is adjusted by increasing the thickness of the gasket between the rims in the sagging corners. Sometimes it helps if you tap a sledgehammer on a beam in a high corner.
The quality and thickness of the installation of inter-crown insulation is checked visually by inspecting the walls.
Window and door openings in a log house
From the second crown they begin to form doorways. The distance from the floor level to the window is chosen in the range of 70 - 90 cm.
Laying timber in crowns in the area of openings has its own characteristics.
 A
- layout of openings in the wall, where: 1
- wall; 2
- door opening; 3
- pier; 4
- window opening. V
— diagram of timber cutting, where c is the remainder of the cutting. G
- option for constructing an opening in a log house with the installation of temporary fastening bars, item 7. d
- option with installation of decks in the opening, item 6 - we immediately get an opening ready for installing a door or window.
A
- layout of openings in the wall, where: 1
- wall; 2
- door opening; 3
- pier; 4
- window opening. V
— diagram of timber cutting, where c is the remainder of the cutting. G
- option for constructing an opening in a log house with the installation of temporary fastening bars, item 7. d
- option with installation of decks in the opening, item 6 - we immediately get an opening ready for installing a door or window. In practice, two options are used for forming openings when assembling a log house.
One option is " G" in the picture. The opening is made in rough form; only preparations are made to create the opening. The opening is not prepared for the installation of doors and windows immediately when assembling the log house. This work is left for later - usually done after the frame has shrunk.
This option allows you to speed up the assembly work of the log house. Beams must be installed in the opening to fasten the partition to the log house, item 7 in the figure. At least two such beams are installed in the doorway.
During the shrinkage of the log house, the piers can “lead” inward or outward. To prevent this, timber in the walls is fastened with vertically installed boards.
In another version - " d"in the figure, the openings are immediately prepared for the installation of doors and windows. To do this, install decks (windows) in the openings - a vertical beam with a groove, item 6 in the figure. The tenon of the wall beam fits into the groove. In this way, the partition beam is fixed from displacement. In this option, the openings are immediately ready for the installation of doors and windows.
Decks (jambs) traditionally serve not only to connect timber in the opening, but also serve as window slopes and window sills. To do this, they are carefully processed and chamfered.
 Option for installing a window in a wall made of timber: 1 - finishing the window slopes; 2 - a vertical frame board with a tenon strip, fits into the groove of the wall beam; 3 — plastic window frame; 4 — PSUL sealing tape
 In modern conditions, when installing plastic windows and constructing plastic slopes and window sills, you don’t have to make a deck (window frame). The beams in the opening are fastened like this. At the ends of the beams along the entire length of the opening, a vertical groove is cut out and a rail is inserted there, which secures the pier beams from displacement.
The length of the deck (plug) or slats should be less than the height of the opening by 5-7 cm so as not to interfere with the shrinkage of the log house.
Timber for home, bathhouse in your city
How to properly install windows in a wall made of timber
If the opening in the wall was made in a rough version (see above), then the installation of the window begins with cutting out the opening to the desired size. To do this, a lath is filled along the edge of the cut, item 2 in the figure, and the beams are sawed off along the edge of the lath with a chain saw.
 Correct installation of a window in a wall made of timber. 1
- wall; 2
- rail; 3
- platband; 4
- window; 5
- window box; 6
- wall beam above the window; 7
— interventional insulation; 8
— shrinkage gap above the window and deck; 9
- window frames; 10
- wall beam (pier); 11
- deck; 12
- nail.
Correct installation of a window in a wall made of timber. 1
- wall; 2
- rail; 3
- platband; 4
- window; 5
- window box; 6
- wall beam above the window; 7
— interventional insulation; 8
— shrinkage gap above the window and deck; 9
- window frames; 10
- wall beam (pier); 11
- deck; 12
- nail. Then, using a circular saw, tenons are cut out at the ends of the wall beams (wall). The deck, pos. 11, is placed on the tenons, pos. 10, with a groove. The joints are sealed with insulation. The deck is nailed to the wall beam with nails driven in at an angle, pos. 12. This way the nails will not interfere with the shrinkage of the frame.
A window frame is inserted into the opening prepared in this way, which is attached to the deck with self-tapping screws. Above the window box be sure to leave a gap, pos. 8, to compensate for the shrinkage of the log house. Gap size 5-7 cm. The gap is filled with soft insulating material.
An expansion gap must also be left above the upper end of the deck.
Openings are prepared in the same way and doors are inserted into the walls made of timber.
After completing the assembly of the first floor of the house, the log house is covered with beams of interfloor or attic (if the building is one-story) floor.
Can be a structural element. And they can also perform an independent function.
The next page describes the structure of a broken roof of a house made of timber, where the floor beams simultaneously serve as an element of the load-bearing frame of the attic roof.
Watch the video clip, which describes and shows in some detail the technology for installing a log house from construction timber.
Houses built from profiled timber are popular, and this is no coincidence. Among the main advantages of the house, it is worth highlighting the speed of installation, since during the construction process the structure is assembled in a short period of time. To build a house from profiled timber with your own hands, you must follow the advice of experts.
Initial stage of construction

First of all, a design project is drawn up. In the process of drawing up a plan, it is important to take into account all the nuances that will affect the cost of materials and work. You can make a plan yourself or turn to professionals who know their business and can do the job.

When harvesting wood yourself, it is worth considering the fact that it is better to do this during the cold period. Wood should take a long time to dry. But in cold weather it is better to refuse work, as wet wood becomes brittle.
To build a house, you need to use wood with a moisture content of no more than 20%, otherwise it will warp and cracks will appear in the walls.
When choosing wood, it is important to give preference to a material without cracks. Next, the log is cut and treated with an antiseptic. If desired, you can purchase wood that has already been processed, in which grooves will be cut. As a result, folding the house will not be difficult.
In order to understand how to do a quality job, it is important to follow the rules.
We are building a house

Building a house must begin by determining the type of foundation needed. For this purpose, it is necessary to study the occurrence of groundwater, become familiar with the structure of the foundation of neighboring houses, as well as the composition of the soil.
For a wooden structure, a pile, columnar or strip shallow foundation is considered an excellent option.
Strip foundation device

- Work begins by marking the boundaries of the foundation along the internal and external corners of the future building with a cord and pegs.
- After marking, it is checked. To do this, the diagonals are measured - they must be the same.
- Next, following the markings, they dig a trench about a meter deep.
- Geotextiles can be laid at the bottom, and thermal insulation material can be installed along the outer edge of the trench - this will protect the shallow strip foundation from freezing.
- Fill in pre-moistened sand, a layer of which reaches 10 cm, and compact it.
- After this, the same layer of sand is poured and compacted again.
- The top is covered with crushed stone, maintaining the previous thickness (10 cm). This cake needs to be thoroughly compacted.
- Formwork being made. You can assemble it yourself or order it from specialists. The first option assumes the presence of wood in which there are no cracks. It can be made non-separable using fiberboard boards. Custom formwork must be made of plastic or steel. The formwork is placed in the trench and leveled. Strength can be increased using a frame made of Ø 10 mm reinforcement. Experts recommend using two reinforcement belts. They cannot be placed at a distance closer than 3 cm from each other, but they should enter the trench freely, without touching its edges.
- The formwork is moistened with water and concrete is poured.
- If the formwork is made of wood, it needs to be moistened with more water. Otherwise, the wood may absorb moisture from the cement mortar, and it is even better to cover the boards with plastic wrap.
- The formwork can be removed after a few days, after the solution has dried.
- Extruded polystyrene foam boards, 5 cm thick, are used as insulation material. The foundation at the corners is insulated with a layer of 8 cm.
- The sides of the foundation need to be tarred.
- The surface of the foundation is insulated with roofing felt, laying it in 2 layers.
- The excavated soil is backfilled.
Construction of the floor

For the walls, a beam with a section of 150×150 mm is required. After laying the first row, it is treated with an antiseptic. Floor joists are also installed, which are laid on edge. The cross-section of the beam should be 100×50 mm. They can be placed on the foundation and attached to the walls of the structure.
Two logs are placed on walls opposite each other. A construction thread is pulled between them, maintaining a distance of one and a half meters. The threads will indicate the level at which other logs can be set and mounted.
The gaps formed between the lags are filled with insulation, which is used as polystyrene foam, mineral wool or polystyrene foam. If the boards intended for laying the floor reach a thickness of 40 mm, the distance between the lags should be about 80 cm. The height of the lags is adjusted using wedges made of thin plywood, which are secured with self-tapping screws or long nails. Logs and wedges are secured to a wooden base with wood screws or long nails. When installing logs on a concrete base, dowels or anchors are used.
Now you can attach the boards. The best option would be boards with a cross section of 25×150 mm. To do this, you need to step back 1 cm from the wall and strengthen a row of boards, focusing on the thread. If the boards will be fastened with self-tapping screws, a hole is drilled for them, after which the board is attached to the joists. The subfloor must be covered with a layer of thermal insulation and waterproofing. For this, polyethylene or penofol is used. A wooden flooring made of tongue and groove boards is laid on the subfloor.
Walling

During the work process, the beams are laid out one by one. At the same time, they are fastened together with dowels, which prevent the timber from moving. The material for dowels is wood or metal.
It is better to purchase wooden dowels, as metal ones can rot.
- In order to build walls using dowels, you need to drill holes in the logs into which they will be inserted. In this case, the diameter of the hole will be 4 cm. The distance between the holes should be 1.5 m.

- When laying beams, it is important to lay insulation between them. For partitions, you can use timber with a cross-section of 100×150 mm. They are carried out only after the construction of the log house is completed.
- You can reduce the cost of your home by building internal frame walls. To do this, create a frame from bars, the cross-section of which is 50x50 mm, and cover it with clapboard.
- To make the house fireproof, it is coated with a special product, which is applied with a regular brush or using a spray bottle.
- Installation of windows is carried out only after shrinkage of the structure. You can give preference metal-plastic or wooden windows.

The most suitable option is considered to be ondulin, metal tiles or corrugated sheets.
- First of all, before laying the Mauerlat, the wall is insulated using waterproof material. This is necessary in order to preserve the timber from rotting. Roofing felt, which is placed in a couple of layers, is suitable as an insulating material.
- Then they attach the Mauerlat, which is presented in the form of a beam. The best option would be hardwood treated with an antiseptic. This material will be an ideal support for wooden rafters. The beams are laid using a level along the entire length of the walls, from pediment to pediment. To secure the Mauerlat, you need to use a 12mm drill, the length of which reaches 300 mm. The Mauerlat is drilled and entered to a depth of 200 mm into the wall of the house. They take the cut reinforcement using a sledgehammer and hammer it into the drilled holes. The ends of the reinforcement can be bent.
- Install beams then the rafters. Lastly, the sheathing.
- After the walls are erected, ceiling joists are installed. At the same time, their ends protrude beyond the edge of the wall by 50 cm. The cross-section of the logs should be 50×100 mm. They are laid out on edge. The distance between them is 90 cm.
- A rafter structure is assembled, the basis of which is boards with a cross-section of 50×150 mm. This system should be strengthened as much as possible with crossbars and braces.
- Fronts made of timber with a cross-section of 150×150 mm are laid.
- To the rafters nail the sheathing(section 25×150 mm).
- To prevent condensation from accumulating, a vapor barrier is made with a layer of waterproofing, after which the roofing material is installed.
How to insulate a house made of timber

To save money in the future heating, it is important to pay attention insulation of the house. External thermal insulation occurs by reducing the moisture content of the beams. The most popular finishing option is clapboard finishing. You can also use mineral wool, flax jute fiber, glass wool slabs. The latter option is laid using a foil vapor barrier layer. Thus, the heat will be directed indoors.
It is not recommended to use polystyrene foam when insulating a house made of timber, as it prevents the evaporation of moisture from the wood, which can lead to rotting of the material. It is better to use a membrane vapor-permeable layer.
For cladding walls inside the house you can apply clapboard or drywall.

Many people mistakenly believe that a house made of profiled timber does not shrink. It is, of course, not so big, but it is important to remember this and not install windows and doors rigidly.
The step-by-step instructions provided will allow anyone to cope with the work, even those without experience in this type of construction.
Video
This video demonstrates the assembly of an eco-friendly house from profiled timber:
Watch a video about which timber profile to choose for a house under construction:
Photo


Despite the widespread development of multi-storey residential and administrative buildings using concrete, glass and metal, classic wooden houses remain popular. Timber has proven itself to be one of the most reliable options when building a wooden house. The opportunity to build a house from profiled timber with your own hands exists for everyone who has the appropriate desire and is ready to acquire building materials for the upcoming work. If you combine enthusiasm with competent planning and a responsible approach to each stage of construction, success is more than guaranteed!
Advantages of profiled timber as a material for the home
Profiled timber is a building material produced by processing coniferous trees: spruce, larch, cedar, pine. The inner side of the beam is a smooth, polished surface, while the outer side can be either round (imitate a log) or have a different shape, and also follow the contour of the inner side, being completely flat.
There are grooves and tenons on the side that serve as joining elements for individual beams. The consumer's choice often falls on timber, not only because of its reliability indicators, which have been confirmed for decades, but also due to the fact that the timber is environmentally friendly, since no glue is used in the manufacturing process.
Another advantage of profiled timber is its very good heat capacity and thermal insulation. This allows any resident and guest of cobblestone houses to always feel comfortable in them. What is important is that, with all its advantages, timber is not a very expensive material compared to its analogues on the market and, in the price range, seems feasible for purchase by the majority of those interested, even with an average income level.
With the help of the elements already prepared on the beams for fastening, it will be relatively easy to assemble a house from them. But do not forget that profiled timber is a wood-based material, and, like any wooden object, it can present unpleasant surprises in the form of fungus or mold contained on it. Of course, this can be avoided by timely treating the timber with special mixtures to protect the surface from the effects of negative environmental factors.
Profiled timber has practically no problems with cracks, but circumstances vary, so if damage to any timber element is detected, repair work should be carried out immediately, since cracks in the timber gradually expand. This is especially true for floors and ceilings made using timber.
If a cobblestone house is located in a region with a permanently cold climate, it is also worth taking care of additional insulation of all its elements.
The initial stage of building a house made of timber

The initial stage of building any house is drawing up a project; a house built from profiled timber with your own hands is no exception. If you still don’t have the desire to use the services of a construction company, you can draw the project yourself. In this case, you should immediately understand that the best period when you can start construction will be the winter season. When harvesting wood in the cold and then drying it for a long time at home, the timber will be of the highest quality and will shrink evenly. However, you should not abuse weather conditions - excessive frost will make the timber brittle.
As an option, you can purchase ready-made beams in accordance with individual requirements for the building material. In this case, the grooves will already be cut, and building a house from profiled timber will become simple, as if you just need to put together a children's construction set.
House foundation made of profiled timber

Before you begin the process of laying the foundation for a future log house, you need to familiarize yourself with the conditions of the area where it will be located, find out on what basis the foundation of neighboring houses is made, especially if they also use profiled timber as a basis.
The ideal option for a house made of timber would be a strip foundation of the following types:
- with shallow recess;
- columnar;
- pile
The construction diagram of a strip foundation with a shallow recess is as follows:
- Marking: marking all the edges of the building and connecting them using cord, for a more voluminous look. Thus, you will already have a relatively accurate version of the structure’s location before your eyes;
- Digging a hole for the foundation. The depth should not exceed 0.6 meters, so as not to reduce the stability of the house in the future. Next, the bottom of the resulting trench must be covered with a layer of sand (about 10 cm), and sprinkled on top with a layer of crushed stone of approximately the same thickness;
- Production of formwork or ordering one. When making it yourself, it is necessary to use the best wood as a basis, without seams and deep cuts; if the choice fell on custom formwork, then it is better to choose the steel option. The formwork is installed and leveled in the very center of the trench;
- Laying the frame and reinforcement in at least 2 belts;
- Insulation, hydro- and thermal insulation using special materials: polyurethane foam, roofing felt, etc.
The floor in the house is made of profiled timber

The construction of each building begins with the creation of a row for subsequent laying on an already processed and leveled waterproofing foundation. For the floor, timber with a cross-sectional size of 100*50 millimeters is used. After the first row of the floor is ready, it must be treated with an antiseptic substance to increase the material’s resistance to negative environmental factors. Next, the floor joists are mounted and laid on the edge.
After the logs are laid, they will need to be left in this condition for 1-2 days to adapt to the ambient temperature. The logs are laid according to a guideline, which can be set as follows: between the logs initially fixed at two opposite walls, a tie made of nylon thread is made every 1.5 meters.
Advice! The gaps that will form between the lags can later be used to fill with insulation. It is best to use polyurethane foam or mineral wool for this.
After laying the logs, the installation of the subfloor and installation of floor boards follows. It is laid in various ways: with or without offset. It is necessary to first lay the initial layer, and then lay the wooden flooring on it. Don’t forget about waterproofing: it will be laid on the rough foundation of the future floor. Penofol or dense polyethylene are perfect for this.
Finally, you need to lay the floor, for which any material is suitable, for example, a tongue-and-groove board 3.6 centimeters thick.
Walls in a house made of profiled timber

The scheme for constructing the walls of a cobblestone house from profiled timber with your own hands is simple: you need to sequentially lay out rows of beams, and each next row is joined to the previous one using vertical connection pins - dowels. The dowels are installed according to the brick laying method: through 2-3 rows, one after another. For dowels, several holes are drilled, up to 3.5 centimeters in diameter, at a distance of 1.5 meters from each other.
It will be necessary to cut out a protrusion in one of the beams, and a groove of the appropriate size in the second. In some layers, grooves and tenons alternate with each other, which makes the structure much more durable and eliminates blowing from the corners.
When the dimensions of the structure being constructed exceed 6*6 meters, at least one partition must be placed on the ground floor - it will provide additional support for the floor of the upper floor.
The last point is that in those places where windows are installed, you will need to cut out technological openings. Air will move through them while the material dries, and when the house finally settles, it will be possible to install windows. Metal, plastic or wood can be used as material for window blocks.
Houses made of profiled timber are a modern take on wooden architecture. The technology is appreciated abroad, where it has been used for many years. Now it has gained wide popularity in Russia, which is facilitated by ease of construction and comfortable living. Such structures can be erected by ordering turnkey construction from a specialized company or by doing the installation yourself.
The secret of success lies in the specific properties of this building material. It is being manufactured made from natural wood and dried under industrial conditions. The most common material is pine, spruce, larch, but you can also find timber from hardwood - oak, aspen.
Its main difference from ordinary timber is the presence of a profile on both sides (along the entire length), providing a locking connection using the tongue-and-groove system. The installation of structures from it is carried out according to the principle of a children's construction set, joining the elements together.
Basic advantages of the indicated houses:
- environmental cleanliness;
- simplicity and speed of installation work;
- high thermal insulation parameters of the material;
- low shrinkage when using well-dried timber;
- aesthetic appearance, related to nature;
- reasonable cost of materials and all construction;
- maintainability;
- possibility of using all kinds of finishing and facing materials.

- low moisture resistance;
- tendency to rot;
- cracking under certain loads and freezing of moisture;
- shrinkage phenomena during operation.
The durability of the cobblestone walls of a wooden house depends entirely on protective measures - impregnation with anti-rot composition and reliable waterproofing.
Important. We should not forget that wood is a highly flammable material, which requires appropriate treatment with non-flammable agents.
Design stage of construction
Any capital construction begins with several important activities.
Design
Documents
Capital construction can only be carried out if the necessary technical documentation:
- Foundation plan drawing based on calculations and soil characteristics (groundwater level and freezing), with specifications for the need for materials.
- Plan of the entire structure based on the previous document.
- A detailed plan with a floor breakdown, placement of rooms and capital elements (stove, fireplace, staircase, etc.).
- Detailed plan of paving walls with planking and cutting in the main areas.
- Specification of individual parts of the structure.
- Roof drawing with details of the rafter system and roofing covering.
- General view of the house from the outside.
Carrying out calculations of timber for a house
 It is very difficult to calculate the required cross-section of a beam taking into account the loads, and therefore when choosing the size of a beam for walls, use the following standards:
- outbuildings and small dachas – 10x10 cm;
- standard houses for permanent residence, baths - 15x15 cm;
- large houses and elite class cottages – 20x20 cm.
The amount of lumber is calculated based on a detailed plan of walls with planking. The required volume of timber (V) for wall masonry is determined as the product P*H*b,
where P is the complete perimeter of the house with all protrusions (m), H is the height of the walls (m), b is the width of the beam (m), minus window and door openings.
The number of beams is determined as V/(b*h*l), where b is the width, h is the height, l is the length of the beam (m). The specific length of the beams is determined by the planking of the walls.
Foundation
The laying and construction of the foundation is carried out in the following order:
- Type selection foundation - strip or columnar (pile). For residential buildings, the strip version is most suitable. When constructing small structures, preference is given to columnar support.
- Size calculation foundation. At the design stage, the depth of the foundation and the width of the tape (area and number of pillars, piles) are determined. For houses made of timber, a shallow foundation is built with a depth equal to the level of soil freezing (most often 60-80 cm).
- Digging a trench or hole for pillars. Backfilling the cushion with sand and crushed stone.
- Wooden installation formwork.
- Laying of reinforcing elements from steel rods with a diameter of at least 12 mm. Linking them horizontally and vertically.
- Fill with careful compaction using a vibrator.
- Overlay waterproofing and thermal insulation. A layer of roofing felt is laid on top of the pillow. The side surface of the foundation is covered with bitumen and then with roofing felt. Thermal insulation of the side walls is made of, or.

The construction of walls begins after concrete curing, i.e. no earlier than 7-10 days after pouring.
Construction of a house
The construction of walls begins with the installation of the box, as it is commonly called the first crown of the log house. It uses timber with a size exceeding the size of the main elements. Typical projects involve the use of timber 15x20 cm. This detail of the house should be especially carefully be treated with an antiseptic. In addition, it is recommended to use larch timber.
Work order:
- Laying roofing felt waterproofing over concrete.
- Fastening metal pins in concrete to fix the lower crown of the frame.
- Installation of larch backing board around the entire perimeter of the house.
- Installing the prepared beams on the pins, forming the frame of the box.
- Checking horizontality using a building level.
Subfloor installation
The subfloor or floor covering is made of wooden logs, which are fixed to the frame of the house. A groove is cut out on the lower beams to match the size of the lag. Soundproofing is placed on the bottom of the groove, rubber gasket. The log beams are laid parallel in increments of 40-60 cm. If the ceiling is high above the ground, then support frames are installed.
 Between the joists it is laid waterproofing from roofing felt or polyethylene film and laid insulation.
Most commonly used expanded clay, ash or sawdust. You can use mineral wool or polystyrene foam.
A subfloor made of boards at least 25 mm thick is laid on top of the logs.
The first board is fixed at a distance of 1-1.5 cm from the wall, forming a damper gap.
Wall assembly
Walls are built by alternate laying of crowns along the entire perimeter of the house with the formation of openings and the allocation of internal, intermediate walls. There are several construction nuances that will be highlighted below.
Timber splicing
You can reliably connect the bars end-to-end in the following ways:
- Straight rim lock. It is formed according to the “half-beam” principle, but in addition a tongue-and-groove connection is created. The total length of the joint is (3-4)h.
- Oblique rim lock. The beams are joined along an inclined plane (at an angle of no more than 40 degrees), on which the step is made. The length of the connecting section is (3.5-5)h.
- "Dovetail". A tongue and groove of a corresponding trapezoidal shape are cut out at the ends of the beams.
- Tongue connection. At the ends of the beams, grooves are cut in the center, into which, after joining, a wooden tongue is driven.
To strengthen the connection, joining surfaces covered with glue. Additionally, it can be reinforced with screws or nails.
Gusset
Forming the corner of the house is considered an important operation responsible for the reliability and appearance of the entire log house. That is why this element is normalized GOST 30974-2002.
The following methods are provided:
- Butt (butt). This is the simplest, but least reliable connection. The end of the beam simply rests on the side edge of another beam. The next crown closes the connection.
- “Half a tree” or “half a beam”. Exactly half of the timber is cut out at the ends of the joining elements, and then these sections are joined.
- "Warm Corner". The previous options create through channels where cold can penetrate. Elimination of “cold bridges” can be ensured by forming a connection using the “ root thorn», « dovetail», angle with remainder. In the first case, the tenon and groove principle with a rectangular profile is used. Dovetail has the same principle, but the connection elements are trapezoidal in shape. When creating a corner with a remainder, one beam is cut into another, and their ends are brought beyond the surface of the wall.
Formation of the wall
The insertion of the wall into the main crowns of the log house can be achieved in the following ways:
- Root Thorn T-shape.
- « Dovetail».
- « Into the bowl" This joint profile is cut in production conditions. When purchasing a complete set of beams for a typical house, the connection is made according to the instructions.
Fastening timber with dowels
 The crowns of the log house are fastened during installation using wooden dowels. They are a wooden rod with a diameter of 16 - 22 mm and a length of 1.5 - 2 times the height of the beam.
The diameter of this element should exceed the size of the hole in the bars by 3-5 mm. The installation of dowels is carried out taking into account the following nuances:
- A hole is drilled in three beams. It should start in the middle of the lowest beam, pass through the middle crown and end in the middle of the third beam.
- The dowel is driven into this hole with a mallet, connecting the 3 crowns together.
- The first hole is drilled at a distance of at least 20-25 cm from the end of the beam. If it is located closer, there is a risk of wood splitting when driving in the dowel.
- The dowel installation pitch is 1.4-2.2 m.
- The dowel should not reach the bottom of the hole to ensure shrinkage.
Insulation options during installation
The seam between the crowns is the area of probable " bridge of cold", which requires insulation. It is believed that you can do without it only if using a “German comb” as a lock profile. But even in this case, it is better to caulk the seam externally.
In other options, heat-insulating fibrous material is placed in the groove along the entire length of the beams - jute, linen. The thickness of such a gasket should not exceed 5-8 mm.
Roof
The roof of a house made of timber is made on the basis of a rafter system and, as a rule, has a gable design.

The following stages are distinguished:
- Installation of ceiling beams. For this, a 15x10 cm beam is used. The beams cut into the upper crown of the log house. The insertion points are reinforced with dowels or anchors. The beam installation step is 60-80 cm.
- Installation of rafter legs. For rafters, timber 10x10, 15x5 or 10x15 cm is used. The angle of the roof slope depends on the intensity of precipitation and the type of attic. At the top, the rafter triangles are connected by a ridge. Braces, crossbars, and racks are used as reinforcing elements. The installation pitch of the rafters is 80-100 cm.
- Lathing. It is made from unedged boards, which are fixed to the rafters.
- Roof waterproofing. Roofing felt is laid on top of the sheathing. If a warm attic is being built, then insulation (mineral wool) is applied under the waterproofing.
- Roofing installation.
- wooden flooring, draft ceiling. Laying thermal insulation and vapor barrier. Subfloor, attic flooring.
Installation of individual elements
When building a house, it is impossible to do without some specific elements. They create certain nuances in the work process:
- Window and door openings. These openings are formed by installing a suitable wooden frame. A compensation gap is left between it and the wall, which eliminates the risk of deformation of windows and doors during the natural shrinkage of the structure. This space should not be filled with foam. A suitable material is considered to be fiber insulation in a vapor-proof wrapper.
- Vertical elements. These include columns and various support posts or pillars. To avoid destruction during shrinkage, they are placed on an adjustable base (jack).
- Roofing parts. To compensate for the shrinkage load in the rafters, a sliding element is provided at the point of their attachment to the frame. In some cases, the possibility of slipping is also provided in the area of the ridge.
- Ladder. It is installed to enter the attic (attic) or in a two-story house. It is recommended to carry out final installation after complete shrinkage of the wooden structure (after 10-12 months). The load-bearing element of the staircase is a bowstring or stringer, which is fixed between the floor and ceiling (interfloor) ceiling.


