This drawing of cardboard virtual reality glasses is based on a sample published in the New York Times in November 2015. An updated version of DIY Cardboard allows you to use larger phones and a button to control your phone instead of magnets.
You can download the drawing from this link.
You will need:
- Cardboard paper measuring 5cm by 7.5cm, thickness 2mm. I used a shoe box and a pizza wrapper.
- A pair of biconvex lenses with a focal length of 45mm, with a diameter of either 25mm or 37mm. There is not much difference, but 25mm is cheaper and easier to get. For example, you can order if the delivery time does not bother you.
- Copper foil for button.
- A small piece of dense foam/sponge (about 6.3mm by 6.3mm by 2.5mm), like the kind you use to package electronic devices.
- Cutting tools.
- Glue. It is better to use a glue stick.
- Velcro (about 7.5cm, cut into 3 pieces)
- Metal ruler
- Cutting board or other work surface.
Step 1: Glue the template and cut out the outer parts


Cut out and cover the cardboard with paper. You should have two large pieces (1 and 2), two small ones (3 and 4) and a button. Don't cut out the internal parts, such as the holes for the lenses, just yet.
Step 2: Fold


Determine and lightly mark the fold lines with a pencil, and then, holding the edge of the ruler to the line, fold the cardboard towards you, unless instructed to do the opposite, such as a moving flap with a button (see fold directions on the template).
Step 3: Adjust and customize

Adjust the pleats and cuts to make sure everything matches up. Pay special attention to the part where your eyes will be looking and the front of the glasses where the phone will be inserted.
Step 4: Cutting the Inner Holes

I suggest you cut holes in the outer layer first and make sure those holes line up with the inner layer when they are folded and assembled into their final position, because depending on the thickness of your cardboard and your cutting skills, the cardboard pieces may be a little misaligned. when the pieces are put together.
Step 5: Add a Button

The button is a “pyramid” attached to a movable flap that you can press. At the top of the pyramid there will be a sponge (for a soft touch) placed over a conductive copper foil strip to transfer a small current from your finger to the screen. If you want, you can skip this step and operate the phone manually through the nose hole. On the flap, bent inward, we glue the button at a distance of about 5mm from the place where the phone will be located.
Step 6: Color if desired

If you want to color your cardboard VR glasses, now is the best time. It is better not to paint the surfaces that you will glue.
If you don't want to paint your glasses, cover the cutout under your nose with tape, because while watching, the cardboard will become greasy around the nose and then everyone will be sure that your glasses are made from a pizza box.
Step 7: Glue the sponge and copper tape


Cut a piece of copper foil the width of the sponge and glue it as evenly as possible. Then cut a strip 5cm long and wrap it around the bottom of the sponge, over the top of the pyramid to the base. (Tip: It's best to peel off the foil a little at a time as needed as it tends to curl, wrinkle and stick to itself) Then cut another piece about 12cm long and attach it to the base on top of the moving flap.
Step 8: Insert the Lenses


Glue the inner (3) and middle (2A) parts that form the front surface and insert your lenses with the curved side forward (towards the phone screen). Then glue the outer panel (1B), making sure they fit together well when folded.
Step 9: Final Assembly


Glue part 4 inside part 1B, making sure you don't glue the button flap (in the first photo I'm pressing it loosely). If the flap does not snap into place, carefully trim the 3 loose edges as necessary. The final look will be the same as in the second photo, except for the still missing part with the button.
Fold the top of the phone section, lining it up with the outer layer of the phone section (2A) and glue it down. Next, fold and glue two pairs of small side panels (my finger is on the right one so you can see it).
The large side panels 2B and the phone cover 1A are not glued together as they will use Velcro to hold them in place.
Step 10: Installing Elastic Bands and Velcro


Velcro holds the front panel and foldable side panels. Basically, if you are not going to lay out the glasses, you can glue the side panels. If you carefully cut out the Velcro and holes for them, they will fit flush.
The rubber band is necessary to prevent your phone from sliding sideways.
Download the virtual reality app and insert your smartphone. If you wish, you can use a head strap, but for complete immersion it is highly advisable to use headphones.
I love the guys from Google. Well done they. Properly placed, enlightened brains and good motivation can sometimes squeeze absolutely brilliant ideas out of a person. Simple as 3 kopecks and at the same time absolutely stunning. An example of such a brilliant, stunning idea is undoubtedly the Google Cardboard virtual reality glasses.
Everything ingenious is simple - a piece of correctly folded cardboard, two cheap lenses, a smartphone with a large screen and a set of sensors - here you have virtual reality glasses. Considering that many people already have such a smartphone in their pocket, the price of the issue is only 150 rubles and 2 hours of free time for assembly and gluing.
It would seem somehow simple... But it works! And how! Games in 3D, movies in 3D, educational applications and virtual travel - please! With the simplicity, genius of the approach and the price of the issue, Google has outshone all the developers of all sorts of Oculus Rifts and so on. The same virtual reality, only almost free. It may look unsightly, but it works. And the appearance, if desired, can be plastic-licked, just look at the famous Chinese website - there are a lot of analogue options, price tags from 700 rubles onwards, with different functionality, adjustments and holes for air...
Any smartphone running Android 4.1 Jelly Bean and higher, iOS 7 and higher, or Windows Phone 7.0 and higher, with a screen diagonal of at least 4.5 inches, is suitable for glasses. The smartphone must have the following sensors: gyroscope, accelerometer, magnetometer (digital compass). IMPORTANT! The gyroscope and accelerometer are required for most applications to work, otherwise you will only be able to watch 3D movies. It is impossible to evaluate virtual reality without a gyroscope and accelerometer.
I recommend that everyone who has such a smartphone try this thing. Believe me, it's great. For those who don’t want to bother with cardboard and scissors, I can recommend buying a ready-made Google Cardboard on aliexpress.com. For those who are not looking for easy ways, you are welcome here, I will tell you how you can do such a thing quickly and without pitfalls.
There are currently 2 versions of Google Cardboard. I will tell you how to assemble the second version a little later, in a separate post, but now we will talk about the easiest to manufacture - the first version. Google, like a true good corporation, did not skimp and made all the information on this invention publicly available.
So, what do we need to make this wonderful device:
1. Sheet of hard cardboard. It is best to use micro-corrugated cardboard, which is widely used for making boxes, containers, packaging, etc. It looks like this:
 |
 |
 |
Personally, I used cardboard, from which a stationery box for papers is bent with cunning manipulations. This box is sold in office supply stores in the form of a flat cardboard sheet (it is suggested that you bend the box from it yourself). The cardboard is good, about 2 mm thick (I don’t recommend taking thicker), it cuts perfectly with a stationery knife and bends without much difficulty. Here's what it looks like:

However, you can use any packaging, even pizza. A motherboard box, for example, works well. The main thing is that the cardboard is dense and not thick (2-3 mm maximum), otherwise problems with dimensions will begin.
2. Cutting template points, printed on regular A4 stationery paper (3 sheets are needed). This template can be found on the Internet, or downloaded here:. This pdf file can be printed on any laser printer, the parts are cut out with scissors and glued onto a sheet of corrugated cardboard. Since the unassembled Google Cardboard is longer than an A4 sheet, the template is cut so that the cut parts need to be placed on top of each other when gluing. These parts are marked with a circle with a number. You need to superimpose a light (unfilled) circle on a filled one with the same number and make sure that the lines match.

3. Lenses in the amount of 2 pieces. This is the most difficult moment. The lens parameters are as follows: aspherical, diameter 25 mm, focal length 45 mm. The difficulty is precisely where to get such lenses. Let's consider the options:
- aliexpress.com is the best option in terms of price, but takes a long time. I ordered my second glasses there, they arrived in 19 days, this is a speed record, because usually everything takes a month or two or three. If this option suits you, look for “google cardboard lens” there
- Search for the same thing in the Russian segment of the Internet. The speed will be faster than China, but the price will be higher.
- Optical stores in your city. Yes, you can search there too. This is probably the most expensive option, I don’t know, I haven’t tried it. Optics salespeople will not understand if you say “aspherical lenses, diameter 25 mm, focal length 45 mm.” They need to speak differently. Since they measure everything in diopters, you will need to ask specifically for lenses with diopters. Now we will count them: there is a formula F=1/D, where F is the focal length in meters, and D is the optical power of the lens in diopters. Thus D = 1/F = 1/0.045 = 22.2222. In general, you need to ask for lenses “+22 diopters”. If any are found, then they can be turned there to the required diameter, or with a larger diameter, but then the template will need to be slightly changed.
- Stationery stores. In it we look for magnifying glasses of suitable size (i.e. magnifying glasses), the higher the magnification, the better. 10x lenses should be fine. This option is the most unreliable, because it is difficult to find 2 identical magnifying glasses so that they match the focal length. However, this option was the first one I tried.
- Various kinds of binoculars, children's toys, lenses, telescopes, peasant junk dealers in the markets, in general, we look for them wherever we can.
The first 3 options are ideologically correct, because they imply an exact match with the design proposed by Google. The remaining options provide inaccurate lenses, so they will require changes in the design of the glasses themselves. Shown more clearly in the figure:
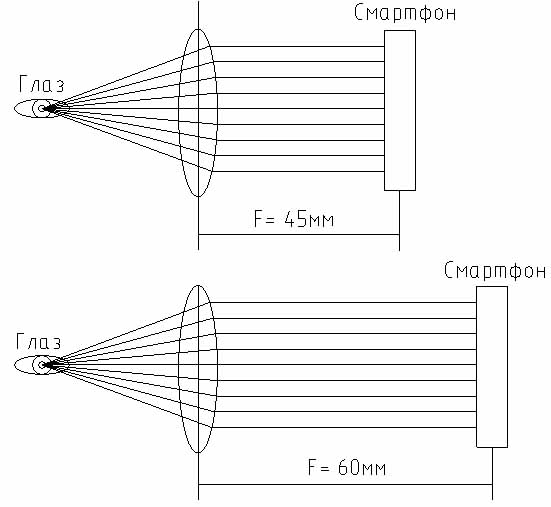
From this picture it follows that the larger the focal length, the further you need to move the smartphone away from the lens. Thus, if you received non-original lenses, make changes to the design. This is exactly what I had to do the first time I bought lenses at an office supply store. It's not difficult, I'll describe the details in the next post, entirely dedicated to my first version of Google Cardboard.
What to do if the focal length of your lenses is unknown? Two ways: either make the design initially with adjusting the distance from the lens to the smartphone, as I did in my first version, or measure it. You can measure the focal length in a simple old-fashioned way: 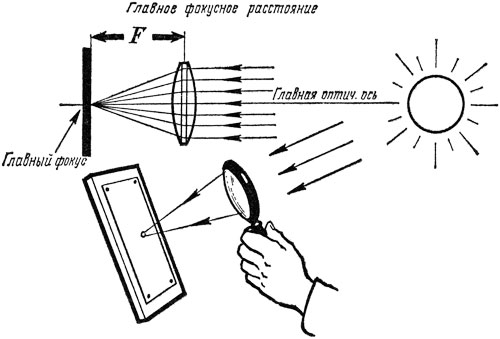
Did you burn it with glass as a child? Yep, same thing. We take a lens and focus the sun into a small point on the surface. The distance from the surface to the lens is equal to the focal distance. The surface must be perpendicular to the optical axis.
So, that's all about lenses for now.
4. Magnets. This item is optional to begin with. The design uses 2 magnets that work like a button. One magnet, round flat, ordinary, made of ferromagnet, is inserted inside the structure, the second, ring-shaped neodymium, is molded outside and held there by the magnetic field of the internal magnet:

In order to control virtual reality, this non-button is used. When we need to somehow influence the virtual world, we must move the external magnet down with our finger and return it back. The smartphone must have a magnetometer (it must have a built-in compass, roughly speaking) in order to detect a change in the magnetic field and perceive it as pressing a button.
I’ll say right away that it’s a crazy idea, and Google itself realized this, so the second version of the glasses already has a mechanical button, but more on that in the corresponding post. For now, I will say that you can do without these magnets, especially since this idea works so-so - people complain that not all smartphones correctly detect changes in the magnetic field of this quasi-button, and some smartphones do not have a magnetometer at all.
In general, I leave this up to your discretion; I did not install magnets for myself. When my first version worked, I made a mechanical button.
5. Clothes Velcro. Well, everything is simple here - we go to the studio and buy Velcro fastener there, they sell it in the form of a tape, by the meter, the price is mere pennies.
6. A utility knife and double-sided tape.
The process has begun!
So, we bought/picked/assembled everything. Let's get started.
1. Print the template and paste it onto cardboard.
2. Cut out the parts and make the necessary slots
3. We collect. To make assembly easier, I attach a video:
This video tutorial will show you how to make cardboard 3D virtual reality glasses. For this we need a phone, two lenses, a pen, a ruler and a cardboard box (thick cardboard). It is recommended to use lenses 5-7x, diameter 25 mm. The article consists of two parts. The first contains the basic steps for creating glasses, the second contains recommendations for improving the product and a description of applications for 3D games.
You can buy ready-made cardboard glasses in this Chinese store.
From cardboard you need to cut out all the parts that will be needed to create the glasses. To do this, it is very convenient to use the diagram, which you can download from the link. It will make everything much easier to do. You can download this drawing for printing on a printer.

Now, according to this diagram, you need to draw out all the details on cardboard and cut them out using scissors. Next, you need to collect it all, which is, in principle, not difficult to do. In all places where there are bends, you need to bend the cardboard and connect everything using hot glue. Next you need to insert two lenses.
If you made the hole a little smaller than the lenses themselves, then you can simply place them very tightly and they will not fall out, but just in case, a couple of drops of hot glue is better.
Now we need to download an application called cardboard to our phone. It has many different games for 3D glasses and videos. You can download the demo version from the Play Store.
Let's finish the 3D glasses. We insert the cardboard with lenses and we are all ready!
Go to the cardboard program. There are two sections here. There are many different games and videos here. We launch the one we like and insert it into our 3D glasses and enjoy virtual reality.
Since the phone has a built-in accelerometer, we can move our heads and the picture will also move.
There are many applications for these 3D glasses on the play market. Make these glasses or buy ready-made ones. In general, this cannot be explained, it’s very cool! Until you try it yourself, you won’t understand what it all looks like.
How to make a reality simulator for a personal computer
Next, we will show you how to make a reality simulator for a personal computer, these are virtual reality glasses like the Oculus Rift. To do this, we need straight hands and a well-functioning head and motivation to create homemade products. If you do not have any of these qualities, but have money, then it is better to immediately buy ready-made virtual glasses.
We will need a virtual reality helmet, which you could make using the video tutorial above. The current version adds larger lenses, head mounts, and Velcro to help the phone hold better. In general, this craft is assembled more carefully.
Where can I find lenses? You can take from the magnifying glass which contains two lenses that are perfect for these virtual glasses.
We will need a more powerful computer and a phone with good characteristics so that all programs work stably and do not freeze.
You need to download a program called droidpad to your computer or phone. This application will help us use our phone as a virtual joystick. Namely, use the phone’s accelerometer itself. This application supports two types of connecting your computer to your phone: using USB and WiFi. We don't need it using usbi, because the phone will be inserted into the virtual glasses. Therefore, we will use the wi-fi method. It is desirable that the Internet speed be good and stable.
Now we have the most difficult work ahead of us. We need to calibrate the accelerometer of the iPod phone to our computer. After installing this program, the phone will be used by default as a virtual phone in games. Certainly not all games will be supported. Instructions for calibrating a phone with a computer are available on the 4PDA website.
After we have calibrated according to the phone's instructions for the computer, you can go into any game and test your magic glasses. The mechanism of this application is that using the phone's accelerometer, when you turn it, the screen rotates. It turns out to be a replacement for a computer mouse. Additionally, we need a program called cardboard. This program is needed to make the phone screen split in half. There is a special function, be sure to find it and configure it correctly so that everything works for you. Check that the phone screen is correctly divided not only on the desktop, but also in other programs.
Finally, download the latest program called Splashtop. This is a program so that we can view the computer screen through the phone. How to set up the program, instructions are also available on the 4PDA website.
After we have downloaded the program to the computer and phone, we need to launch the droidpad program to control the accelerometer, the cardboard program to divide the screen in half. These two programs must be running in the background. You need to open the Splashtop program and check if everything works. Launch the game on your computer and enjoy.
There is one caveat - the higher the pixel density on the phone, the clearer the picture will be. Besides games, of course, you can watch movies.
Everything voluminous is becoming fashionable, and many people want to have it in their home for creativity.
Cardboard virtual reality glasses immerse a person in completely new sensations. With them you can ride a roller coaster or feel like the main character in your favorite horror movie without leaving the couch. To do this, you just need to figure out how they are designed and how to use them.
To preserve the cardboard case, Google Cardboard is shipped folded only. Therefore, if virtual reality glasses were bought as a gift, then the birthday person will be pleased if his gift is collected in advance. This is done simply and excitingly, reminiscent of a construction set or a puzzle. The main thing is to follow the step-by-step instructions and everything will work out. For complete convenience, we recommend that you lay out the body and additional parts as shown in the diagram below.

Step 1.
Insert the eyepiece with lenses (part 2) into section 1.1. as shown in the picture. In this case, the front side of the eyepiece should be directed towards you.

Step 2.
Carefully fold the body (part 1), alternately bending it along the lines from right to left, i.e. from paragraph 1.4. to 1.5. As a result, the eyepiece will be closed on 4 sides. In this case, it will be possible to align its holes with the protruding parts of the eyepiece.

Step 3.
To fix the resulting structure, we need to secure two sections. To do this, it is necessary to remove the protective layer from the self-adhesive strip 1.6. and fasten sections 1.4 with it. and 1.5. For strength, all protruding parts should be fitted to the corresponding holes. If it seemed to you that the band is 1.6. If it doesn't hold everything as securely as we would like, you can use tape.

Step 4.
Install the partition (part 3) into the holes of the eyepiece and section 1.1. After this, insert the magnetic ring (part 5) into the oval hole located in section 1.5. Place your smartphone on the border between section 1.1. and 1.7. to assess the suitability of its size with the glasses. If the smartphone turns out to be smaller, then for comfortable use of the gadget, install an additional step (detail 4.). Now all that remains is to tighten the assembled body with a harness (part 6) to completely secure the structure.

Step 5.
Attach a special elastic band to hold the glasses if you purchased them in one set with Google Cardboard.
Step 6.
A smartphone with an Android or iOS operating system is the “heart” of Google Cardboard. Paste it into section 1.7. Launch the desired application and secure the cover with the Velcro fasteners. Now you can ride a roller coaster ;)
Search for applications.
There are more and more interesting applications - games, virtual excursions, videos, etc. To find applications compatible with your smartphone, use the following keywords:
- cardboard;
- google cardboard;
- stereo pair
To search for videos on YouTube, use two tags - “stereo pair” or “sbs”.
A few tips.
- Google glasses apps drain your phone's battery significantly. We recommend turning on airplane mode or at least not moving far from the outlet;
- Some apps can put you into a state of active gesticulation. Therefore, try to stand or sit further away from objects that can be accidentally broken;
- using headphones, you can immerse yourself even deeper into the virtual world;
- It’s better to buy glasses along with an elastic band holder so that your hands don’t accidentally drop the gadget at some unexpected moment.
Virtual reality is an amazing world, immersing yourself in which you get a lot of unusual impressions. But in order to move into the three-dimensional dimension, you need to have special glasses. They are quite expensive in the store, but it is not difficult to make them at home. You just need to know how to make virtual reality glasses with your own hands. The easiest way is to make an analogue.
What will be needed for production?
In fact, you don’t need to buy a large number of tools and materials to make glasses. You just need to have:
- A gadget with which you will immerse yourself in the virtual world. This can be a smartphone or tablet (smartphone is preferable)
The more modern the device is, the more spectacular the game will be. The size of your phone or tablet is also not important. The only thing is that the smallest side must be equal to at least two distances between the pupils of the eyes. But you shouldn’t take too large a gadget either, since the middle of each half of the frame should fall into the center of the pupil. This parameter must be adjusted using lenses, moving them closer and further away from each other.
- You can't make a homemade virtual reality helmet without lenses. There should be two pairs of them. It is better to choose glass of large diameter. This is due to the fact that their minimum distortion is closer to the center. The greater the distance, the more the image is distorted. The small diameter of the glasses will not be able to cope with the difference between the pupils and the center of each half of the picture.
- You will need construction polyethylene 20 mm thick. It should be of medium density.
- In addition, you will need double-sided tape, as well as regular or vinyl film.
- The frame of the helmet will consist of cardboard. It should be micro-corrugated and 2 mm thick.
- To secure the glasses you will need a wide belt or elastic band. It is convenient to use the Velcro fastening.
- To make a helmet, you need drawings. To create them you will need tools for drawing and cutting materials.
All materials are inexpensive, and therefore the helmet will cost much less than a store-bought one.
Making a helmet
Before you make a virtual reality helmet with your own hands, you need to download the Cardboard smartphone application in advance, which will allow you to evaluate the quality of your future helmet.
Next, you need to start making the frame for the first pair of glasses. It is made from a sheet of foam plastic. It is recommended to adjust the lenses so that the distance between your eyes and the phone screen is minimal. To do this, the smartphone is placed on the table and the focus is adjusted using lenses. Once the required distance has been found, the holes can be cut using a centrifugal drill or a compass with a utility knife.
Next, a frame is made for the second pair of lenses. Each glass should be placed in polyethylene. With its help, a 3D effect is obtained. To achieve it, you need to choose the right focus. This can only be done by experimenting with glasses.
After this, you need to make a frame for the helmet. Here it is important to adjust the box to your anatomical features: the shape of the nose, skull, vision. The main thing is that the helmet is comfortable.
It is also necessary to consider the sound output. This is where you should choose good headphones.
The next step is the correct positioning of the phone or tablet screen.
Important! The axis of symmetry, located horizontally, must coincide with the height of the represented line between the pupils.
The screen should be approximately 4 cm from the near edge of the eyepiece. Therefore, it is necessary to decorate the top, bottom, and sides with foam plastic. It should look like a kind of box. The gadget screen is placed in it.
After everything is ready, you need to once again adjust the focus of the lenses and, if necessary, correct the location of the device.
The final stage is the production of the outer frame of the helmet, which is made of cardboard. It turns out to be a box with a lid, inside of which the mobile device is located. It protects the fragile foam device from damage. In addition, it is the cardboard frame that holds the bulk of the smartphone or tablet and presses it against the foam.
Now all that remains is to attach the rubber band fastening. You can attach it to the frame using double-sided tape.
You also need to make a hole for the USB cable.
The virtual reality helmet is ready! You can safely download games with a 3D effect to your device and enjoy the exciting story.


