Let's look at how to make black and white in Photoshop white photo. Creating a black and white image allows you to convey the unique atmosphere of the photograph.
Often such photographs are taken in thematic photo shoots, when simulating historical photographs, or to highlight the main object depicted in the photograph.
Method 1. Discoloration
The first and easiest way to create a black and white photo in Photoshop is to desaturate the original photo.
Follow the instructions to convert your photo:
- Open the drawing in any version of Photoshop;
- Wait for the toolbar and layers window to load;
- At the top of the main program window, select “Image”. Then click on “Correction” and select “Desaturate” from the drop-down list (or “Image” - “Adjustments” - “Desaturate” if you have the English version of the program).
To execute this command, you can also use the hotkey combination Shift -Ctrl -U.
Automatic color layer elimination creates an image with low level contrast.
In general, the picture looks quite dim, there is no “depth” effect. The figure shows a photo before and after applying the bleaching procedure.

Method 2: Duplicate an image
This method is also very easy. Its essence is to duplicate the initial image and discolor it.
Open the photo in Photoshop.
Use the hotkey combination Ctrl -Shift -U or select “Image” - “Adjustments” - “Black&White” in the main menu.


Making part of the picture color
To color a specific object in a black and white picture, select “Brush” on the left in the toolbar or simply press the “B” button on your keyboard.
Create a layer mask. Set the following brush parameters: hardness – 60 percent, pressure level – 40 percent.
As you work, you can select other parameters based on the characteristics of the photo you are editing.
Select the brush colors, black and white, in the order shown in the image:

When switching between colors, remember that using black you can erase, and using white you can restore a photo. Go over the photo with your brush.
To make it more convenient, zoom in and adjust the diameter of the brush itself.

Creating a B&W photograph by duplicating allows you to achieve better effect than after bleaching (method 1).
Despite this, some data is still lost. Automatic image conversion always destroys some of the photo's pixels, degrading the quality.
To achieve a more professional effect, avoid using automatic tools.
Method 3: Using an adjustment layer
This method is more complex than the previous ones. Its essence is that to create a B&W image we will use color and saturation adjustment layers.
This method allows you to return the original appearance of the drawing at any time. The user does not change the original image.
Follow the instructions:
- Go to the Layers tab. Select “Create a new adjustment layer” (“Layer” – “New adjustment layer”);
- In the list, click on “Color (Saturation)” (“Hue/Saturation”);

- Save it without making any changes to it;
- In the image layers display panel, change the blending mode from “Normal” to “Color” (Color);

- Create another adjustment layer (“Hue/Saturation”);
- In the Layer Options, adjust the Saturation slider to 100. Save changes;

Double click on the second adjustment layer. Adjust the Hue slider until you like the result.
In addition to these parameters, you can also adjust the saturation (“Lightness”), thus creating a deeper gamut of the B&W picture.
Copy the very first adjustment layer created and drag it onto this icon  . It is located at the very bottom of the all layers palette.
Now switch to the second adjustment layer window and change its mode to “Overlay”.
At this stage, you can reduce the transparency to 60-65% to achieve a better result.
As a result, we get a deeper and more detailed image.
Using this method, you can experiment with adjusting the layer settings yourself.

Rice. 10 – comparison of using two methods (bleaching and adjustment layers)
Good day to you, my dear readers. I was recently looking through my childhood photographs (up to 6 years old) and how many of them were in black and white. Previously, this was a common thing, but now there are no purely black and white cameras, but it is still sometimes very nice to look at a photo without color. In some cases, it is even more pleasant to look at. Don't you think so?
Many cameras have a non-color shooting function (b/w, sepia, etc.), but in this article I would like to tell you how to make a picture black and white in Photoshop. And it doesn’t matter what kind of picture it is. The main thing is that this function still remains and no one is going to give it up. By the way, in my article about I actually used the effect of turning a color photo into black and white. Remember?
So let's get started! What do you want to convert to b/w color? Personally, I want to desaturate the car that I showed you in the tutorial about.

The easiest way to desaturate an image is through the Image menu. To do this, go to the menu “Image” - “Correction” - “Desaturate”. After this, the photo instantly removes all colors.

Grayscale
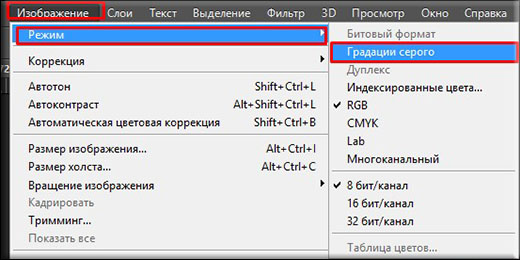
This method is similar to the first and will be just as easy to complete. You need to enter the “Image” menu, then select “Mode” from the drop-down menu, and only then "Grayscale".
Voila! Yours black and white image ready.

Both methods are the simplest, but not the best. For a more subtle transformation, it is better to use other methods.
Black and white
This method is convenient because we can adjust the image as we need, so the quality of the resulting photo will be better.
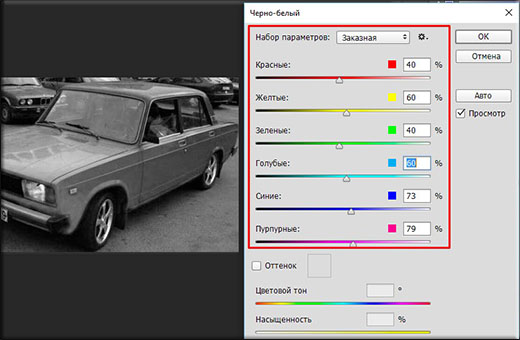
Go again to the “Image” menu, then select the familiar word “Correction”, and at the end feel free to select “Black and white...”.

As you can see, our image has become black and white, and at the same time various sliders with the names of colors have appeared. With the help of them we will correct our b/w image. Try moving different sliders in turn and you will see that the contrast and image quality change, and in certain areas. Each area has its own color.
In this way, adjust all the colors until the image has better saturation and contrast. Voila.

Just don’t click on “Tint”, otherwise you won’t get any black and white image. If you don’t want b/w, but want it in yellow or other tones, then please.
Adjustment Layer
Most best way to create a black and white image from a color one - create an adjustment layer. But there are several here too different ways such a transformation.
Channel mixing

Black and white
Here I will go over briefly, since this method is identical to the “Black and White” method, which we did above. Only here everything happens through an adjustment layer.

Well, in general, these are the methods I wanted to show you. I hope that they will be enough for you). If you have any questions, then ask. I will be happy to answer them.
In addition, I would like to recommend the wonderful Photoshop video tutorials for beginners. Everything a beginner needs is collected here, the material is presented superbly and everything is explained in great detail. Each element is broken down into pieces, so you will know Photoshop completely. So be sure to check it out.
Well, for today I say goodbye to you. Tomorrow will be a new day and new lesson. And get a good night's sleep today. Most importantly, don’t forget to subscribe to updates on my blog articles. Good luck with your learning and everything else. Bye bye!
Do you like cats? Then you will like this lesson, I'm sure! Oh, what am I talking about? I continue to atone for my guilt and try to write on the blog more often. Because, and I realized: “I haven’t done anything for 3 months.” Honestly? This confused me very much, and now I present this lesson to your attention!
So what will it be about? I’m sure each of you has seen photographs on the Internet where everything is black and white, but the object they want to highlight is left in color. Have you seen such photos? We saw it, I know. And today I will teach you, with joy, how to do this!
Let's get started? Open and repeat after me
Step 1. We will work with a magic wand. It’s simple, select the eye with a magic wand (holding Shift), something like this:

Can be used not only magic wand, you can use, for example, lasso and other selection tools! The main thing is to highlight the object that you want to leave in color.
Step 2. Selected? GREAT! Now we press Ctrl+J, and thus we create a new layer with the eye, no matter how terrible it sounds. And now step 1 And step 2 repeat with the other eye.

Step 3. We work with the main layer, or rather, with our cat. Remember? Did I teach you earlier? It's time to use this skill! Yes, you understood everything correctly, let’s make the main background black and white!
And this is what we should get approximately:
TO

AFTER

I hope you have now learned make part of a photo black and white in Photoshop. Or leave one object in color in black and white photography, it depends on what the situation is and how you look at it.
Good luck to you! If you have questions about the lesson, write in the comments.
P.S.: How nice it is to receive a scholarship
Greetings, readers of my blog. In touch, Timur Mustaev. I am often asked the question, how to turn a color photograph into black and white? Today I decided to write a detailed article regarding this issue. Therefore, we will take a detailed look at how to make a black and white photo in Photoshop.
Today we will look at four main methods. Each of them is unique in its own way. After reading the article to the end, you will decide which one is most convenient for you, and which method produces the most contrasting photo.
As in previous lessons, I will use Photoshop cs5 in Russian. You can do the same thing in the cs6 or cc version, which will not be difficult, since I will show everything in detail by attaching screenshots.
Let's start in order and start with the simplest method in my opinion.
I'll use this photo as an example.
I won’t show you how to upload a photo into Photoshop, I hope you know that ( File – Open).
Method 1 – Grayscale
This method is achieved in just a few clicks Image – Mode – Grayscale(Image – Mode – Grayscale).

This is what we get.

Agree, everything is quite simple, but to be honest, this is not what I would like from black and white photography and this method does not impress me. Let's move on to the next one.
Method 2 – Desaturate
Image – Correction – Discolor(Image – Adjustments – Desaturate)

What do we get?

It is not much different in quality, but still does not provide the depth that we expect from black and white photography. It's time to move on to more advanced methods.
Method 3 - Adjustment Layers
In this method, we will use adjustment layers. What are they good for and what are they needed for? It's very simple. When using them, we do not change the main image, and we can easily return to its original form, which is very good.
Let's get started, stop languishing.
Layer – New adjustment layer – Color/Saturation(Layer – New Adjustment layer – Hue/Saturation)

After pressing, change the mode from Normal on Chroma, leave everything else unchanged, don’t change anything and click OK.


Next, create another layer using the same method. Layer – New adjustment layer – Color/Saturation don't change anything and press OK. After, we slider Saturation(Saturation) set to -100 .

At this stage, we received a normal image, as in the previous 2 methods. Now the fun begins.
Click on the circle of the first adjustment layer (it is located at number 1), and change the position of the slider Color tone(Hue) the way we need, we are looking for the most interesting contrast, in my case it turned out to be +27.

We received the following image. It looks much more interesting, but still not what we need.

Let's refine it a little more. We need to create a copy of the adjustment layer. How to do this? It's very simple. We left-click on the layer with the number 1 and, without releasing the mouse button, move it to the square icon at the bottom of Photoshop and release the mouse button. Thus we get a duplicate.


Now on this layer we change the blending mode from Chroma(Color) on Overlap(Overlay), and reduce it a little Opacity(opacity), approximately 40-60%. In my case I set it to 45%.


This is what we got. Agree that now the photo looks more contrast and more dynamic. Here, for example, you can adjust the Opacity yourself, depending on your image, experiment!

Method 4 - Channel Mixing
Now let's look at the last method in our arsenal. Here we will use a Channel Mixer adjustment layer.
Opens the original color image. Next, Layer – New adjustment layer – Channel mixing(Layer – New Adjustment Layer – Channel mixer), click OK. In the window that appears, put a tick Monochrome(Monochrome).


Now, move the color sliders, Red, Green, Blue so that the total is 100%, this is very IMPORTANT to avoid blur in your image.
In my case I installed:
- Red – 10%;
- Green – 10%;
- Blue – 80%.
The final stage. We create a copy of the adjustment layer, you already know how to do this, in the 3rd method we did it. In the new layer, change the mode from Regular(Normal) on Overlap(Overlay). And change the opacity to about 20-40%. In my case I set it to 30%.

This is what we got in the end. How do you like the black and white image?

Now you know all the ways to get a black and white image. Agree, not everything is so complicated?
If you don’t understand a lot of things and you are completely new to Photoshop program, then video course " Photoshop from scratch in VIP 3.0 video format" for you. It explains in great detail and shows all the features necessary for a beginner. After studying this course, you will begin to understand Photoshop and switch to “YOU” with it.

That's all for me, I will be very grateful if you share the article on social networks. Good luck.
All the best to you, Timur Mustaev.
Hi all! We continue to conquer the basics of working in Photoshop. Today I have prepared a lesson for readers on the topic How to turn a color photo into black and white.
Sooner or later, while processing photographs and images in Photoshop, we are faced with the need to turn a color photograph into black and white. Therefore, I decided to prepare this short lesson for my readers to show how this is done visually.
There are many ways to perform this operation. In this mini lesson, we will not consider the methods used by professional photographers, we will look at the simplest and quick ways How to turn a color photo into black and white. In future lessons, we will definitely return to this topic and look at other methods, more complex and professional, used by advanced Photoshop users.
Let's get acquainted with 3 ways converting color photographs into black and white, I’ll say right away that these methods are not professional, the quality after processing is not the best, but these methods are quite suitable for learning by novice users.
So, I propose to move from words to deeds. First, let's open the image we want to make black and white.
Now let's start processing. I present to your attention the first method.
Method #1:
We turn a color photo into black and white using the “G” function gray radiation".
To do this we need to go to the top menu: Image/Mode/Grayscale. A window will appear with the question “Delete color information”, click delete and our photo will become black and white.

Go to the menu Picture/Modes/Grayscale
Very quick and easy, right? Let's move on.
Attention! Remember that you can always revert an action using the CTRL+Z hotkeys. Let's move on to the second method.
Method #2:
We turn a color photo into black and white using the “ Discolor".
We go up to the top menu of the program and go to:( Shift + CTRL+U ) . See below the result of the operation performed.

Go to the top menu Image/Adjustments/Desaturate or press hotkeys Shift+Ctrl+U
Method #3:
Making a black and white image using an adjustment layer " Black and white"
This method is also extremely simple and fast, its advantage is that when using adjustment layers, the Photoshop program makes changes and corrections to a special adjustment layer, and not to the original image, which we decided to make black and white. We also have such features as: reversing the entire editing process, controlling the opacity of the layer, turning the visibility of the layer on and off. This method allows you to get a more beautiful black and white image, unlike the previous ones.
Step 1:
So, we already have the photo open. Now let's go to the panel "Correction", if it is closed for you, then open it through the top menu Window/Correction. We find in the panel “ Correction» adjustment layer « Black and white" and click on it.

To open the adjustment layers panel, go to the top menu Window/Correction
Step 2:
After you click on the adjustment layer " Black and white“, our image was converted to black and white and a window with sliders appeared. In this window, using many simple parameters, you can adjust the black and white effect to suit you as you like. Move the sliders until you achieve a contrasting black and white image. Moving the sliders to the right makes areas that were previously colored the color of the slider appear more light shade gray, and moving the controls to the contrary to the left colors the areas in a darker shade of gray.

At the top of this window, you can select ready-made sets or create your own set and then save it through the “triangle with stripes” menu, which is located in the upper right corner of the window. If you click on the button " Auto“, Photoshop will automatically select the parameters of how it thinks the black and white image should look. This is what happened to me.

This is what happened to me
That's all for today, try to practice everyone 3 ways and write about your results below in the comments. See you in the next lessons!


