One of the most frequently asked questions is how to replace the background in Photoshop. This is the information that interests new Photoshop users. And naturally, the program gives us many ways to implement this operation. It’s worth noting right away that all further information is intended for inexperienced users of Photoshop. If you already have a lot of experience working with this, then you will simply not be interested. So, get ready to learn how to change the background in Photoshop.
Required funds
If you have already installed software Adobe Photoshop to your computer, then you are already halfway done. If not, then you can use the official website of this program. The method described below for replacing the background does not require that you have latest version"Photoshop". As for photo requirements, it is better to use high-quality, high-resolution images. This will make your work easier. If everything is ready, then you can begin to review the instructions.

Instructions
Change to Photoshop program possible using many different methods. Some methods require in-depth knowledge of certain tools, while others, on the contrary, are created specifically for inexperienced users. Photoshop for beginners has a tool called Quick Selection that allows you to quickly and easily create a selection. It is with this tool that we will work.
- We will need two photographs. One will serve as the background image, the other will be in the foreground. To make it clearer, we will further use, for example, a photo with a person.
- Let's open two images in the program at once. Let's start working with the main image (which is in the foreground).
- We need to separate the person himself from the background. To do this, use the “quick selection” tool (W - hotkey). Select the required diameter of the control cursor (to do this, you can use the “[” and “]” buttons to decrease or increase the size).
- We outline the outline of the person while holding down the left mouse button. The selection will be created automatically. Once everything is completed, right-click on this area. Select “invert selected area” and press the “Delete” key.
- Now we need to transfer our man to another image. To do this, we will use the key combinations Ctrl+C (copy) and Ctrl+V (paste). Most often, the images do not match in size. In this case, you need to enlarge or reduce the photo with the person. To do this, press Ctrl+T ( free transformation). A rectangular frame is formed around the image, where control elements (squares) will be located. Drag these squares to the sides to increase or decrease. To maintain proportions, hold down the Shift key.
- Smoothing of sharp transitions occurs using the “blur” tool.

Conclusion
The question of how to replace the background in Photoshop is found on almost all forums and portals, dedicated to the program Photoshop. There is no need to make this request again. This instruction will help you understand how to replace the background in Photoshop. You may also encounter other methods for performing this operation. After all, as mentioned earlier, a wide selection of tools allows users to approach the task from different angles.
On the toolbar located vertically on the left, select the Magic Wand Tool:
And click on the white area in the image, in the example I clicked on the right top corner, as a result of which a selected area appeared in the document, marked by a moving dotted line; this line, indicating the border of the selected area, is popularly called “marching ants”:

Now we can edit only that part of the image that is in the selected area. Everything that is outside the selection is not available for any editing (deleting, drawing, color correction, etc.).
But, there are times when it is not entirely clear which part of the image is a selection and which is not.
To determine which pixels in the image are available for editing, you need to turn on the quick mask highlight, to do this, press the Q key. This is what the document now looks like:

The area of the image located in red is marked outside selection zones, i.e. not editable. To turn off the backlight, i.e. quick mask, press the Q key again.
Deleting the entire selected area is very simple - you just need to press the Delete key. Let's do this and, for better viewing, remove the selection. by pressing the combination Ctrl+D. This is what happened, with a gray and white checkerboard background representing a transparent area:

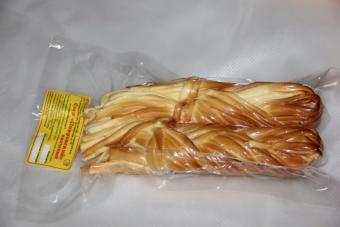
So, the background around the basket is removed, but the task is not completed. because fragments of the background remained inside the basket.
These areas have not been removed. because were not initially included in the selection, but this happened due to incorrect settings of the Magic Wand tool.
Let's go back and restore the original state of the document by pressing the F12 button.
Let's set up the Magic Wand. On at the moment We are only interested in one option of this tool - “Contiguous Pixels”, which is turned on by default in Photoshop. When this option is active, the “Magic Wand” selects only adjacent ones, i.e. pixels of similar colors touching each other, and, in our case, the white pixels inside the basket handle are separated from the outside by brown pixels of this very handle. Therefore, uncheck the “Adjacent pixels” option:
And click the “Magic Wand” in the same place where you clicked for the first time, the result:

Press the Q key to enable quick mask to make the selected area clearer:

Now the area under the handle is available for editing and deleting, but at the same time, some pixels on the area of the basket itself are also available for deletion, but we don’t need this.
To correct this shortcoming, we will use the currently active Quick Mask.

Press the D key so that the main color in the color palette becomes black, make the diameter of the brush approximately equal to the diameter of the white spots, set the hardness to 100%, and paint over the spots; in the process of painting, the spots should disappear under the pink highlight:

After the spots are painted over, press the Q key again and then Delete. Result:

Note. If, before creating a selection with the Magic Wand, you set the Tolerance parameter to zero (this parameter is located at the top of the Photoshop window slightly to the left of the “Adjacent Pixels” option, now it is equal to 32, see the figure above), then the selection will not include areas on the basket itself, and you won’t need to do dances with a quick mask and brush.
Actually, the task is completed, the background under the fruit is removed. Now I can drag the layer onto another image using the Move Tool, or create a new layer with some image under the basket layer.
In the example, I created a layer with an orange-red gradient under the basket layer:

Removing the background from a photo using the Magic Eraser Tool
The operation of this tool is similar in principle to the “Magic Wand”, the difference is that it is more automated and specialized.
Like all specialized tools, working with the Magic Eraser is easier and faster, but it is not suitable for performing all such removal tasks.
But, for our case, this tool is ideal, so let's get started.
The Magic Eraser is located in the stack under the Eraser tool:

To use the "Magic Eraser" you do not need to unlock the background layer; the tool does this automatically the first time you click on the layer.
To remove the white background from my photo, all I need to do before using the tool is set the tolerance value to zero and disable the adjacent pixels option:

Now click on any area white background and it will be instantly deleted, without creating a selected area:

Actually, that’s it, the task is completed. you will agree, much faster than the “Magic Wand”.
Additionally, if you set the Opacity to less than 100%, the Magic Eraser will not completely remove the background, but will make it semi-transparent.
It follows from this that the Magic Eraser tool is ideal for removing a plain background. But the range of applications of this tool is much narrower. than " magic wand".
This frequently asked question among beginners starting to learn Adobe Photoshop. Today I will show you one of the ways to change the background in Photoshop. We'll be using a Quick Mask and the Refine Edge tool, so you'll need Photoshop CS5 to get started.
This Photoshop tutorial will be quite simple, and at the same time, the presented method of highlighting in Photoshop is suitable for almost any image.
At the end of this photoshop tutorial we will get this result:
The difficulty of highlighting in Photoshop depends on how close the background color is to the image itself. If you take, for example, a portrait of a person on a white background, then changing the background for him will not be difficult. We'll take a closer look complex example. Let's change the background of this dog photo.

As you can see, the dog here blends in with the yellow autumn leaves, so simple tools quick selection will be problematic. I advise you to take a photo of yourself, so you will better understand the material
1. Go to quick mask mode (Q key) (you can read more about masks in the lesson “). Take a hard brush suitable size and start painting over the image of the dog:

Please note that the Flow (Pressure) and Opacity (Opacity) parameters must be 100%, otherwise the mask will not be complete and you will have gaps in the image. Completely paint over the dog:

If during your work you accidentally hit the background, just press the X key (the main color will become white) and remove the mask in the place where it is not needed.
2. Let's move on to the most interesting part. Press the Q key to apply the quick mask, it will turn into a selection. But the selection turned out to be, to put it mildly, poor. Invert it (Shift+Ctrl+I). Take any selection tool and click the Refine Edge button.

The following window with settings will appear:

And here we will dwell in more detail.
The View parameter specifies the background against which you will view the current selection. It does not affect anything and is needed solely for your convenience. I chose a black background because... This image is most convenient to view on it.
The Edge Detection parameter is the most important and allows you to automatically separate the edges of the image from the background. Unfortunately, it is not perfect, but, nevertheless, it copes with the task quite well. To use this option, check the Smart Radius checkbox and select the optimal radius for your image. For me it's 11.3px. If I turn the radius further, the tool will capture part of the background.
The options in the Adjust Edge tab adjust the edges of the selected image. Smooth sets the smoothness, Feather makes the edges soft, Contrast automatically increases the contrast of the edges, and Shift Edge expands or narrows the selection area. You can see the parameters for my image in the picture above.
And finally, the Decontaminate Colors option allows you to get rid of artifacts at the junction of the image and background. I use it almost always. There is one feature you need to be aware of - if the color refinement is active, after applying Refine Edge, a new layer with a mask will be immediately created, and the current selection will be copied onto it. I find it convenient.
So, we apply Refine Edge and see:

That’s it, now you can put any background under the dog’s photo:
Now you know how to change the background in photoshop. The method I showed is far from the only one, but it works great. Here are some more examples of changing the background in Photoshop:


This completes the Photoshop lesson on how to change the background in Photoshop. Don't forget to leave comments and share the lesson with your friends. And I say goodbye to you until we meet again.
“Photoshop”, which has become the idol of a colossal audience on the Internet, some rub their hands in anticipation of editing unsuccessful photographs, others create stunning compositions of future collages in their minds, others in their imagination lustfully dress up models, trying on outfits that are “more revealing than ever”, but almost Sooner or later they will all have to figure out how to change the background in Photoshop.
This problem can be solved either by removing the background itself, or by extracting the object from it and transferring it to another background. Sometimes the background is repainted or its individual sections are partially replaced with fragments of other images, but in all cases, preliminary selection of “undesirable” elements or objects of manipulation is required.
Thus, replacing the background in Photoshop essentially comes down to the procedure of selecting objects using standard program tools in conjunction with various methods And technical methods, and also special functions, allowing you to refine the contours of the selection to the smallest detail.
Selecting with standard shapes
This group of tools (Rectangular Marquee Tool), which selects with rectangles, ellipses (circles) and lines, is rarely used in connection with replacing the background, except for selecting/cutting out objects with regular shapes. Everything is simple here: click where necessary with the mouse and stretch the frame, but if you drag with the Shift key pressed, the shape will be correct, and if you move the cursor inside the outline, the selection can be moved entirely.
For the oval selection (Elliptical Marquee Tool), there is an Anti-aliased contour mode, which clearly lives up to its name, so you should not forget about the checkbox in the settings panel at the top.
"Cowboy" selection
With the tools of the "Lasso" group (Polygonal Lasso Tool), you can not only efficiently cut out the background in Photoshop, but also highlight the contours of objects with a complex profile.
A simple but “real” lasso works like the Pencil tool, only, unlike the latter, the lasso “loop” does not have to be closed, since it will happen automatically as soon as you release the left mouse button, no matter where it happens in the loop . The ants will immediately “run” along the closed contour.
Having picked up the “Rectilinear Lasso”, with the left mouse button they “click” the broken outline of an object or area and close it, however, you can click earlier. When a circle appears near the starting point next to the cursor, then the contour will close on its own. The same effect will occur after double-clicking the mouse (with the Ctrl key in earlier versions of Photoshop). If you are not satisfied with the created contour, the Esc key will remove it, and by pressing Delete, you can delete only the last segment. The Alt key pressed during the selection process redistributes the roles of both types of lasso on the fly.
Having turned on the “Magnetic Lasso Tool”, just click on the border of the selected area and smoothly circle it with the mouse, without “writing out a pretzel” of the complex profile of the object, because the smart “lasso with a magnet”, following the cursor, is attracted to the border of the object and It fits itself exactly along the contour. For this tool, unlike other lasso, you need to specify the width (width) of the zone within which it should define the boundary in the settings panel at the top.
The following pair of standard selection tools easily solve problems such as cutting out the background in Photoshop, and if it is also uniform, then one click is enough to select it.
"Fill" with selection
The “Magic Wand Tool” works like the “Paint Bucket Tool”, only it does not fill it with paint from a bucket, but selects adjacent areas with the same color as at the point where you “pointed” your mouse with your finger. This is what the “sorceress wand” will do if the “Contiguous” checkbox is checked in the settings panel; otherwise, areas close to the selected color throughout the image will be highlighted. In addition to this, the wand can also specify the “Sample Size” and “Tolerance”, as well as select the “Smoothing” and “Sample from all layers” functions.

The Quick Selection tool functions in much the same way, but it does it with your hand, offering a brush that can be adjusted in hardness, shape, size, spacing, and angle.
Selection by deletion
The condition of the task “how to remove the background in Photoshop” already contains an answer or a hint (“remove”). You can select and then cut out an object by simply erasing the excess using a group of erasers, which includes the Eraser Tool, Background Eraser Tool, and Magic Eraser Tool. A simple eraser is the same brush (or pencil), with the only difference being that some paint, while others erase until transparent. The magic eraser "mows" under the same wand, and the background one, if you show it a sample, will erase what you need.

Alternative to highlighting by color
Starting with the version of “Photoshop SC3”, the “Color Range” command has settled in the “Select” menu, according to which the selection is made, in principle, similar to the magic of a magic wand, but here some additional features and benefits that are especially felt when performing operations such as changing the background in Photoshop. To select the color to be highlighted, there is a standard trio of eyedroppers (main and +/-), which you can click endlessly (if necessary), selecting the desired shades directly from the image or from its thumbnail in the center of the dialog box. You can control the selection process by selecting the “Selected area” option under the thumbnail. Unlike the Magic Wand, where choosing a tolerance when selecting non-uniformly colored areas can sometimes be very tedious, in Color Range this is easily done with the “Fuzzinness” slider, which corrects the scattering outside the border of the selected area, and the effect can be observed in the image thumbnail.

"Filter homewrecker"
There is a command in the “Filter” menu, the name of which directly indicates how to change the background through “Photoshop”. This is the "Extract" function, which has a gorgeous dialog box that looks like a mini image editor. We will, of course, extract not the background, but an object, which must first be outlined with a felt-tip pen by selecting it in the toolbar, at the top right, and then filled with paint from the bucket by clicking on it and clicking inside the outlined outline. After this, the hitherto lifeless “OK” button will become active and, when you move the cursor to it, it will fill with a “blue blush” with pride for the function entrusted to it. And in the main document window a flawlessly cut out object will already be waiting for you. transparent background, however, if you correctly set the thickness of the “felt-tip pen” stroke, showing the program where the border between the object and the background will lie, which should be contained within the felt-tip pen strip.

Allocation "through your channels"
Having understood how to change the background in Photoshop using standard selection tools, you can move on to extraordinary methods. To highlight objects with very complex contours, experienced users often use color channels.
Open your shaggy, hairy, woolly, lacy, etc. object in Photoshop and go to the “Channels” tab, and if there is not one in the palette, go to the “Window” menu and select it.
Click on all the channels and select the one with the most contrast (usually blue or less often red). Then make a copy of the selected channel by dragging this layer onto the "Create a new channel" icon at the bottom.
Now our task is to “blacken” the object as much as possible and “whiten” the background on the duplicate layer (and maybe vice versa) in order to maximize the contrast of the border between them. Depending on the nature of a particular object, this is achieved by adjusting the parameters of the “Brightness”/”Contrast” (Contrast) or “Levels” functions in the “Image” > “Adjustments” menu. But in any version, as a rule, there is a need for the help of a black brush to add black and a white brush to add white.
Having finished working on the silhouette, click on the duplicate channel layer with the Ctrl key pressed, return to the "Layers" tab, where the object is already safely selected and, having selected the layer in the palette, invert the selection by selecting the "Inverse" command from the "Selection" menu (Select). Press Ctrl + J - and the cut out object will appear on a new layer, but without its original background.
Channels are used in another, more advanced selection method, which very effectively solves issues such as changing the background in Photoshop.
Let's go back with our object to the "Channels" tab and immediately select the blue channel. Then go to “Image” > “Calculations” and for both sources (Source) select Blue (Blue copy), without changing other default parameters. As a result, a new alpha channel (Alpha 1) will appear in the channel palette.

Staying on the Alpha 1 layer, go to “Image” (Image)> “Correction” (Adjustments) and, selecting “Levels” (Levels), adjust the brightness settings so that the object appears brightly black against the brightest background.
Now switch to the Layers panel, go to “Select” > “Load Selection”, select Alpha 1 from the Channel list and click “OK”. All that remains is to delete (Delete) the original background and add another (uniform and dark) to make sure that the contour of the cut out object is perfect.
Pen highlighting
Many "Photoshoppers" believe that using the Pen tool ( Pen Tool) the most accurate and “clean” selection is obtained, but this method, in addition to skill, requires enormous patience. Nevertheless, there are “masochists” who highlight hair with a pen (fortunately, the scale can be increased to 3200%).
In general, carefully outline the object with a pen, then, making sure to close the outline, right-click on it and select the “Make Selection” command. The program will execute the command immediately as soon as you specify the Feather Radius and decide whether you need Smoothing.
Grinding the edges of the selected contours
Regardless of the “origin” of the selected outline, starting from Photoshop CS5, you can always correct it using the “Refine Edge” tool, by clicking the button of the same name in the settings panel at the top right or by selecting such a command in the “Selection” menu.

There is a brush that increases the detection area, a very “Smart Radius” that automatically adapts to the edges of the image and adjusts the parameters of smoothing, feathering, offset, and also the contrast of the borders of the selected object.
Having mastered at least part of such a solid arsenal of tools for selecting complex objects, figuring out how to insert a background in Photoshop will be “a piece of cake.”
If your separated object is still in Photoshop and a new background has been selected for it, load it into the editor as well. Then go to the object window and, having turned on the Move tool, pick it up with the mouse, pull it up to the background file name and, when it appears in the window, lower the object and release the mouse button. All that remains is to arrange the object against a new background as if it were at home.
You can also take the traditional route by selecting the entire object (Ctrl + A), copying it to a pocket (Ctrl + C) and then pasting it onto the background (Ctrl + V). Using the "Place" command in the "File" menu, the selected document will also appear in the window from which the command was issued.
Good day to you, my dear friends. Today is Monday, but the weekend continues. How are you doing? How are you feeling? I have an excellent one! Feels like May. How much have I seen different photos, where people stand against the background of some Eiffel Tower, although they themselves (as it turns out) have never been to Paris. Apparently they want to show off, make fun of someone, or, on the contrary, they dream of visiting there.
If you also want to find yourself in the background of something, then you need to replace the background. I will tell you how to change the background in Photoshop in this article. I will show you all the steps using two examples.
We will divide our lesson into two stages: First, we will remove the background, and then we will insert a new background and adjust everything as it should.
Example with a uniform background
Example with heterogeneous background
But everything is not always perfect. What I mean is that it is rare to find a uniform background, so the previous method will be difficult to use. Am I right? That's why I'll show you how you can change the background in a photo and make everything look peek-a-boo if the background is heterogeneous.
- Open the image in Photoshop. Just immediately remove the lock from the layer so that we can edit it. Remember how this is done? If not, then simply click on the lock with the left mouse button.

- Select any selection tool. In this case, I would take either “ ” or highlight with . Mmmmm...I'll still take a quick mask. Just don't forget that quick mask doesn't work on its own. We also need to select to paint over what we need to highlight.
- Now carefully select the object that should remain and remove the mask. What we have is that it is not the object itself that is selected, but the area around it. This is what we need. But if you select the lasso, then do not forget to invert it later, i.e. go to “Selection” - “Inversion”, or click SHIFT+CTRL+I.

- After this, press as standard DELETE and delete it taking into account the content, after which we remove our dotted line.

- Well, then again we load a new background onto this document. Only the background with the background is lowered below the background with the girl, just as we did in the previous example.

- Here we need to remove some jambs. You can wipe and also remove gaps between the hair. And I would also make the girl herself smaller, otherwise I think she looks gigantic against this background. Don't you think?
- After this, you can still add naturalness, namely, play with, or go to “Image” - “Correction” - “Levels”, and by moving the different sliders, select the most suitable type of illumination for the background.

Well, basically our image is ready. Now the girl sunbathes not on the beach, but on the grass in an open field)). Here's a simple trick.

Everything seems to be simple. You can, of course, still remove the joints to achieve a more realistic effect. For example, part of the palm and foot can be wiped with an eraser. This will show that her arms and legs are slightly in the grass.
The methods are very simple and do not require much preparation. But if you want to be fluent in Photoshop, then be sure to check it out. wonderful video course on this topic. With these tutorials, you'll truly learn Photoshop from A to Z with unrivaled ease.
Well, I say goodbye to you for today. I hope you enjoyed my lesson today. But if you want to be the first to know about the release of new lessons that you need, then be sure to subscribe to my blog updates. I also advise you to look at my other articles. Surely you will find a lot of interesting things for you. Good luck to you. Bye bye!
Best regards, Dmitry Kostin!
We recommend reading
 Fusel oils in moonshine and other alcoholic beverages: influence, benefits, harm and purification
 Functional projections of zodiac signs What can be said about vector projection signs
 Degas E. “Blue Dancers. Essay based on the painting by Edgar Degas “Blue Dancers Dancers in Blue”
 We reflect in the RSV reimbursement of social insurance expenses for the last year Appendix 2 line 090 of the calculation of insurance premiums