If you have a cat, then you probably dreamed of a beautiful and comfortable house for her. Most often, houses and beds for pets are bought in special stores, but such things are not cheap. We'll have to a whole month, or even two, save money to purchase an appropriate house for your cat. But at this time you need to buy her food and litter for the toilet. Someone else gets their pet vaccinated monthly. And this also costs a lot of money.
DIY cat house
Your cat's home is a place where she can sleep. long time or hide from the owners. Representatives of the cat family generally like to hide in dark places.
Their favorite places are boxes, cabinets, a compartment inside the sofa or somewhere under an armchair. You, like no one else, should know what troubles your pet’s sleep brings, for example, in a closet. Clothes are constantly covered in wool and in puffs. Before putting the item on, you have to clean it or iron it. That’s why I really want my beloved cat to have his own private place to relax.
Types of housing for cats
Which house is best to choose for your beloved pet? A place to sleep and rest can be of several types:

Having studied the Internet, you can find many videos from which you can learn how and from what you can create a future house for your pet. Very often, from such videos, owners learn how to get something truly beautiful for little money. Every home owner has such unnecessary things as some foam rubber, cardboard boxes, small pieces of some fabric or old jackets or fur coats.
It is from these materials that you can create an excellent home for your cat.
How to sew a house for your beloved cat (patterns and step-by-step algorithm)
To create a house we need pieces of upholstery from a sofa or thick velor fabric, for the filler we will use foam rubber. You may ask why this particular fabric? It is denser, and if your pet decides to scratch its claws in its house, the house will remain intact. In addition, such a fabric will be easier to clean from your animal’s hair.
Now let’s study in more detail the creation of our future masterpiece, and photographs will help us with this.
- Preparatory stage . We will need two types of fabric about two meters long and wide 60 cm. If you don't have one piece of fabric that long, you can sew several pieces of material together to make a total of 200×60 cm. each fabric. The inside of the house should be made of thick fabric, and the outside should be of your choice, as long as it pleases the eye. For the filler, foam rubber one and a half centimeters thick, also measuring 200x60cm, is suitable. If it is not available, you can purchase it at any industrial store. Price about 300 rubles per sheet size 1x2 m. This will be quite enough. And you must admit, 300 rubles is not 2 thousand, like the price of houses in stores.
- Making a pattern . For the template you will need cardboard; if it is not available, a regular newspaper will do. Template dimensions 40×55 cm. (40 cm width of our house, 30 cm height + 25 cm roof). Cut out the template as shown in the photo and apply it to the fabric. When tracing the template, leave a couple of centimeters for the seam. Thus, we cut out 10 parts (5 from each material). You should succeed 8 wall parts 40x30x25 and two bottom parts 40×40.
- We do the same with foam rubber, only without 2 cm for indentation. We get 5 parts. 4 walls 40x30x25 and 1 bottom 40x40.
- Fastening the fabric . We fold 2 pieces of different fabric to each other, put foam rubber between them and secure with needles. We fasten along the entire perimeter of the foam. Thus, we proceed with all 4 walls. In the last fourth wall, we make a hole - the entrance. To do this, apply a plate, as seen in the photo, and draw a circle.
- Sewing fabrics . We use a sewing machine; if you don’t have one, you can carefully sew it with a needle with a good seam.
- Circle - entrance
. We trim our circle for the entrance. You can use a zigzag stitch on a machine, or try to sew it beautifully with a needle by hand.
Seam in the pattern
- Preparing the entry hole . To do this, in the already stitched circle, carefully cut a hole in a circle.
- Future bottom. We sew together the parts of the future bottom using the same method, so that the foam rubber is inside.
- Preparing the frame
. We sew all the parts together as shown in the photo. In order for the beautiful fabric you have chosen to be on the outside, sew the parts together with thick fabric or upholstery. We start sewing the parts from the entrance wall with the hole, then all the rest according to the same principle.
The frame is almost ready
- Bottom. We attach the bottom and stitch around the perimeter.
Trying the frame to the bottom
- Finish. We turn the product right side out and invite the cat to evaluate our work.
The chief expert is already sitting inside
Cats love to watch what's going on in the house. . A great option to place her house somewhere higher , for example, on a closet or bedside table . Sometimes waking up , the cat will feel in control of its territory .
Conclusion
All your cats will be “delighted” with such a house
Thus, we created a house for our beloved pet with our own hands. This is a very convenient house for an animal, and is far from the only option that can be created by simply adding a little imagination. Congratulate your pet on his housewarming and treat him to something tasty. The cat should instantly appreciate its new shelter and thank you.
A do-it-yourself cat house is much more profitable financial expenses, takes into account individual characteristics animal, matched to the interior of the apartment.
There are several options for homemade houses - temporary, permanent. The first ones are built at the dacha, where they take the cat with them, and place them in the car when moving. The second ones are in the apartment
Some cat owners are perplexed why build a special house if the animals already live in it. However, if you observe the behavior of your pet, you may notice some strangeness. The cat chooses a place to sleep - curls up on an armchair, climbs into suitcases, niches for shoes, lockers for clothes. Or he constantly climbs onto the bedside table or window sill, causing inconvenience to the owners. And all this is connected with her instincts.
A cat is a predatory animal. Her constant presence in a person’s house makes her not such an aggressive hunter, but wild instincts continue to be present in her. In nature, a cat always has a den, where she sleeps during the day and hides her kittens. And also a shelter from which the animal looks out for prey at night and hides from enemies. A caring, loving owner must take into account the needs of his pet and make his stay in the house as comfortable as possible.
Buy or make it yourself
Currently, in any pet store you can choose any kind of housing for a cat. The variety of shapes and designs is impressive. Stylish, beautiful, and quite expensive. This is the main problem. In addition, it often happens that a pet refuses to live in a purchased house, ignores it in every possible way, bypasses it, and looks askance with distrust.
This behavior of the animal is explained by an overdeveloped sense of smell. The cat gets used to the smell of the house, feels calm in it, other people's aromas alarm it and scare it away. The glue with which the house was assembled, or the material itself, may smell. Another hindrance may be a discrepancy in size.
Of course, you can choose a house, taking into account the cat’s breed, morals, and behavioral characteristics. But, having brought it home, there is no need to rush to introduce it to the residents. Initially, it is worth making sure that it is saturated with the “native” smell. Place it on the balcony for a few days, then keep it unassembled in the apartment for a week. After that, try to introduce it to the cat.
A house made for a cat with your own hands will be more familiar to it, since the smell of its beloved owner will remain in it. The cat will definitely want to stay in it and will purr loudly as a sign of gratitude.
Features of a cat house
You should immediately pay attention to the fact that the house of the cat and cat  differ from each other. The cat is less demanding. All he needs is one manhole, a roof with all-round visibility. In this position, the hunter looks down on everything that is happening, looks out for the victim, and feels safe.
The cat takes care not only of itself, but also of the kittens. Her idea of safe housing is somewhat different. Her home should have an entrance and an additional exit; the observation deck is not located on the roof at all, but a little to the side.
The cat climbs onto the observation deck, watches everything that happens, at the same time, reliably protects the entrance of her shelter with kittens. And if an enemy attacks her, she will be able to ward off the danger from the cubs. If the enemy manages to discover the entrance to the lair with kittens, they will be able to escape through the emergency exit.
A house made for a cat with your own hands must take into account all these features.
Types of homemade houses
All of them are divided into stationary and mobile. The first ones have a more complex design and are manufactured taking into account the fact that they will not be periodically disassembled or moved to another place. Mobile houses are simple, sometimes made with quick hand from improvised means. Suitcases, baskets, old clothes, sheets, bags are used. Anything you can imagine. Such houses should be light and quick to assemble. Pets are placed in them when traveling by car, shopping, and street walks.
A house made for a cat with your own hands can be of different colors, since they do not distinguish colors well. Therefore, this nuance completely depends on the personal preferences of the owner. The animal makes claims about the material from which the house is made.
The following classification of types of housing for cats is based on the form:
- Hammocks are soft loungers that are attached in different ways for the legs of chairs and tables. A cozy cradle appears under the cover of a chair or table.
- Beds - a simple option, does not require special effort for manufacturing. Consists of a small elevation, a mattress. For example, you can put it on a basket. Place a wide drawer with faux fur and a mattress made of foam rubber.
- Booth - different materials are used, most often plywood, polystyrene foam. Covered with soft fabric, square or rectangular in shape, there should be a scratching post.
- Cardboard house - made very quickly, a cardboard box or separate sheets are used to create housing of any shape. Beautiful, fast, but short-lived.
- Wigwam - some breeds of cats in the wild live in hollow hollows of old trees, constantly rising on their hind legs to look out from there. A wigwam is built using this principle.
- Houses with complex structures. They can be built-in or free-standing. They consist of several booths, observation platforms, sunbeds, and scratching posts.
The list goes on, since there are no limits to human imagination. A house made from an old T-shirt, basket, suitcase, burlap, thread, etc. The scheme of each of them is quite simple, the drawings do not take much time.
Do-it-yourself climbing frames for cats: photo


A house made for a cat with your own hands from a box

Surely in every home there is a box in which a cat can easily fit. It is quite suitable for creating a quick house. The simplest option is to place a pillow, mattress, or faux fur in a box. A home made for a cat with your own hands is ready. You can put such a house anywhere. Suitable as mobile housing.
The second option is to cut several holes in the box. One is for the entrance, about 25 cm in diameter. The rest are cut out in the form of windows. This device is made very quickly and does not require special skills. A large box can accommodate several individuals at once. The main disadvantage is its fragility. And the advantage is that you can quickly make a new one to replace it.
House instructions from a T-shirt
A house made for a cat from a T-shirt will surely attract everyone's attention for a pet. With the condition that an old T-shirt will be used. The design resembles a tent. The material is the simplest, always available household, can be done in 5 minutes, the diagram is clear, drawings are available.
Manufacturing instructions
Materials for production:
- T-shirt;
- Scotch;
- Pins;
- Wire;
- Sheet of cardboard – 40*40 cm;
- Wire hanger – 2 pcs.
Scheme and drawings of the labor process: 
- From the hanger - trempel, cut off the upper part - the hook. Bend the rest of the wire in the form of an arc, as for a tent.
- Cover the cardboard with tape. This way it will look a little better and become stronger.
- Fasten 2 wire arcs crosswise. They can stand calmly in this position.
- Adjust this semicircle to the size of the cardboard, pierce the ends in each corner. Wrap from the bottom of the cardboard and secure with tape.
- Place the structure and cover it with a T-shirt. The neck should be at the front of the tent - this is the entrance. At the back, secure the excess part of the T-shirt, sleeves, with pins, or sew by hand.
To prevent the house from leaning to the side, you need to securely fasten the wire at the base. For greater reliability and durability, instead of cardboard, use a sheet of plywood, foam plastic, or chipboard. The T-shirt can be easily removed, you can periodically replace it with another one, cats do not distinguish color and will not notice the substitution.
A do-it-yourself cat house made from a T-shirt can be used as a stationary or mobile one.
Cat house from an old monitor
A non-working TV will still come in handy around the house. It turns out to be a beautiful, durable, reliable house for a family of cats.
Material: 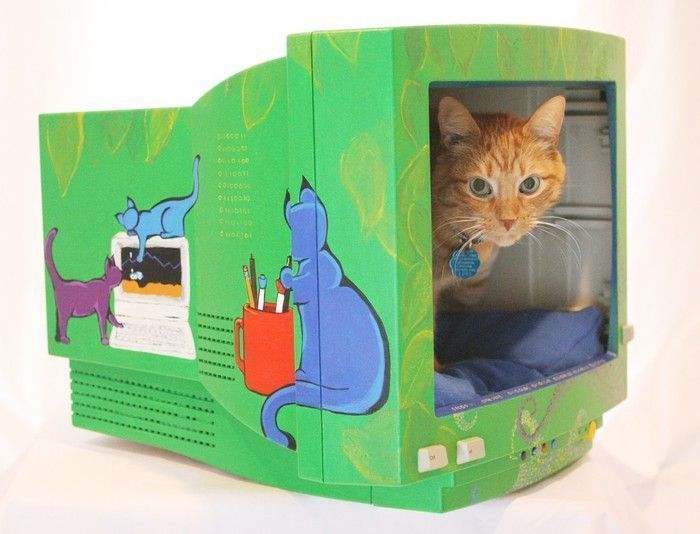
- Water-based paint;
- Soft fabric for interior upholstery;
- Mattress fabric, foam rubber;
- Stickers;
- Glue gun.
Scheme and drawings:
- Remove the inside of the old monitor and remove the screen;
- Cut a round hole on the side that will serve as the entrance.
- Paint the monitor with paint of any color, but the main thing is that it is water-based.
- Sew upholstery for the inside of the house. The material should be used in such a way that it is not electrified, since constant friction of the wool can provoke a discharge. The upholstery is secured with glue.
- The mattress is sewn according to the size of the monitor.
- Various stickers are placed on the plastic screen so you can draw something. Kittens will look at them with interest, and for people it will look like a computer monitor, and the screensaver will be live kittens or a cat.
The house for the cat is ready with your own hands. However, this point should be taken into account. Plastic does not allow air to pass through and is a synthetic material. Staying in such a house is unsafe for health. That's why. Still, it’s better to refuse such a house.
Wigwam for cats
A home made for a cat with your own hands, in the form of a wigwam, is made like a home made from a T-shirt. Its height should be 60 cm. Cardboard, chipboard, foam plastic, and plywood are used as a solid base. The main task is to make a strong frame. Strong wire and wooden planks are suitable for these purposes. The outer fabric for covering the wigwam should be natural. They put it on top of the structure, the ends can be tied with ropes and ribbons. See instructions for making a T-shirt shelter.
DIY cat house from a suitcase
Nothing could be simpler. Will need old suitcase. If the upholstery looks  not too good, you can put a self-sewn cover on top. The easiest option is to open the suitcase, put a pillow or mattress in it. The house for the cat is ready with your own hands.
To make it all look more interesting, they do as follows. Prepare the legs. They can be carved from wood, if anyone knows how to do this, you can buy them ready-made at a furniture store, or use simple wooden planks. If there are several animals, you can make a two-story house out of one suitcase. Remove the suitcase lid. Attach the legs to the bottom of both parts. Place it like a bunk bed and secure it.
Instructions for a plywood house
A house made for a cat with your own hands from plywood is the most  practical, durable. Any complex design can be made. As a rule, it contains a booth, an observation deck, and a scratching post.
Material:
- It is better not to use plywood sheets up to 12 mm thick, chipboard, since the material contains foreign odors;
- Hemp rope, tourniquet for making a scratching post;
- PVA glue, after drying it leaves no odor;
- A dry stick with a diameter of at least 15 mm;
- Foam rubber;
- Quilted synthetic winterizer for making bedding;
- Upholstery furniture fabric from an old sofa, armchair.
Scheme and drawings:
- The interior of the space should be comfortable for lying. The average dimensions of the box are 40*60*40 cm. For large breeds recalculate based on body size.
- The diameter of the hole at the top of the box should be such that the cat can easily pass through. Average diameter 20 cm.
- The observation deck is made at a height so that the cat can easily climb up, standing on its hind legs. The playground itself should be such that the pet can fit well on it.
- Lubricate the stick with PVA glue and wind the rope tightly without gaps. This will be a scratching post.
Plywood drawings can be very diverse. A typical house looks something like this:


Tools:
- Hacksaw or jigsaw;
- Screwdriver;
- Hammer;
- Scissors;
- Awl;
- Ruler;
- Glue brush;
- Pliers.
Cut: 
- All the elements of the house are drawn on plywood, observation deck. Cut with a jigsaw. You will need 4 rectangles 40*60 cm for the side parts of the house, the base is 80*120 cm. The house will be attached to it. The roof is made either three-dimensional, then additional parts are cut out, or a rectangle - size 70*70 cm.
- A round hole for entry is cut out in one of the rectangles. And also on the plywood, which will serve as a roof, there is a hole for climbing to the observation deck.
- Prepare 2 sticks of equal size. One will be installed on the roof, the other on the plywood base.
- It would be better if the roof is removable. This will make it easier to clean the house.
- They cut out foam rubber for the upholstery of the inside of the house and the observation deck.
- Prepare the base for the mattress.
Drawings and sizes are individual.
Assembly instructions:
- The inside of the house should be soft. Foam rubber is glued onto the plywood, fabric on top, and upholstery material from an old sofa on the outside.
- Prepare the claw sharpener and install it on the base using glue.
- All parts of the house are glued together, installed on the base, and secured with glue.
- Lastly, the observation deck is installed.
A house made for a cat with your own hands will become a real decoration of the apartment. It must be installed where the cat likes to spend time. If she likes to climb onto the windowsill and watch what is happening outside, it is worth placing the house closer to the window. If the cat strives for warmth, closer to the radiator or in a sunny place.
Everyone knows that cats love to hide in various shelters. So why not provide your cat with its own cozy home? There are many different houses for cats - from small sleeping place to luxury homes. Of course, you can just buy such a house at a pet store, but it’s much more interesting to make it yourself, because it gives you the opportunity to get creative, create your own unique masterpiece, and just have a good time in the creative process.
Why does a cat need a house?
Cats love a variety of shelters, sometimes choosing completely inappropriate places for sleeping and resting. Few owners will like the fact that the cat sleeps on a shelf in the closet, and by getting into the washing machine, the cat completely exposes itself to danger.
Hidden in washing machine the cat puts itself in danger
If you don’t want your pet to hide where she absolutely shouldn’t be, you can provide her with her own place in the house.
There are many different variations. from the simplest beds to play complexes equipped with various scratching posts and toys. ladders and so on. A variety of materials will allow you to choose what suits you.
Such a sleeping place is not a complete shelter. A small mattress with soft sides or a box covered with soft fabric inside will make a wonderful bed for your pet.
Mattress with low soft sides
Hammocks for cats look unusual and save space. They are very similar in design to human hammocks. You can secure such a sleeping place for your pet, for example, on the legs of a coffee table.
Hammock attached to furniture legs
There are also hammocks that are attached to heating radiators. This sleeping place is ideal for heat-loving cats and will look very unusual.
A hammock is hung on a heating radiator
Such a house is not only a sleeping place, but also a full-fledged shelter where the cat can relax and retire. Cat houses come in different sizes.
Allows the cat to have privacy inside
Made from various materials, kennel houses can become not only a refuge for your furry pet, but also an interior decoration.
House for a cat unusual shape looks good in the interior
In addition to the aesthetic appearance, such houses have another useful feature- they can be equipped additional accessories, for example, a scratching post that will save furniture from sharp claws.
A scratching post located near the entrance to the house will save furniture from claws
Some cats like to both hide and relax in plain sight. A house that combines a shelter and a bed is ideal for such cats.
The cat can not only hide in the house, but also lie on top of it
Miniature cat furniture
Such a sleeping place for a furry pet looks very unusual and will appeal to those who like to photograph their pet. Small sofas and beds are decorated with various rugs, pillows and blankets, making them look realistic and cute.
Photo gallery: examples of miniature furniture for cats
A sofa with a wooden back of an unusual shape and a bright mattress Looks funny and unusual This bright sofa looks very unusual This sofa is good for a photo shoot This bed can comfortably accommodate two pets
Play complexes for cats
The gaming complex is perfect for active cats who need to run, climb, and play active games. Such complexes consist of various shelters, beds, ladders, scratching posts, tunnels and toys.
Consists of a ladder, a scratching post, several beds and shelters
An alternative to such a gaming complex can be a structure whose walls are made in the manner of a tent.
The fabric is fixed to the frame. Equipped with a tunnel
Cat shelters built into furniture
The main advantage of such shelters for cats is their versatility. However, it is important to differentiate in the cat’s mind where its territory is and where the owner’s things are. It is not always easy to accustom a cat to such a shelter.
Finding such furniture in a store is quite difficult; most often it is made to order, or the cat’s owners themselves remodel existing cabinets or chests of drawers.
There is a special cat hole on the side of the cabinet
Cardboard cat house
A cat's home made of cardboard is short-lived, but allows you to fantasize with might and main. It’s quite easy to make such a house yourself, especially since it’s easy to find drawings on the Internet.
Made in the form of a miniature house with a window and a pipe
How to make a cat house with your own hands
First of all, you should determine which house is suitable for your pet. For young and active cats, spacious homes and a variety of toys are best suited. For cats that love privacy, closed houses are suitable. Cats who prefer to relax in open areas will appreciate regular beds and hammocks. If your cat likes to look at the world from above, then you should think about a house with several levels.
It is also important to choose the right material from which you will make a home for your pet. The material must be safe and not have strong smell. It is also important that there are no rough edges, sharp corners or other defects that could lead to injury to the cat.
House for a cat made from unwanted clothes
You probably have a T-shirt that you don't wear, or an old sweater that you hate to throw away. All this is perfect for creating a sleeping place for your furry pet.
You will also need filler, such as padding polyester or foam rubber, threads, needles and, of course, imagination.
Sweater sleeves are stuffed with padding polyester
To make a cat bed from a sweater, you will need the following:
- Old sweater;
- Filling - padding polyester, holofiber, padding polyester, etc.;
- Scissors, needle, thread;
Now you can proceed directly to creating the bed.
- We cut off the neck of the sweater and sew it up.
Cut the neck of the sweater and sew it up
- We make a seam from one sleeve to the other.
Sew from one sleeve to the other
- We stuff the sleeves of the sweater with padding polyester. It should look like this “sausage”.
The sweater is stuffed with padding polyester
- Sew the sleeves of the sweater.
Sew sweater sleeves
- Fill the bottom of the bed. A thin piece of foam rubber, warm thick fabric, or synthetic padding is suitable for this.
We fill the bottom of the future bed
- Sew up the bottom of the sweater.
Sew up the bottom of the sweater
- Sew on the sleeves of the sweater to create the side of the bed.
Sew the sleeves to the sweater
- The bed is ready.
At your discretion, you can decorate the resulting bed with appliqués, embroideries, tassels or pom-poms. This warm and soft bed, made by the owner’s hands, will definitely please your cat.
Video: cat bed made from a sweater
Tent house made from an old T-shirt
If you have a spare T-shirt, you can build a cozy tent for your cat.
The T-shirt is stretched over a wire frame, and the neck forms the entrance
To create a tent you will need:
- Unnecessary T-shirt;
- Wire, such as wire clothes hangers;
- A piece of thick cardboard;
- Wide tape;
- Pliers, wire cutters and awl;
- Pins, threads, needle;
Let's get creative:
- Use wire cutters to remove hanger hooks. Make sure that the ends of the wire do not catch or scratch.
Separate the hanger hooks
- Unfold the hangers. Bend the wire to form the tent poles.
Unbend the hangers, give them an arc shape
- In the corners of a sheet of cardboard, make through holes with a diameter approximately the same as a wire. Don't make them too close to the edge.
Punch holes in the cardboard
- Now fasten the wire arcs together exactly in the middle using tape or tape. The structure must be very strong.
Fasten the wire arcs together
- Insert the ends of the wire into the holes in the cardboard.
Insert the ends of the wire into the holes in the cardboard
- Bend the ends of the wire.
Bend the ends of the wire
- Cover the ends of the wire with electrical tape or tape to prevent them from snagging or scratching.
Cover the ends of the wire with tape
- Checking the base of the tent. It must be strong and stable.
Cat Tent Base
- We stretch the T-shirt over the frame so that the neck forms an entrance.
We stretch the T-shirt onto the frame
- We fold the edges of the T-shirt under the bottom of the tent, secure it with pins and stitch it.
We fold the edges of the T-shirt under the bottom of the tent, fix it and stitch it
- The tent is ready! You can invite your pet to a new home.
Video: T-shirt cat tent
Cardboard cat house
This method of making a cat house gives complete freedom of imagination.
You can make a house out of corrugated cardboard, a box, wood pipe or other similar material.
House for a cat made of cardboard circles
This house looks very unusual. You can also give it any shape that your imagination allows.
The house is glued together from cardboard circles of various diameters
To create a house you will need the following materials:
- Corrugated cardboard;
- Stationery knife;
- Compass;
- Glue;
- Pencil;
Let's start creating an unusual home for your pet:
- First of all, you need to cut out 8 circles from cardboard with a diameter of 21.5 cm, 21 cm, 20.5 cm, 20 cm, 19.5 cm, 19 cm, 18.5 cm and 18 cm. Each of the circles must be divided into rings 4 cm wide.
Cardboard markings
- Cut out the drawn parts.
Cutting out cardboard rings
- Now we make blanks for the bottom of the house. We cut out 6 circles with a diameter of 21 cm, leave one whole, and cut out rings 4 cm wide from five.
Cut out the bottom for the house and 5 identical rings
- Place the rings on a solid circle.
Assembling the bottom of the pyramid
- We assemble a pyramid using rings of decreasing size.
Pyramid of cardboard circles
- We measure the height of the “doorway” and remove the extra circles from above.
Measuring the height of the entrance
- We draw an opening, making marks on each circle.
Draw the entrance, making notes on each circle
- We mark on each disk a line along which the opening will be cut.
Correct angle to cut the opening
- Cut the rings according to the markings.
Cut cardboard rings according to the markings
10. Now the pyramid needs to be glued together. We start from the bottom and lower rings. Don't mix up the rings!
Gluing the pyramid
11. Your cat's home is ready. Let the glue dry and you can invite your pet inside.
House made of cardboard rings is ready
Video: house for a cat made of cardboard circles
House for a cat made of cardboard boxes
Having one or several boxes at your disposal, you can make a bed for your cat, a full-fledged house, or even a play complex from several interconnected boxes.
It is prohibited to use a stapler when making cat houses from cardboard! The fact is that cats love to chew cardboard and can accidentally swallow a metal bracket or injure their mouth. For the same reasons, non-toxic paints and glue should be used.
The house is covered with colored paper
To make a cat house from cardboard box, you will need:
- Carton;
- Scissors, stationery knife;
- Ruler or stencil (for windows);
- Glue, tape;
- Colored paper, self-adhesive film for decoration;
- Step one. We build the house itself out of a box. To do this, take a box, as in Figure 1. Using electrical tape, glue the bottom of the box. We form the roof of the house from two rectangular pieces of cardboard and the sides of the “lid” of the box. On the other two parts of the “lid” of the box we outline two triangles - the ends of the roof. We also attach them to the roof slope using electrical tape. Next we will need a ruler and a pencil again. We mark the door of the house. Cut it out using a stationery knife.
Making a house out of a box
- Step two. Let's start decorating our house. To do this we cut white paper into identical stripes. Using glue, we begin to cover the house. We glue the first strips near the doors and bend them around the corner of the house. In this way we glue the side and back walls of the house.
We begin to cover the house with paper
- Step three. We glue the front part of the house above the door. We bend the ends of the paper strips onto the roof slope. We glue a self-adhesive film to the roof slope.
We glue the front part of the house and the roof
- Step four. In a similar way, we paste blue paper over the doors of the house.
We cover the doors of the house with blue paper
5. Step five. Take a rectangular piece of cardboard and cover it with strips of orange paper. We bend the ends of the strips onto the bottom of the cardboard. This will be the porch of our house. You can decorate it with an inscription or picture.
Making a porch
Video: cat castle made from cardboard boxes
Weaving from newspaper tubes- a fairly common type of creativity.
Products made from newspaper tubes are very similar in appearance to baskets woven from wicker, especially if they are coated with varnish or stain. The shape of such products can be completely varied and depends only on your imagination and skills.
A cat house woven from newspaper tubes will look exclusive, unusual and fit well into the interior.
It looks very beautiful and is almost indistinguishable from one woven from wicker.
To create such a house you will need:
- A stack of newspapers;
- Knitting needle;
- PVA glue;
- Ruler, pencil;
- Scissors, stationery knife;
Let's start making a home for your pet.
- We mark long strips 7–12 cm wide on the newspapers. We cut the newspapers. We wind the resulting paper strips tightly onto a knitting needle at an angle of 45–60°, and secure the end with glue. Be patient, as you will need a lot of tubes.
A strip of newspaper is wound around the knitting needle, the end is secured with glue, then the knitting needle is carefully removed
2. Now you can start making the bottom of the house. To do this, weave a circle of the required diameter from the tubes. Weaving starts from the center; if necessary, the length of the tubes can be increased by inserting one tube into another.
We weave a circle of the required diameter from the tubes - the bottom of the house
3. Now we start weaving the side walls. You can attach the base tubes to the cardboard frame using clothespins. This will make it easier to create the shape you need.
Making the side walls of the house
4. We braid the edge of our house.
We braid the edge
5. Finish the work, hide the base tubes.
Finishing the weaving
6. The finished cat house can be covered with stain to make it look like a vine or with any dye of your choice.
Video: cat basket made from newspaper tubes. Part 1
Video: cat basket made from newspaper tubes. Part 2
Video: cat basket made from newspaper tubes. Part 3
Video: cat basket made from newspaper tubes. Part 4
Video: cat basket made from newspaper tubes. Part 5
DIY cat house
If your cat likes to sleep in a warm place, then a house made of fabric is quite suitable for her. The walls of such a house can be made of foam rubber, and the design and colors depend entirely on your imagination.
To make a cozy sleeping place for a cat you will need the following:
- Sheet of foam rubber;
- Textile;
- Faux fur;
- Threads, needles, pins;
- Marking pencil, scissors;
- Pattern paper;
Let's start making a warm house for the cat.
- Let's make a pattern. We draw two circles with a radius of 20 cm, the space between the centers of the circles is 10 cm. We complete the circle so that we get an oval. This will be the drawing for the bottom of the house. We set aside 10 cm from the edge of the oval on each side and build a second circle. Using this pattern we will make the roof. For the side of the house we draw a rectangle 150 cm long and 20 cm high. In the middle we make a 10 cm recess for the doorway. We mark the slots on the larger oval - this will be the drawing for the roof of the house.
Let's make a pattern. Pattern diagram for house parts
- We transfer the contours from the pattern to the foam rubber and cut it out.
Transfer the contours of the pattern onto the foam rubber and cut it out
- The assembled frame of the house should look something like this.
Foam frame of the house
- Now the house needs to be sheathed. We use fabric for the lining on the outside and faux fur on the inside. We use the same patterns as for the frame, adding 1.5 cm seam allowances. We assemble the house. Ready.

Cat breeds of animals are always very attached to their owners, they love them and remain devoted to them. However, do not forget that cats are predators and they always need their own personal space.
Therefore, if in your apartment there is a corner reserved specifically for four-legged friend, then he will be very happy. Unfortunately, not many people can afford to buy a house for a pet, and therefore we suggest you make a house for your cat with your own hands.
Why do you need a cat house?
Many people think that a kitten house is just a fad. Indeed, for many centuries cats have lived with their owners and have always managed without any equipment. But what has changed now?
Previously, kittens lived in private houses, where they were given free access to the street. Therefore, they could always calmly move around a large space, climb trees, sharpen their claws, hunt and make friends. What do we see today?

Unfortunately, most people, like their pets, live in high-rise buildings and animals cannot see the street at all. In fact, their life takes place within four walls. As you can see, the lifestyle of cats has changed, but their desires and habits, laid down by nature, still remain.
But there are also animals that can safely go outside to play. However, there are many dangers hidden for such pets. Because having free space, the cat may fall under the wheels of a car or encounter an unfriendly dog.

In addition, when hunting, many pets die after catching a poisoned mouse (if the owners see that the kitten is carrying a mouse in its teeth, get rid of it immediately, otherwise the poison that may be inside the animal can kill your furry friend).

Therefore, if you look at what is hidden behind your doors, on the street, then in this case it is better for the animal to stay at home. Therefore, most pets today are completely unaware of street life.
It is for these reasons that the kitten needs its own private place. What kind of loving owner wouldn’t want to please his furry animal with a home made with his own hands?
So, if you decide to design a mini-housing for your animal, then you should understand this issue in order.
So, how to make a cat house with your own hands?
First step
Before you start work, you need to choose a place in the apartment where such a house will stand. Such a place should be somewhere in a corner.

Firstly, it can be hidden from human eyes, that is, the animal will be able to completely relax there and retire from everyone, and secondly, it is better to have a place where the house will not interfere with the movement of the owners, guests or children. In addition, based on the chosen location, you can plan what size the cat device will be so that it fits exactly into that space.

If the cat is calmer and inactive, then you can make a small house, just so that she can sleep there in privacy. Well, if your cat is always looking for adventure, then be prepared to build a slightly more complex structure on which he can climb and have fun.
Do not spare effort and resources for such a gymnastic complex, because having done something small, the cat will simply refuse to stay in it, so your work will go, as they say, down the drain. Therefore, in order not to remodel the mini-house, think about what kind of house it is needed based on the cat’s temperament.

For such active pets, the complex should be open, multi-tiered and wide for spacious movement. You can also build a scratching post on one of the floors, which will also please your cat. In addition, the furniture and corners of the wallpaper will remain intact and unharmed (see how to do it).
If you have a neutered cat, it is unlikely that he will want to frolic much. As a rule, operated cats quickly gain weight, which makes them lazy and always sleeping. Therefore, for such animals, on the contrary, it is not worth spending a lot of effort making large combinations. A shelf fixed against the wall or a simple lounger will be enough.

Please note that posts or houses standing on a weak support are not suitable; a kitten (especially one that is overweight) will easily knock it over or will constantly fall on its own. This is where you need to be prudent and far-sighted.
Those people who have excellent taste and some design skills can easily make such a device not only necessary, but also beautiful. You can add a painting to it on the wall, install a piece of wood, make transitions or labyrinths. By decorating all this beautifully, you can give your interior a new look.
Second step
Once you have decided on the location of the miracle house and its size, you need to think about the materials. This is also one of important issues, because what your structure is made of will determine its strength and longevity.

This is why you need to follow certain rules:
- There are materials that, during use, release poison or toxins. Naturally, all this will harm the health of the pet and people;
- the quality of materials plays a huge role, so take natural fabrics and wood;
- materials must be durable and resistant - this will save your budget and time. Any owner wants to make a house and forget about it, so these are the devices that will help you in this matter;
- place emphasis on the base of the design. As already mentioned, under the weight of a cat, the house can collapse, and therefore the strength of the structure is the key to success.
You shouldn’t immediately run to the shops and buy expensive materials. First, look in your closet for unwanted items made from natural fabric, faux fur, drape or plush. All this is suitable for upholstering the house with soft fabric.

If your design has room for a scratching post, then look for hemp or jute thread. You can wrap it around a post or stick it to the wall.
However, remember that the glue should only be water-based, otherwise you can ruin the entire structure, since other glues have pungent odor, which will repel the pet. Also remember that their sense of smell is much more developed than ours, so if you don’t smell it, it doesn’t mean that you don’t smell it.
How to make a house?
In principle conventional designs for your four-legged furbabies, they consist of a base - this is a house, on top of a post for scratching and a roof - a flat surface where the cat can jump out. But, any owner can use his imagination and combine these designs in different ways.

In any case, no matter what the combination is, owners must have:
- plastic pipes (can be different sizes length and volume);
- staples, screws or glue;
- plywood (at least 8 mm thick);
- plush fabric, fur, carpet or other similar fabric;
- furniture corners;
- drill, hacksaw, scissors.
With all the necessary tools and materials at hand, you can get to work.
Warp
It is best if the bottom of the house is attached to the base of the floor, because such a structure will never shake, even if a cat jumps onto it from a running start. Naturally, many cat owners do not want to damage the floor by making holes in it. Then it is necessary to strengthen the base of the house in a different way.

For example, place a thick sheet of plywood on the bottom. It is quite durable and heavy, so it will perfectly support the entire structure and your pet.
But keep in mind that such a sheet of plywood must be larger than the entire structure. Therefore, the more structures and transitions there are, the larger the area and solid foundation should be.
House
A house can be made using shelves or pipes. At a short distance from the floor, screw it to the wall. The inside should be lined with soft material that your cat likes to sleep on. Or put a small pillow there.

The simplest option for a house is to make it from a cardboard box. In principle, nothing special needs to be done, the only thing is the way out. However, it is necessary to take into account that the dimensions of such material should be based on the size of the cat. Because if he can lie in such a house only curled up, then he is unlikely to like it.

If the roof over the animal’s head is made of plywood, then in order it is necessary to make the walls, the bottom, and only then the roof. Such an apartment can be square or rectangular, but all sides must be at least 40 cm in length.
The walls need to be fastened with corners. Inside or outside, such a house can be covered with ropes that cats love to drag.
Column
Taking a small piece of plastic pipe, you need to wrap it with thread (jute or hemp). The height of the pipe should be such that the cat can calmly, stretching out, scratch its claws.

The thread must be wound tightly one next to the other. If the post is too high, then secure the thread with glue or a stapler every 10 centimeters. Such a pipe can be attached to the base of the house if it is made of plywood, but if not, then attach it to the flat roof of a mini cat house.
For the frame, instead of such a column, you can take dry wood, which must be cleaned and varnished. On strong branches you can make another platform or house if the base is strong. Some branches can be wrapped with a special thread.
Because such houses remind kittens of trees, and this particular element is present there, they happily climb them and spend their time there.
Finally
Take a board and cover it with a soft cloth. Attach such a platform to a post that is on the base or roof of the house. This could be the end of your work. If you decide to make a gymnastics platform, then you can build a bridge from this site to another and so on.
A very original device is a labyrinth that cats love so much. It can be built from boxes. To do this, you need to make several holes (round or square) in the boxes so that the cat can easily pass through. Glue such modules together in any order and then you will get various transitions from one box to another and a third.
Such houses can be sprayed with special sprays, the smell of which attracts pets. You can hang various toys on a string on the house, which your baby can play with in his free time.
And now, the house is ready. Be sure to check its strength to keep your animal safe!
In this article we will share ideas, methods and current tips on how to make a cat house with your own hands. Step-by-step instructions with photos, detailed explanations production process and master classes will help you quickly and easily create an original cat house. Choose the option that fits perfectly into your interior.
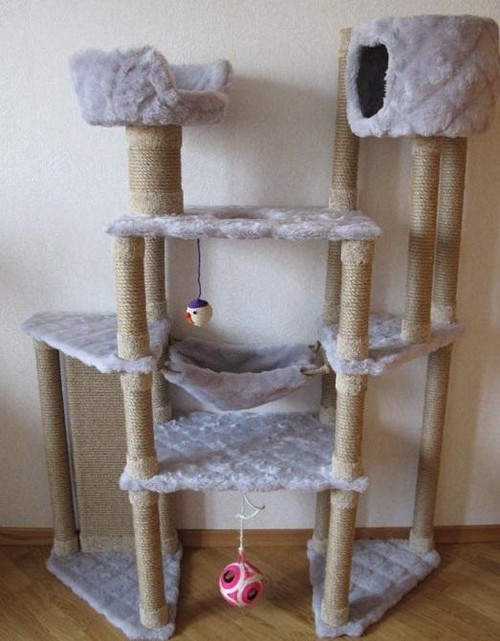
Set for cats with scratching posts, a bed and a hanging toy
For games, sleep and relaxation, as well as for sharpening claws, you can build a cozy cat house with your own hands, which will not only decorate the room, but also bring benefits. This ideal complex for a cat will not take up much space. A spacious house is suitable for a large fluffy or pregnant cat. A vertical scratching post, a soft bed and a dangling toy will be great entertainment for adult animals. A cozy house and an inclined scratching post will be a favorite place for curious little kittens.
Materials required for the base of the structure and the house:
- Fibreboard (hardboard) 40x122 cm (for the base);
- Chipboard 44x61 cm (for the roof of the house);
- Chipboard 55x44cm (for walls);
- 7 slats 3x4x37 cm (spacers for walls);
- pipe with a diameter of 11 mm, length 60 cm;
- 2 bars (for pipe stability);
For the bed:
- Chipboard 44x30 cm;
- Fibreboard 44x30 cm;
- foam rubber measuring 44x30 cm;
For scratching posts:
- rope made of cotton materials or jute, about 110 mm thick, 15 m (for a vertical scratching post);
- rope or fabric (for an inclined scratching post);
- toy;
- board 18x41 cm;
Additional materials and tools:
- fabric or fur for covering;
- saw, hand or electric jigsaw;
- drill, screwdriver;
- knife, scissors, sandpaper;
- stapler for furniture, hot glue gun;
- tape measure, pencil, chalk, marker.
The process of making a cat house with your own hands
The first step is to cut out chipboard and fibreboard from existing materials rectangles: for the base of the house, walls and beds. Required dimensions are listed above, but you can independently determine the size that suits you and is comfortable for your pet. On both rectangles for the walls of the house you need to draw circle from radii of about 27 cm. The most convenient way to do this is with a compass, but not from the center of the rectangle, but just below. You can use a marker if you attach a rope to it and hold it in the center of the future truncated circle.

One wall of the house will be solid, and on the second wall you need to draw circle-holes for entrance and several windows. It's original to make them look like a cat's footprint. We will make the large circle 22 cm in diameter, and the small ones 5.5 cm.

DIY cat house step by step instructions yu Photo
Small side circles should be placed at a symmetrical distance from great circle(equal to 17.5 cm). And the central small circle should be placed a little further.

The next step in building a cat house with your own hands will be sawing out. Carefully, using a drill, jigsaw or other suitable tools, you need to cut out alternately small and large circles.

Next, we combine both walls of the future house and mark the places where we plan to fasten them with slats. In our example, these are 7 points. They are most conveniently made by drilling through them so that the marks are visible on both panels.

At all marked points we drill holes for self-tapping screws. This is where the slats will be attached.

Preparing the slats: plan, smooth the edges, remove roughness. For stability, the bottom slats can be made thicker.

We fasten both parts at seven points using prepared slats and self-tapping screws.

DIY cat house step by step instructions. Photo
Let's prepare wall fabric house. It should be slightly larger than the walls themselves. For the safety and comfort of the cat, it is better to choose fabrics with cut pile so that the animal does not get caught in the claws. You can use faux fur or other materials.

Pieces of fabric using a hot glue gun glue it to preparing the house. It is best to use glue without strong odor, the cat probably won't like it.

On front side house, cut holes in the fabric in the right places, bend it and carefully secure it along the edges.

We place and glue on the base for the complex (in the place where the house will stand) foam rubber. Its size should correspond to the distance between the two side bottom slats of the house. This will be the first bed; next to it we mark with a circle the place for the vertical pipe.

We completely cover the entire base of the structure. cloth.

To keep the fabric firmly in place, it is better to secure it with staples using a furniture stapler. If there is fabric on the sides that begins to fray, it needs to be wrapped. Next, we secure the structure on top using a sheet of fiberboard.
Let's prepare roof house. We mark the allowances on the fabric with chalk and paste it over a sheet of fiberboard.

We take two narrow pieces of fabric and glue them to the inside of the two lower ribs. If you are using colored fabrics, you need to use the base color here. 
Connecting house with foundation. At this stage, it is important to choose self-tapping screws of the optimal length. They should hold the house firmly, but not protrude beyond the base. 
We hide the slats under the fabric. 
We place the fiberboard rectangle on the roof of the house and fix it with a furniture stapler. 
Using small scissors, we hide the staples in the fabric. 
We ennoble inner part
house. Glue the fabric of the corresponding color. 
The DIY cat house is almost ready. There are only parts left: scratching posts and a bed. 
Let's prepare pipe made of cardboard, plastic or wood and two bars of slightly smaller diameter. This guarantees the stability of the structure. In our example, a plastic pipe and wooden blocks are used. 
We firmly insert and secure the bars in the pipe; this can be done with glue or self-tapping screws (depending on the materials used). 
From rectangular sheets of chipboard and fiberboard we cut out identical semicircular parts for beds.
We string a piece of fiberboard onto a pipe, having previously made a hole. This part will cover the glued fabric underneath. 
On the underside of the bed we prepare holes for self-tapping screws. We connect the bench and the block fixed in the pipe. 
Turn the house horizontally. We place the pipe parallel to the floor, place any objects under it to determine a suitable place to attach the scratching post. 
We make marks on the bottom of the base, make holes for the screws, and screw the pipe. In our version, we made four holes for better fastening. 
The very bottom of the pipe can be cover with cloth. Cats usually sharpen their claws by extending their paws upward. 
We cut the foam rubber to the required size and glue it to the bed. 
Take a rope and attach it to one end toy, and we fix the other side with a furniture stapler on the side to the base of the bed. 
We completely cover the top of the bed with fabric, making allowances for bending it. We glue the fiberboard part so as to beautifully hide the edges of the fabric.

We deceive the pipe with a rope, periodically securing it with glue. 
Cooking inclined scratching post. Bottom part we trim it so that it touches the base. Cover both ends of the board with fabric. 
The DIY cat house is almost ready. We wrap the central part of the inclined scratching post, on which the cat can sharpen its claws, with rope or cloth. We place the board on the base of the complex and secure it to one of the slats between the walls of the house. 
Using our master class, you can independently complement and complicate the design, increasing its size and number of components. 
Scheme of a cat house in the form of a castle

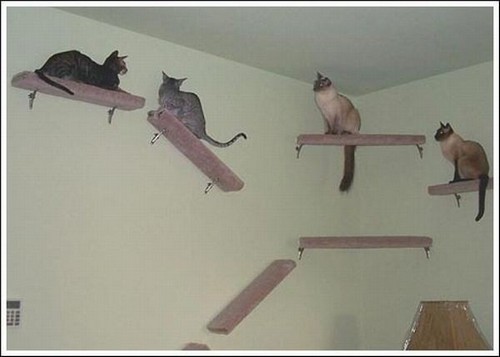
Standard playgrounds for cats usually take up a lot of space in the apartment. It is not always possible to allocate an area to install such a structure at home. But if the desire to make your pet happy haunts you, then we suggest doinglean-to housefor a cat with your own hands. And not just a house, but a whole castle! It is convenient to place it anywhere on the wall. You can make any number of towers and connect them together with ladders.
If there are small children in the house or there is a dog in addition to the cat, then such a hanging complex with a scratching post will be the mustachioed purr’s favorite place. There the cat can sleep peacefully without being disturbed.

Materials required for the construction of towers:

In addition, you will need construction tools, such as a saw, a hand or electric jigsaw, a drill, a screwdriver or screwdriver, a furniture stapler, a stationery knife or scissors, a pencil (marker) and a tape measure.

Planning and preparation stage
In our example, the dimensions of the turrets have a base of 34x34 cm, a wall height of 45.5 cm, the upper tier begins at a height of 30 cm from the lower base of the wall. Therefore, to build the turrets we will need: a base, a side wall (size 34x44 cm), two small side walls (size 30.5x44), a shelf 30.5x30.5 cm, two slats 5.5x44 cm, two slats 5.5x23 cm. The chipboard sheet is about 1.5 cm thick.
To make a cat house beautiful, comfortable and functional, you need to think about the size of the turrets. They should look harmonious in the room and be high enough for the cat to stretch and move around inside. If the cat play structure will include two-tier towers, then the size of the upper base should allow the cat to curl up in a ball and feel safe due to sides.
DIY cat house step by step instructions
From chipboard sheet cut out 9 rectangular parts according to the previously indicated dimensions.

Let's draw outlines of the tower: battlements, three pieces, 6.5 cm high and recesses.

We take a large side wall, divide its side into 5 equal segments and put marks. (A side is 34 cm, divide it by 5, we get 6.8 cm). We take smaller side walls, place them on top of the first wall, and place thin side slats at the edges. Then we transfer the marks from the bottom wall to smaller walls. This is necessary to ensure that all the teeth are the same size.
We transfer the marks from the ends of the wall to its horizontal line, draw a line of 6.5 cm. By connecting the dots, we get a ready-made drawing of the teeth.

Carefully along the lines cut out the teeth jigsaw

Next we do it at the tower entrance, its width will be 20 cm, height 25 cm. We measure the same distance from the center up and down, mark with dots required sizes. If desired, you can round the top line. In this case, you can set aside a segment of 12.5 cm from it. Draw an arc.

Let's do jigsaw entrance according to the drawing.


We connect the side wall with the front wall with self-tapping screws.

We attach the second side wall in a similar way. For convenience, you can put between them shelf.

We turn the tower over and add a base, which is also secured with self-tapping screws.

At a height of 30 cm from the base, we make marks, recesses for screws and attach the shelf.

We fix two side horizontal and two vertical slats on the side, covering the sections of the walls.

Cutting off a piece fabrics a little more than the height and width of the tower, try it on and adjust the size.

We secure the fabric with glue or a furniture stapler, carefully shaping and folding the edges. In the area of the teeth, leave about 1.5 cm for the hem. It is important that the glue does not have a strong, repulsive odor.


Using a narrow long piece of fabric (about 6.5 cm high) we glue the teeth on the inside. Carefully seal the ends.


For side entrances We prepare the fabric with a reserve, try it on and cut it, then glue it.

We make out ends at the entrance, and finally we fix another piece of fabric from the bottom of the tower.


We select foam rubber parts for the beds, wrap them with fabric on the top side, fasten them with glue.

We fix the lower part of the foam bed with glue to the shelf, paying special attention to the edges.


We put fasteners on the back of the tower and hang it on the wall. We add at will scratching post ladder, which can be created similarly to the first method by wrapping a rope around a board or pipe.


To make it convenient for a cat to climb into its house and crawl along the turrets, you need to come up with bridges between the towers. This could be a piece of wood covered with fabric. Using both a scratching post and bridges in the design, it is important that there is a gap for the cat against the wall.

This is how easy it is to make an unusual cat house with your own hands. If desired, you can build several towers of different sizes, hang them near the floor or high near the ceiling. If you place the structure around the entire perimeter of the house, then it is better to make entrances to the turrets on three sides.


DIY entertainment complex for cats
Another option to allocate a place for your pet is to create an interior detail in your home that is interesting for the cat and unusual for you. WITH entertainment corner your pet will always be busy, even in your absence. We will show you how to make a three-tier complex for a cat.

Required tools:
- two tables of different sizes on low legs;
- rope, fabric or fur;
- stapler, glue;
- toys and decorative items;
- screw and screws;
- dye.
Step-by-step instructions for an entertaining corner for your pet
The first step will be table preparation. They should be disassembled, legs, shelves (if any), tabletops should be unscrewed to decorate and improve. In our case, we use a fur piece - a large piece of fur. We want to use it to completely cover the shelf from the table. To fix the fur should be folded down.

We also decorate a small tabletop using this method, securing the fur underneath with a stapler.
Table legs make great scratching posts, you just have to wrap them with tight ropes. You can wrap all the legs, or only part of them. To secure the rope during the winding process, you can fasten it with staples.

We suggest painting the remaining legs and other parts of the tables a different color with safe paint.

After the paint has dried, you can assemble all the parts.

We will place our smaller table on a large table, taking into account where the scratching posts are facing, so that it is convenient for the cat to use them. The top table can be glued, secured with screws or self-tapping screws.
The final touch to decorating a cat bed with your own hands is to add toys and entertainment accessories. These could be hanging toys on ropes, a glued pot with a flower, or a piece of carpet for claws. Fantasy is limitless.


Do-it-yourself multi-story cat house
Building a multi-storey complex for a cat will require a little more time and patience, but the beauty that will result in the end will delight the little resident of the house and its builder. In such a complex you can sleep, pamper yourself, and sharpen your claws.

To make such a complex you will need:
- chipboards;
- electric jigsaw;
- fabric and rope;
- tape measure, pencil, scissors;
- entrance/window templates;
- glue;
- pipes made of plastic or cardboard;
- self-tapping screws, door hinges, screws, corners.
Do-it-yourself multifunctional six-level cat house step-by-step instructions
The very first step is to prepare base complex, house And lower compartment with an entrance that can be of any shape (circle, oval, rectangle).

We chose a figurine in the form of a cat's head, traced it on a sheet of chipboard, and then cut it out jigsaw


We assemble five rectangles of any size box house, in our version its length is 80 cm, height 30 cm, width 55 cm. The main thing is that the cat is comfortable.

We hang it on the remaining side part loops for the future door.


We attach the door to the house on screws.

We will have pipes between the floors, so we attach furniture corners to their base, with the help of which it is easy to attach the pipe to the base.

Thus, using pipes and chipboard panels, you can build several floors of different shapes and sizes. At the same time, holes should be left in them for the cat. The layout of the cat house depends on your imagination.


From the side or between levels, a multi-storey cat house can be attached stairs. You can simply make it from ordinary boards. The ladder can be placed at an angle by turning the legs from below at an angle of 45 degrees. This element can be attached to the house using furniture corners.


On the top of the house a house with gable roof. Its base will rest on several pipes, it is better if they are symmetrically located for balance.

We cut out pieces of suitable size from chipboard boards, form them into a structure, and secure them with screws and furniture corners.

One side of the house or roof can be placed on hinges, not only for the cat's entertainment, but also for the convenience of opening and cleaning the home.

In our version, we made a house with a side entrance and a door on the roof.

The top floor (that is, the attic) can be located right under the ceiling or you can make a kind of step from it to the closet.

Using another pipe and a mini chipboard panel, we connect the cat complex to the top of the cabinet.

Decorative finishing
When completing the construction of a cat house with your own hands, it is important to decorate it beautifully and make it a beautiful interior accessory.

We wrap all the pipes with rope or rope, secure them at the bases and at the tops with glue.

Roofs, walls, side and internal sides paste over carpet

We measure each detail, make the necessary holes in the carpet, try it on and fix it.

It is convenient to use a furniture stapler at corners and in places that are difficult to reach for gluing.


If you wish, you can trim all the parts in one color or use several different ones. We painted the roof of the house in green.

Special attention should be given to corners, ends and joints. It is good to use a furniture strip at the ends in the area of the holes. It is smooth, bends easily and takes the desired shape.


The master class on building such a complex is very simple. Anyone can do it. Your cat will appreciate such a gift.
DIY soft bed for a cat

Cats love to sleep, they always look for the softest, calmest and most comfortable place in the house. Give your mustachioed beast his own place to sleep and relax. You can make a cat bed with your own hands in just a couple of hours. This method does not require male skills; there are no complex details in the master class.

Materials for making a bed:

You can choose any size and shape for the bed. This method is also suitable for making a dog bed.
Step-by-step instructions on how to make a cat bed
Choosing a place where the bed will be located affects its shape. You can place the future structure in a corner, on a window or under a table. We will make a classic oval shape. For ordinary cat A size of 40 or 50 cm in length is suitable.

An important step is choice of fabric. It should be pleasant, easy to clean and safe for your cat's claws. You can choose a color that matches the main shade in the interior.
We're drawing oval shape on a sheet of fiberboard. This can be done in two ways.
The first method is without using a compass. Draw a straight line and divide it in half with segments.

We fix the side points with push pins or pins, and put a thread on them, tied at both ends. Using a pencil, pull the thread left side to make a triangle. Let's put an end to it.

Using the same tension, draw a line around the buttons to get a nice oval.

Another way to get an oval shape is to draw it using compass.

We draw a segment, divide it into equal parts, put points A and B at the end of it. Using a compass, draw two circles with centers at the end of the segment, with a diameter up to points A and B, respectively.

Above the intersection of the circles we draw arcs from the top points of the circles to each other. We get an oval.


We transfer it to the fiberboard panel and cut out This shape has 2 identical figures.

We measure and design the sides. For this we take foam rubber. Its length is equal to the length of our oval (135 cm), and its width will be 10 cm.

From a piece foam rubber we form a side. We fold a piece of foam rubber along its entire length in half and secure it with glue.


Let's prepare textile, with which we will cover the foam rubber. The fabric should be a few cm wider in order to make it convenient to glue the structure to the bottom of the base of the bed. We chose a width of 14 cm.

Glue the foam side and a piece of fabric together.


We fix the resulting side to the bed, leaving a free edge of the fabric on the outside.


We complete the semicircle by connecting the two ends of the side.


At the bottom of the bed we fasten the fabric from the side.


To hide this part of the structure, we cover it with a previously prepared fiberboard part.

We issue in the inside of the bed. Cut out the foam rubber to shape. We apply and try on the size, it should be slightly smaller than the diameter of the couch.


We wrap the foam rubber with fabric, making allowances. We fasten them from the bottom.

Apply glue to the remaining part of the foam rubber that is not covered with fabric and place the soft part in the center of the structure. You can do without glue, then the foam rubber should be completely wrapped in fabric and sewn up with thread.

A compact and soft place for the cat is ready!


Master class: house for a cat out of a box
One of the most favorite pastimes for cats is searching for secluded corners or containers where they can sit comfortably. Even the simplest small shoe boxes instantly attract the attention of cats. What a joy they will be to receive a house from a large cardboard box!
You can make a house for a cat from one large cardboard box (from under equipment) or from several small boxes. For this you will need:
- scissors or stationery knife;
- hot glue gun;
- ruler or stencils (for windows);
- self-adhesive paper, paint or fabric (for decoration);
On the walls of the box you need to draw and then cut out windows and entrances; they can be of any shape and size. For stability, it is important to reinforce the corners, bottom and side walls with tape.

To make the house look like a real one, it is better to make its roof gable. To do this, you need to work with the top of the box, consisting of 4 rectangular parts (a continuation of the walls). The two wide parts will become slopes, and the two narrower parts will become pediments (triangular parts of the walls). It is most convenient to secure the collapse of the house hot glue.
Using this method of building a house for a cat with your own hands, you can make one house or entire tunnels, if the territory allows. The structure can be painted or covered with colored paper or wallpaper on top. If desired, you can insulate it from the inside and outside with various materials: foam rubber, carpet or fabric, and add a pillow for softness.
From an old T-shirt
One of the most basic ways to make a cat house at home is to build it from wire and an ordinary men's T-shirt.
For this you will need:
- cardboard or piece of plastic;
- 2 metal hangers made of thin wire;
- pliers;
- T-shirt or other clothing with sleeves and collar;
- pillow or foam rubber;
- pins or glue.
Let's prepare house frame. Using pliers, we straighten out ordinary clothes hangers and install them on a cardboard base crosswise in the form of arcs. At the top, both wires need to be connected with tape. We will pay special attention to securing the arcs at all four points at the base. You can pierce the cardboard, bend the wire a little with reverse side and secure it with tape. You can glue fabric to the base, put foam rubber or a pillow for softness.

We put the T-shirt on the frame, stretch the fabric on top, fold it down and pin it. The T-shirt should be positioned so that the opening for the collar forms an entrance. If desired, it is easy to leave windows on the sides of the house from the sleeves or make additional holes.

Other ideas for creating houses for cats with your own hands
You can make original cat houses with your own hands from wicker basket. Two baskets will make a cozy bed in the shape of a pearl, and you can put a soft pillow on the bottom.

A cat-shaped house with sewn on ears, eyes, tail and a hole resembling a yawning mouth. It is better to sew such a house from dense fabric that holds its shape.

For a children's room or hallway, a cat house made from colored wooden cubes. You can make several inputs in the form geometric shapes and positively decorate the outside of the cubes.

A noticeable detail of the interior will be a cat house - wigwam with shelves. You can assemble it from wooden or cardboard boards fastened horizontally and vertically, lay a soft blanket inside, and hang fabric instead of walls.

The easiest way to do wigwam for cat- connect several sticks in the form of a cone, fasten them well at the top and at the base. Then cover the house with fabric, make an entrance and windows.

You can make a cozy house for a cat with your own hands if you felt it or created it from fabric (carpet) mini round house. Then make a cutout and decorate it along the edge with a knitted scarf.

The cat will like it hanging fabric house in the shape of a cone with one or more inputs. The main thing is to make a soft bottom. This composition can be hung anywhere.

Decorate the apartment with a laconic home for a cat in the shape of an egg. Smooth and hard on the outside, but soft due to the bedding on the inside, the house and its owner will take center stage on a window or shelf.

Vertical house with scratching posts and a cylinder in the center very compact and functional. The cat will be able to hide inside or frivolously lie down on the top bed, watching what is happening around.


